
OnestQ – Your Partner in Queue Excellence
Welcome to OnestQ! Your all-in-one solution for effortless queue and token management. OnestQ simplifies customer flow, token generation, and service delivery across multiple branches and locations. Manage self-service kiosks, digital displays, and counter operations — all from a single platform. With real-time updates, comprehensive reporting, and multi-language support, OnestQ keeps your queues organized, efficient, and your customers satisfied.
Whether you're running a hospital, bank, government office, or retail store, OnestQ transforms the way you manage customer waiting lines. Generate tokens instantly, display queue status in real-time, and track service performance — all while providing a seamless experience for both your staff and customers.
Overview
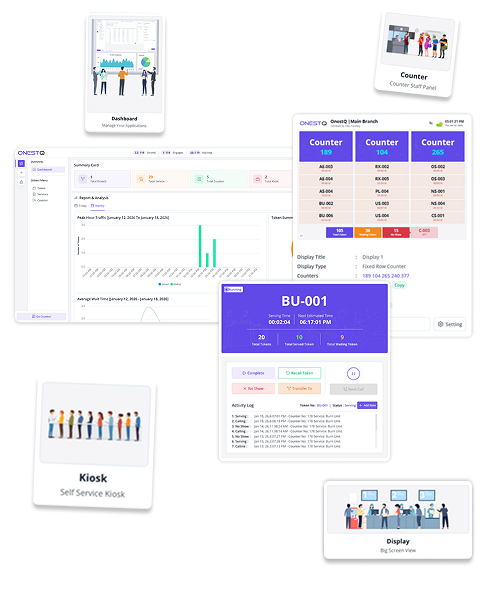
OnestQ is a Queue Management System (QMS) for managing customer flow across one or more branches. It includes: Kiosk (token generation), Counter (staff serving workflow), and Display (public screen announcements), with real-time updates.
Core concepts
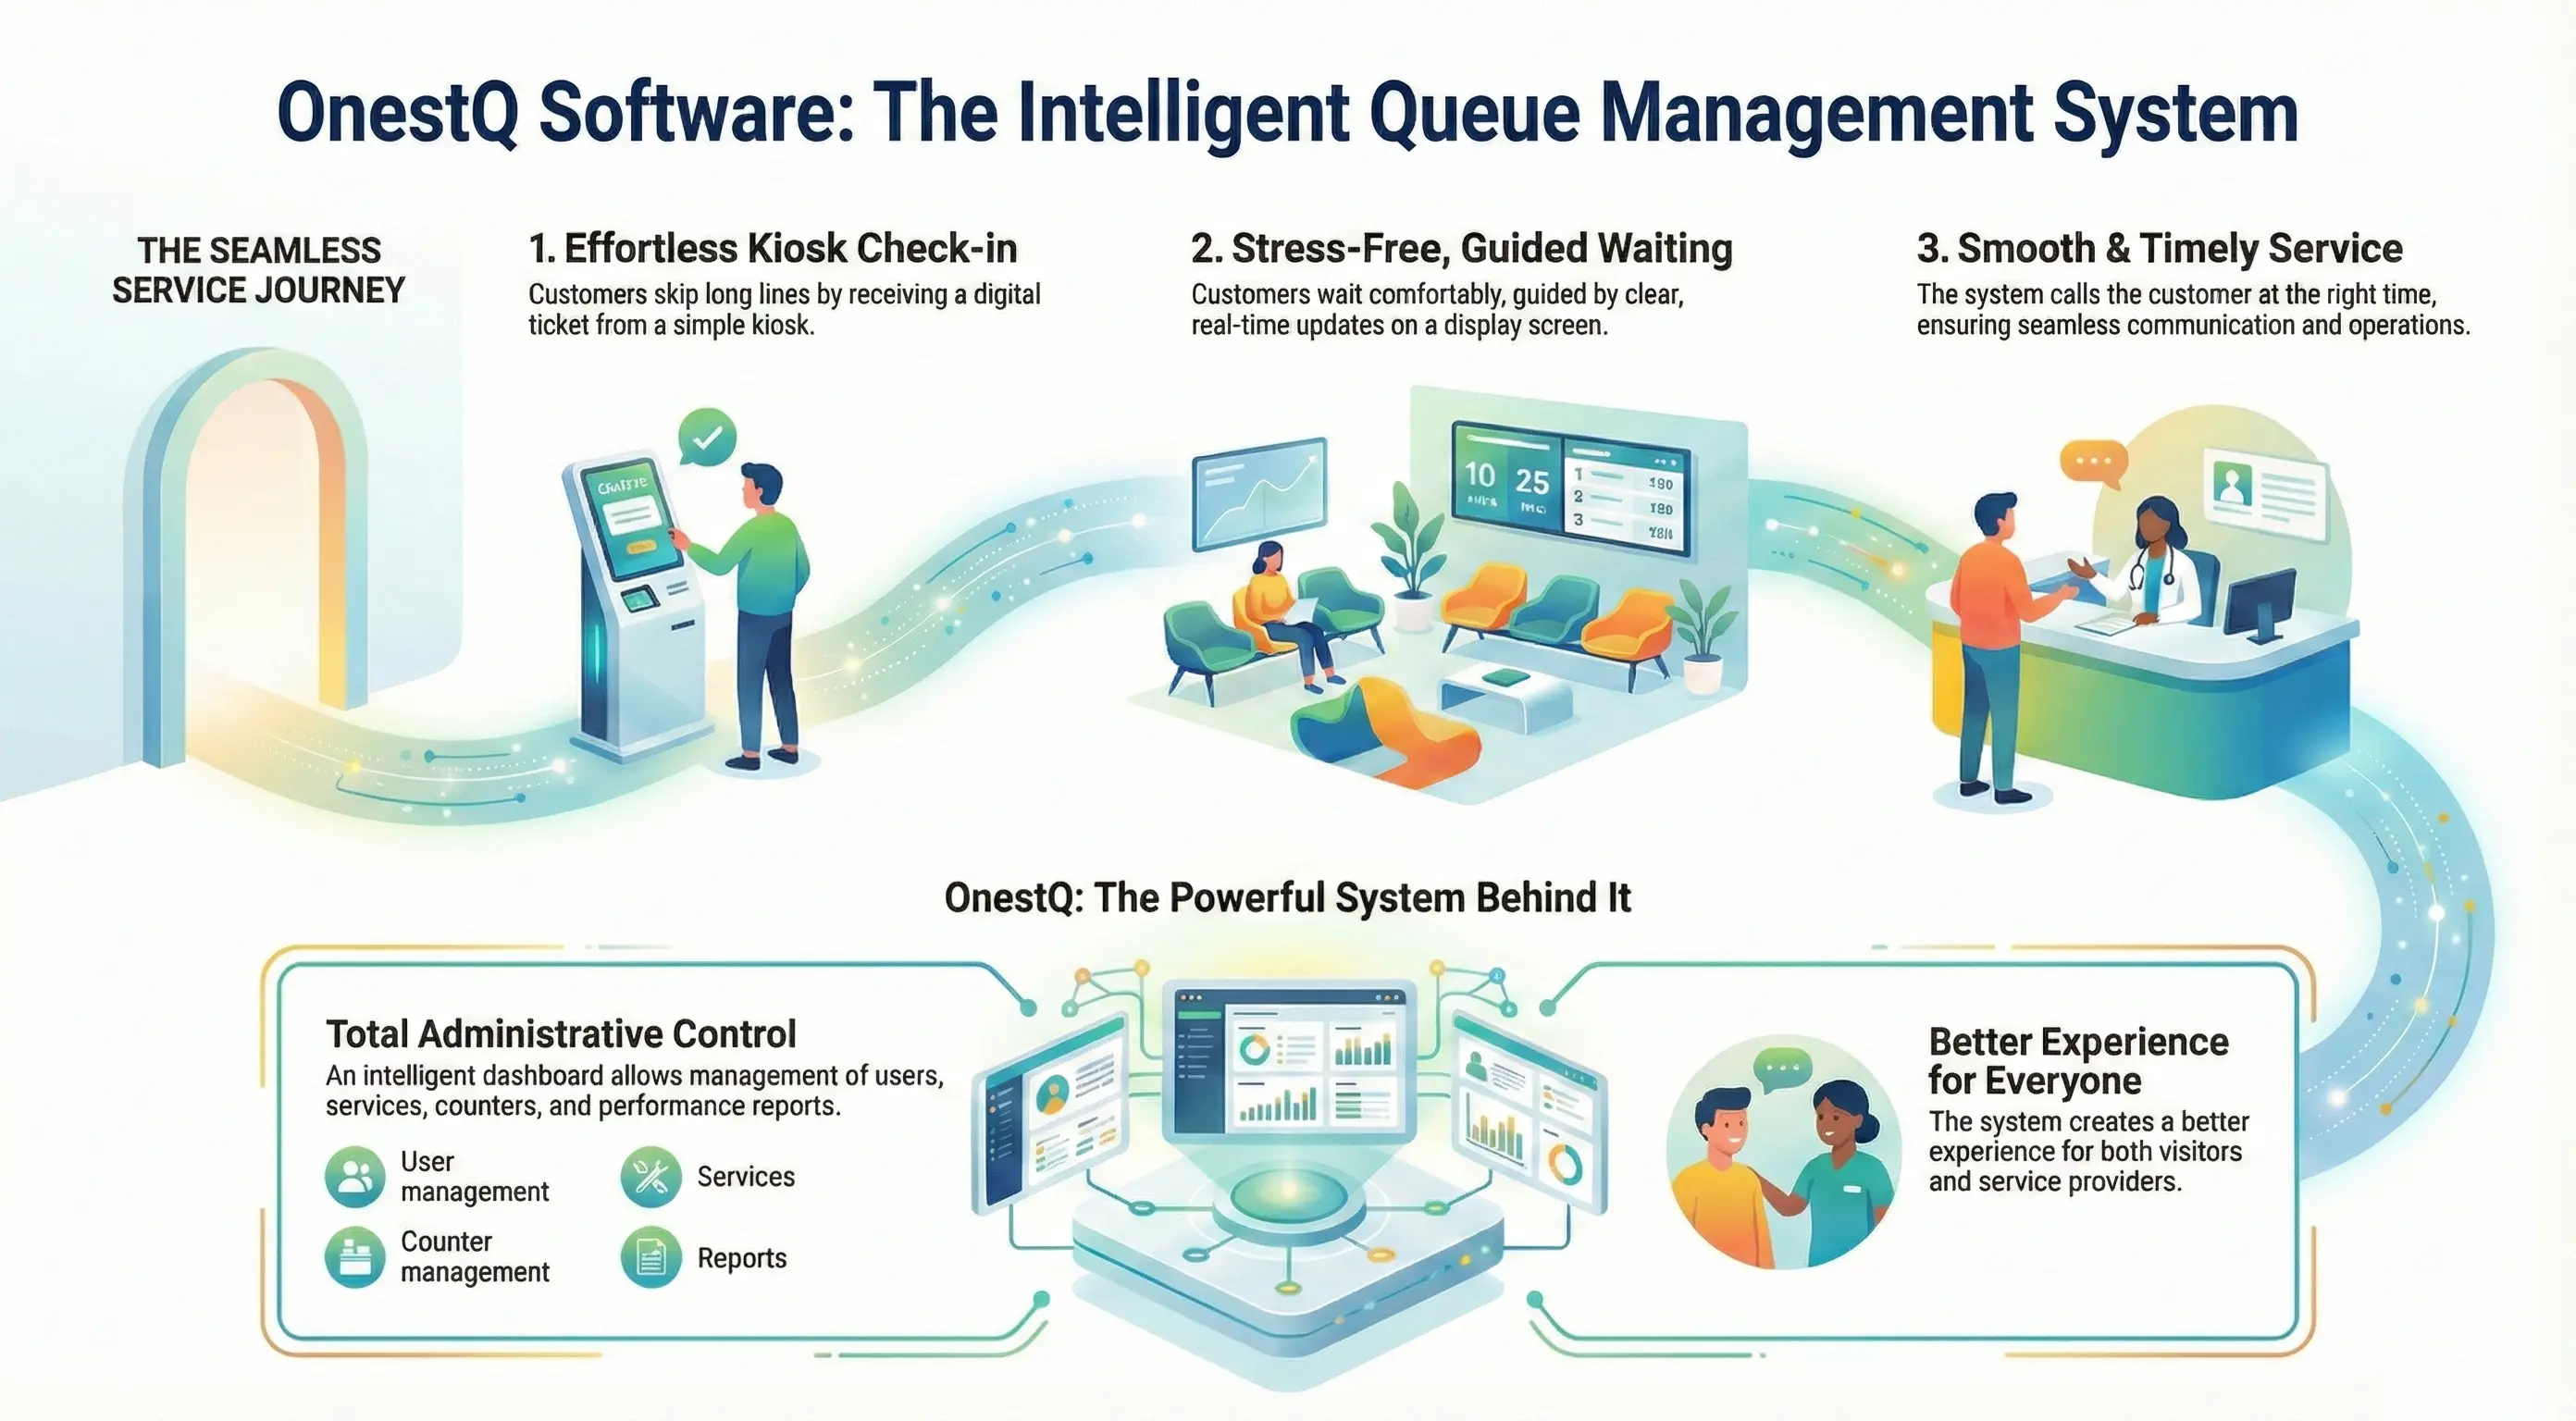
A Queue Management System (QMS) is designed to organize customer flow, reduce waiting chaos, and improve service efficiency. Instead of standing in messy lines, customers receive a digital token, wait comfortably, and get called automatically when it's their turn.
The system connects four key components into one smooth experience:
- Admin Dashboard (control center)
- Kiosk (customer entry point)
- Service Panel (staff workspace)
- Serial Display (public queue screen)
Everything works together in real-time.
Understanding the Building Blocks
- Company: The top-level organization. Think of it as the umbrella that holds everything together—your entire business entity.
- Branch: A physical location under your company (e.g., Downtown Office, Airport Branch). Most data—services, counters, tokens—is scoped by branch, so each location operates independently while staying connected to the central system.
- Service: A queue type that customers take tokens for (e.g., Billing, Registration, Support, Consultation). Services live under a branch and define what kind of help customers need.
- Counter: A service point (desk) where staff calls and serves customers. Each counter can handle one or multiple services depending on your setup.
- Token: A digital ticket issued to a customer for a specific service. Tokens move through statuses: waiting → called/serving → served/no-show/cancelled/transferred. This lifecycle tracking ensures accurate reporting and smooth operations.
- Devices: Kiosk, Display, and Printer entries configured in the system. Each device has specific behavior and access controls, allowing you to manage hardware across multiple branches from one dashboard.
How the System Works (Flow Explained Simply)
Most Queue Management Systems follow the same core model: customers are issued a ticket (token), wait in a service queue, get called to a counter, then the visit is completed (or handled as an exception such as no-show or transfer).
Let's walk through the complete journey step by step:
1. Customer Arrives → Uses Kiosk
The journey starts at the Kiosk.
Customer selects:
- Service Category (e.g., Emergency & Trauma, Diagnostic & Imaging, Surgical Services)
- Service (e.g., Accident & Emergency, Ambulance Services, ICU, Burn Unit)
- User Details (Name, Phone, Email) (optional)
- Print Token (optional)
Then the system:
- Generates a unique token number
- Prints ticket or shows digital confirmation
- Adds the customer to the live queue
Goal: Zero confusion, zero staff involvement at entry.
2. Admin Configures Everything from Dashboard
Behind the scenes, the Admin Dashboard controls the system.
Admin can manage:
- Services (add/remove/edit)
- Counters & staff assignments
- Working hours and schedules
- Analytics & reports
Think of it as: "The brain of the entire system."
Any change made here instantly reflects in Kiosk, Service Panel, and Display.
3. Staff Operates from Service Panel
Service agents log in to the Service Panel.
They can:
- Call next token
- Skip or hold tokens
- Transfer customers between counters
- Mark service complete
- See live queue status
The system automatically:
- Updates the queue order
- Pushes the called token to Serial Display
- Keeps everything synced in real-time
Goal: Faster service, fewer mistakes, smoother operations.
4. Customers Watch Serial Display
Customers simply relax and watch the Serial Display screen.
It shows:
- Current token being served
- Counter number
- Upcoming tokens
- Announcements or notices
When their token appears → They go directly to the counter.
No shouting. No confusion. No crowd pressure.
Queue Rules & Exception Handling
- Queue rules: Usually "first-come, first-served" per service and transfer to another service. While transfered the system will reassign counter to the token based on counter availability.
- Exceptions: No-show, cancelled, hold, reserved, transferred—these are tracked so reports remain accurate and operations stay transparent.
- Audit trail: Good systems keep activity logs (who changed what, when). OnestQ provides comprehensive logs via the "Logs" actions in menus, ensuring full accountability.
Industry-Standard KPIs You Should Monitor Daily
Track these metrics to optimize your operations:
- Total tokens — Volume / throughput (how many customers served)
- Average wait time — Customer experience indicator
- Average service time — Operational efficiency measure
- Completion rate — Served vs cancelled/no-show ratio
- Counter utilization — Capacity planning and resource optimization
Login to Dashboard
To help you get started with OnestQ immediately, we have pre-configured three demo users with specific roles. You can use these accounts to explore the system's features and functionalities right after installation. Goto your domain URL and login.
- App switcher: Open the home page and choose Dashboard / Display / Counter / Kiosk.
- Demo login: On login screens you can use the built-in demo buttons (e.g., Super Admin, Branch Manager, Staff, Counter Manager) to sign in automatically for testing.
- Device authentication: Display/Kiosk are commonly configured as devices. Use the device login ID/PIN (configured under device settings) to authorize a device.
Default Login Credentials
| No | Name | Password | Role | |
|---|---|---|---|---|
| 1 | Super Admin |
12345678
|
Admin | |
| 2 | Branch Manager |
12345678
|
Branch Manager | |
| 3 | Staff |
12345678
|
Staff | |
| 4 | Counter Manager |
12345678
|
Counter Manager |
Note
The system includes a robust permission system. You can create new roles with specific permissions on your own. Additionally, according to your company policy, you can customize accessibility with our support.
Warning
For security purposes, we highly recommend changing the passwords for these default users immediately after your first login. You can do this from the user management section within the Admin panel.
Roles & access (what each user sees)
OnestQ uses roles to control what menus, pages, and actions a user can access. The same system can look different depending on whether you're a Branch Manager, Staff, or Counter Manager.
- Branch Manager: manages branch operations (tokens/services/counters) and reviews branch analytics.
- Staff: operational user who can view and manage records relevant to day to day flow; may not be assigned to a counter.
- Counter Manager: focuses on the Counter panel (calling/serving workflow) and counter-specific token lists.
Server Requirements
Ensure your server meets the following requirements before proceeding with the installation.
Minimum Server Requirements
- PHP
>= 8.2 (8.3+ preferred) -
MySQL
>= 8.0or MariaDB>= 10.10 -
Apache
>= 2.4or Nginx>= 1.15 (Recommended: 1.20+ (LTS)) -
Memory Limit
>= 1 GB (Recommended: 2 GB+) - Max Execution Time
>= 300seconds -
Disk Space
>= 10 GB (Recommended: 20 GB+)
Required PHP Extensions
- OpenSSL PHP Extension
- PDO PHP Extension
- Mbstring PHP Extension
- Tokenizer PHP Extension
- cURL Extension
- JSON Extension
- XML PHP Extension
- BCMath PHP Extension
- Ctype PHP Extension
- Fileinfo PHP Extension
- DOM PHP Extension
- GD PHP Extension (or Imagick)
- ZIP PHP Extension
- Exif PHP Extension
- mysqli PHP Extension
- pdo_mysql (for MySQL/MariaDB)
Required PHP Settings
allow_url_fopen = On
file_uploads = On
max_file_uploads = 20
upload_max_filesize = 32M
post_max_size = 32M
max_input_vars = 3000
max_execution_time = 300
memory_limit = 200M
Database Requirements
- MySQL 8+ or MariaDB 10.10+
- InnoDB storage engine support
- UTF8MB4 character set support
- Database user with full privileges
Web Server Configuration
- URL Rewrite Module enabled
- HTTPS support (recommended)
- Gzip compression enabled (recommended)
- Security headers configured (recommended)
File Permissions
Please ensure the following file and folder permissions are set correctly for the application to function properly. Incorrect permissions may cause installation or runtime errors.
Required Writable Permissions
(777)
/lang— Language files
Required Writable Permissions
(775) [If you face permission errors try 777]
-
/storage— Application logs, cache, and temporary files /storage/app— Application file storage-
/storage/framework— Framework cache and session files /storage/logs— Application log files/bootstrap/cache— Bootstrap cache files/vendor— Vendor files
Required File Permissions
(664) [If you face permission errors try 666]
.env— Environment configuration file-
modules_statuses.json— Modules configuration file
Common Issues and Solutions
If you see this error after copying and extracting the files on your server (common on VPS), you may need to manually set the permissions first. On a Linux VPS, run the following commands in the project directory terminal:
Command
sudo chmod -R 777 bootstrap/cache
sudo chmod -R 777 storage
sudo chmod -R 777 lang
sudo chmod -R 777 vendor
sudo chmod -R 666 modules_statuses.json
sudo chmod -R 666 .env
Create Database
Before installing OnestQ, you need to create a MySQL database and user. This section provides comprehensive instructions for different methods.
Creating DB in cPanel
Step 1: Create Database
- Login to your cPanel dashboard
- Navigate to Manage My Databases section
-
Under Create New Database, enter database name (e.g.,
yourdb_your_db_name) - Click Create Database
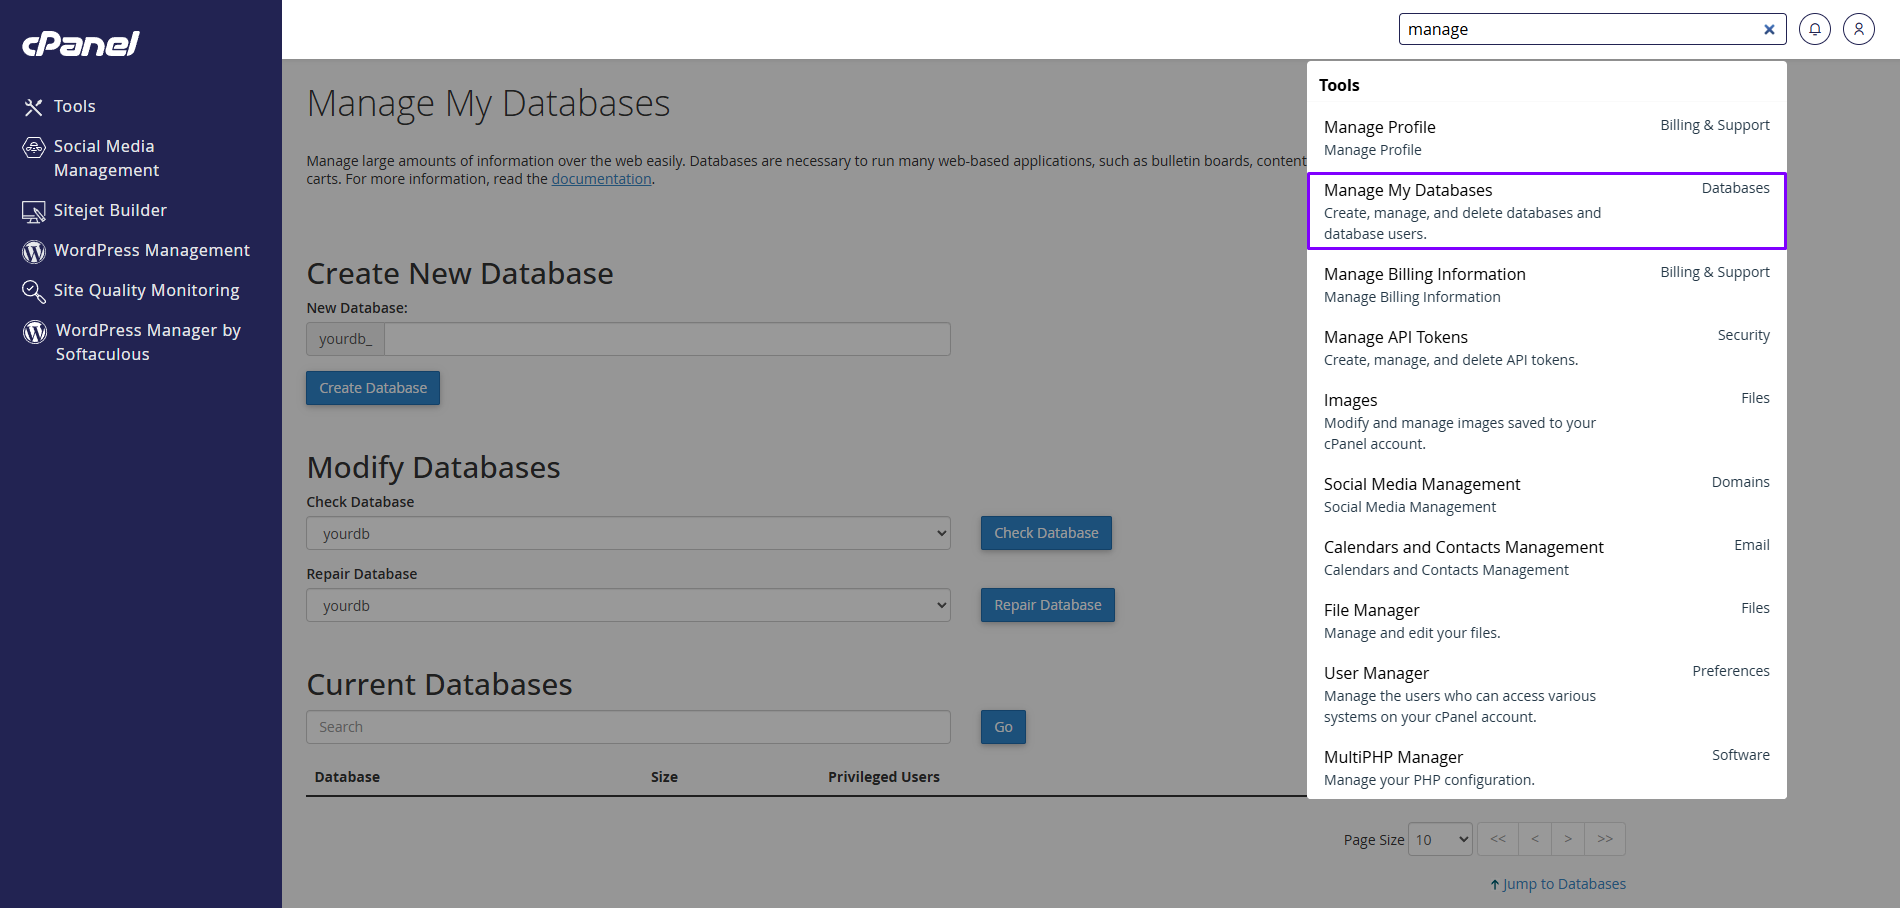
Goto the Manage My Databases from cPanel
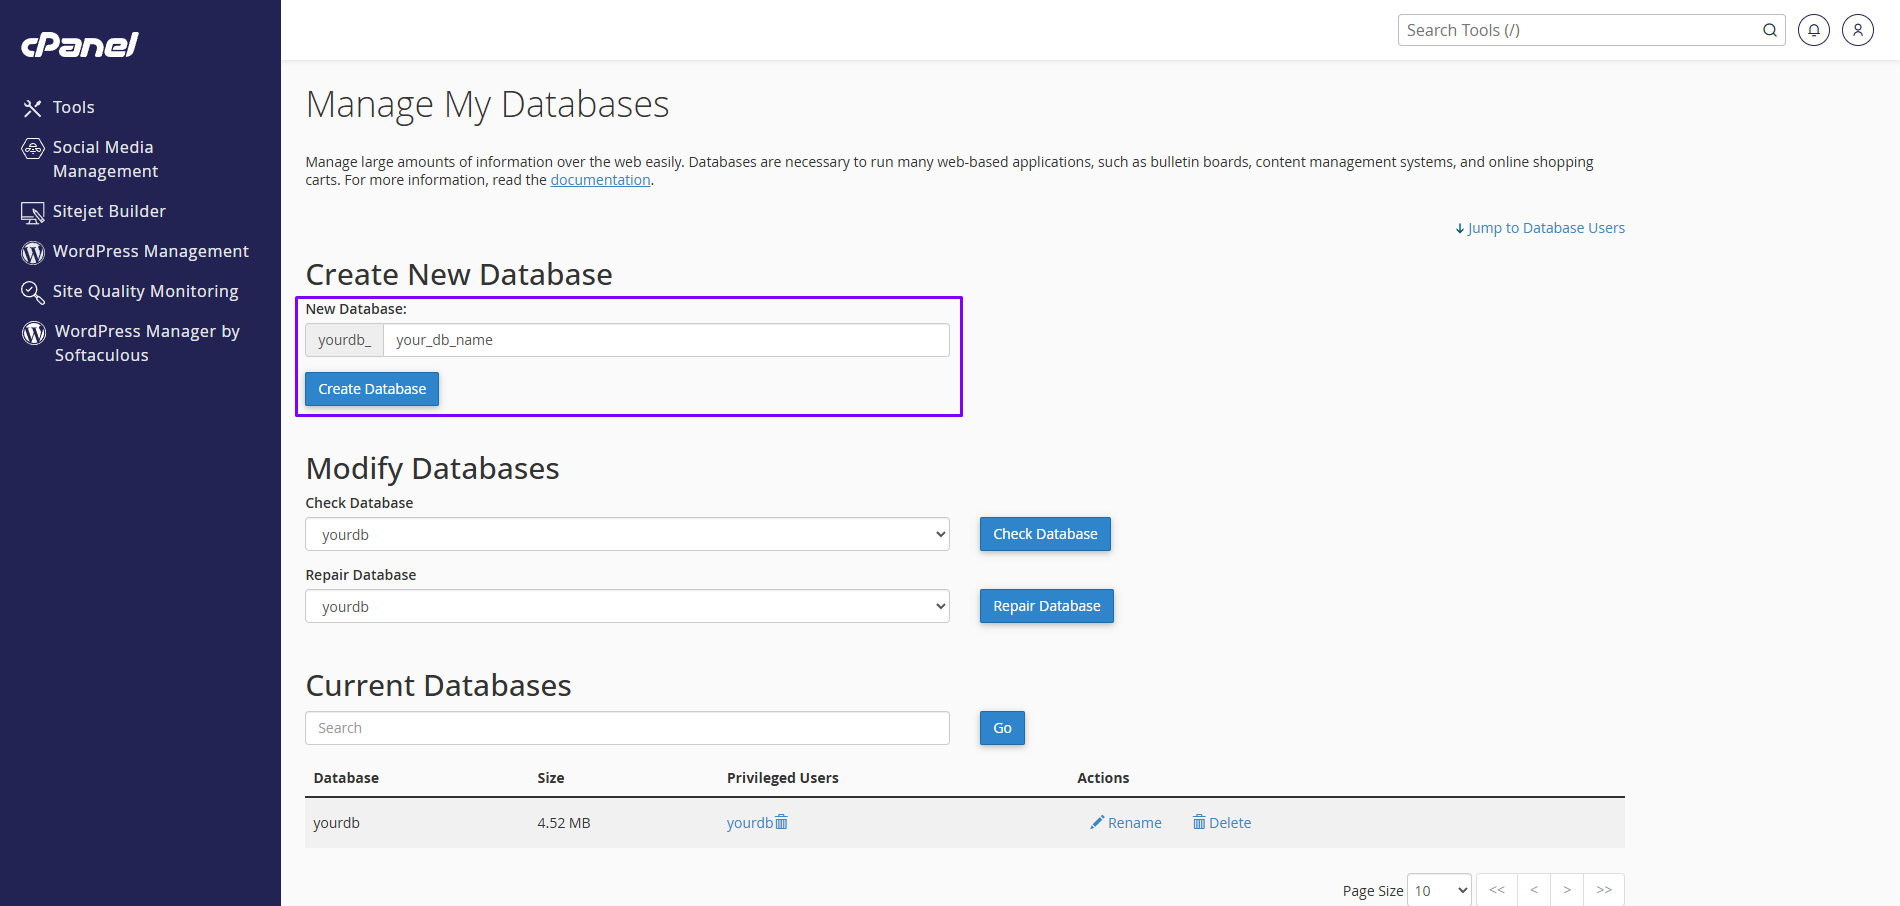
Create New Database
Step 2: Create Database User
- Scroll down to MySQL Users section
-
Enter username (e.g.,
yourdb_your_db_user_name) -
Enter a strong password (avoid
#character) - Click Create User
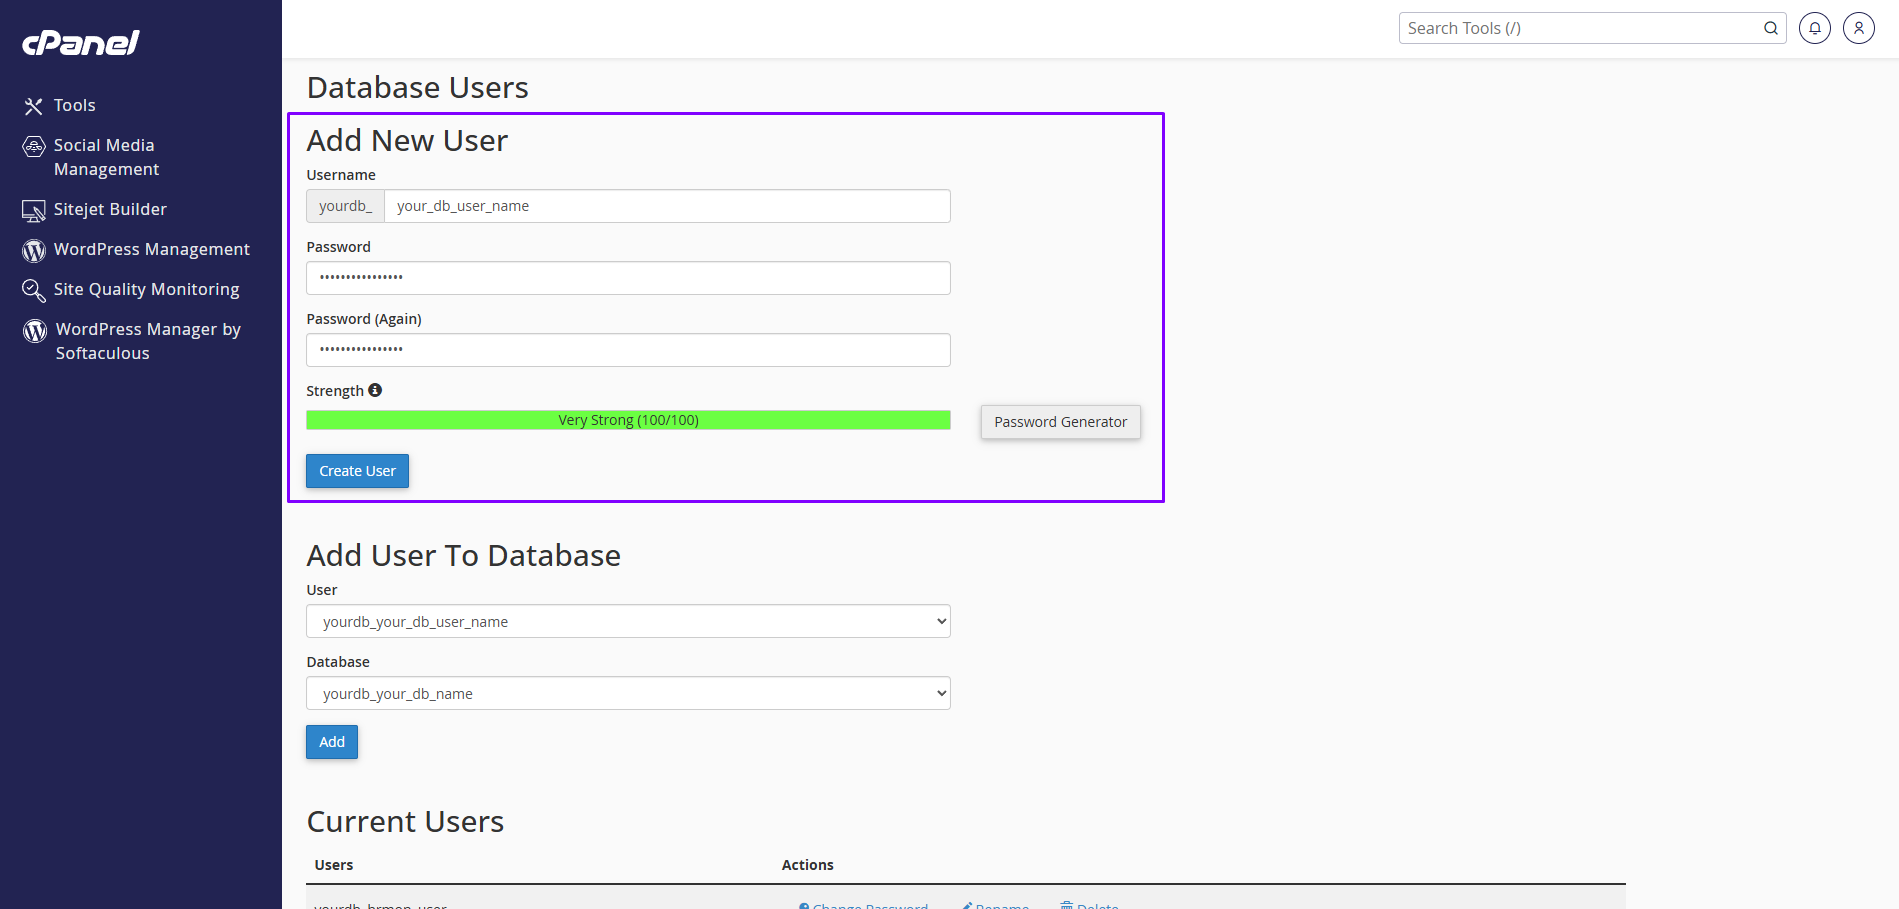
Add New User
Remember
Remember Database Name, User Name, and Password for future tasks
Important
Do not use a password that contains a # (hash)
character as it will be treated as a comment in configuration
files.
Security Best Practices
- Use strong passwords with a mix of letters, numbers, and symbols
- Avoid common passwords or dictionary words
- Don't use the root MySQL user for application connections
- Regularly backup your database
- Keep your MySQL server updated
Step 3: Add User to Database
- In Add User to Database section
- Select the user you created
- Select the database you created
- Click Add
- Check ALL PRIVILEGES and click Make Changes
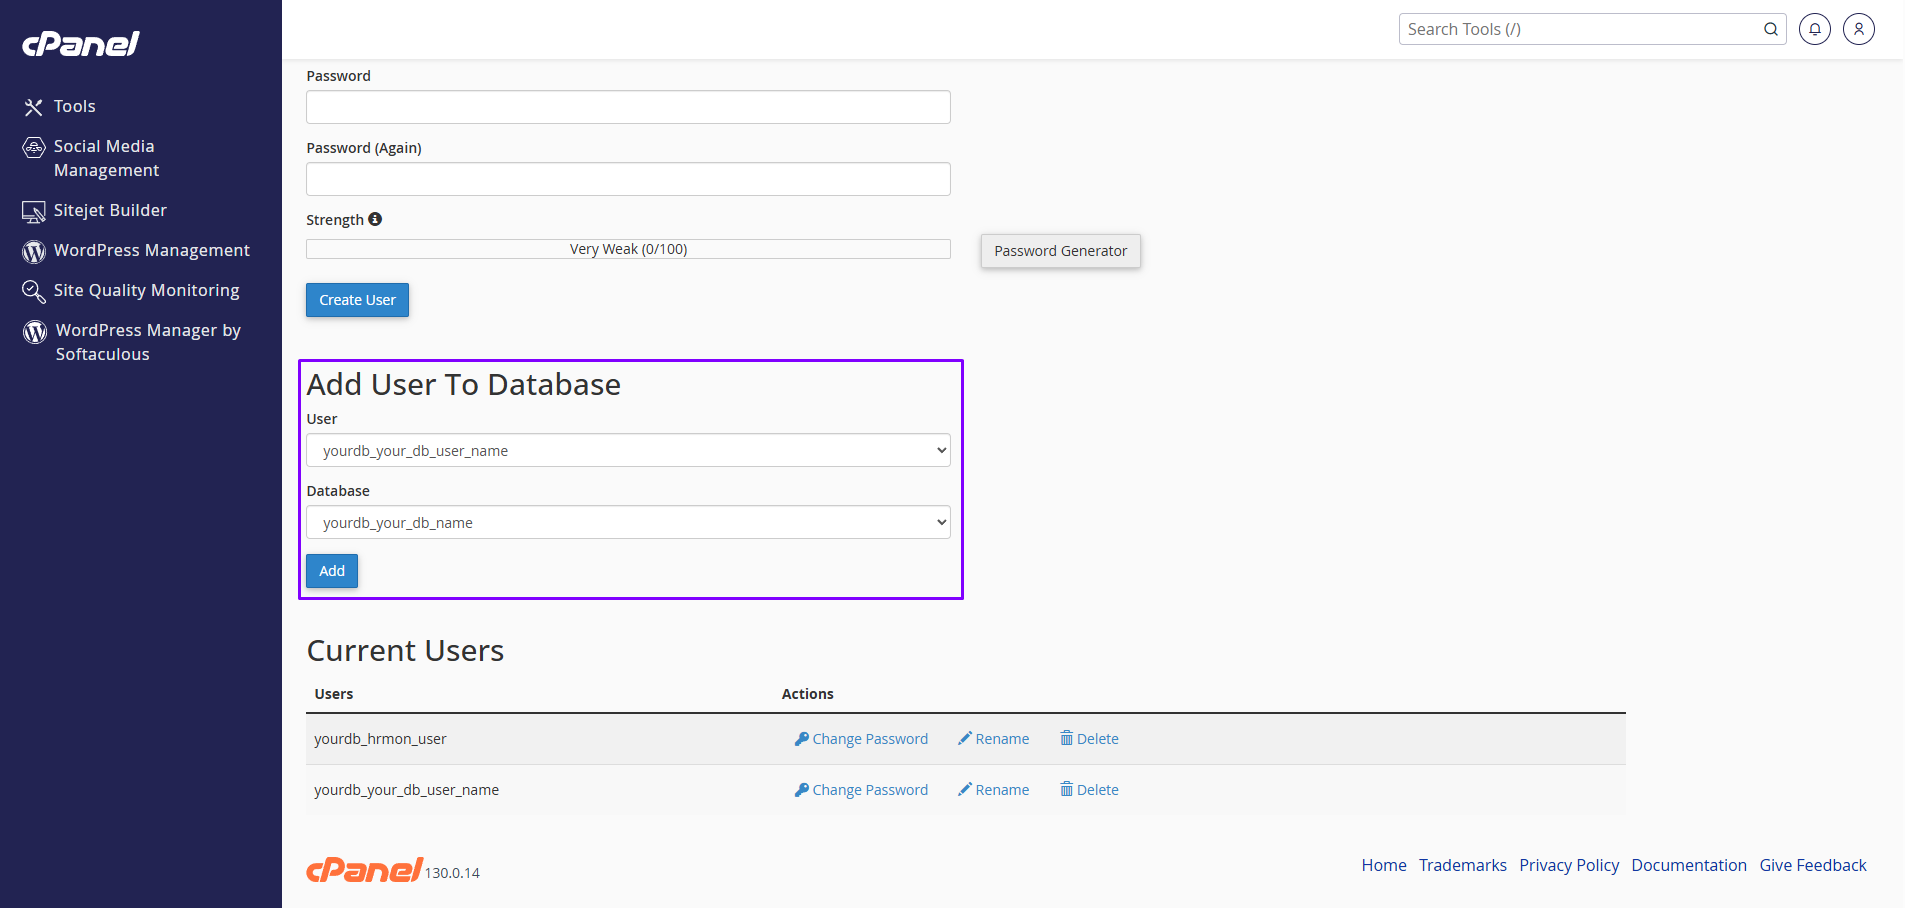
Add User To Database
Common Issues and Solutions
Universal / Other Servers
- Open phpMyAdmin from your hosting panel or localhost stack (XAMPP/WAMP/Laragon).
- Go to Databases → enter a name → click Create.
- Optionally create a dedicated user under Users and set a strong password.
- Grant ALL PRIVILEGES on the new database to that user.
-
Save these values and update them in your
.envfile.
- Open the hosting control panel and go to MySQL Databases.
- Create a new database (note the exact name).
- Create a database user with a strong password.
- Assign the user to the database with ALL PRIVILEGES.
-
Update your
.envwith DB name, user, and password.
Connect via SSH and run the following in the MySQL shell:
CREATE DATABASE `yourdb` DEFAULT CHARACTER SET utf8mb4 COLLATE utf8mb4_unicode_ci;
CREATE USER 'youruser'@'%' IDENTIFIED BY 'strong_password';
GRANT ALL PRIVILEGES ON `yourdb`.* TO 'youruser'@'%';
FLUSH PRIVILEGES;
Note: Use 'localhost' instead of
'%' if connecting locally only. Replace
names/passwords accordingly and update your
.env.
- Create a managed MySQL instance (engine version per requirements).
- Allow application server IP in inbound rules/security group.
- Create a database within the instance and a dedicated user.
-
Collect host, port, db name, user, and password;
update
.env. - Test connectivity with a MySQL client before running migrations.
Installation
Follow our user-friendly installation wizard to set up OnestQ. The process is divided into 6 simple steps.
Prerequisites
Before starting, ensure you have created a MySQL Database and have the Database Name, Username, and Password ready.
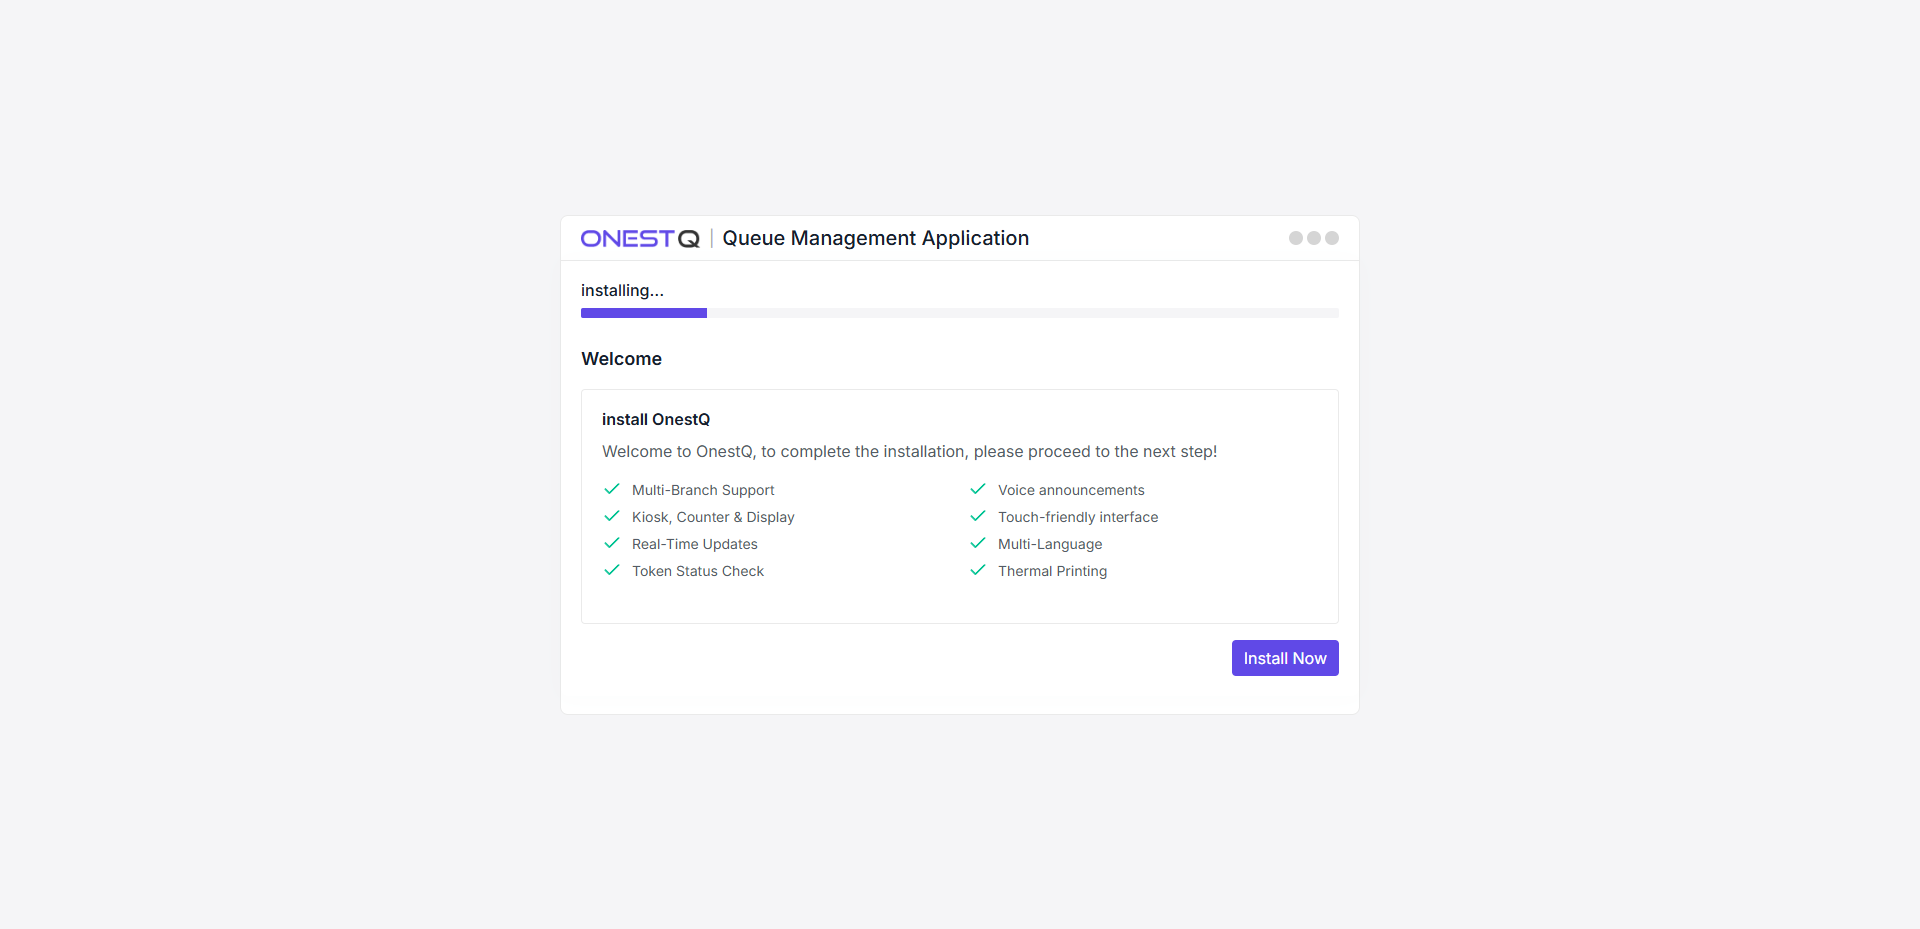
Step 1: Welcome Note
After extracting the files and opening your domain, you will see the welcome screen. Click Get Started to begin.
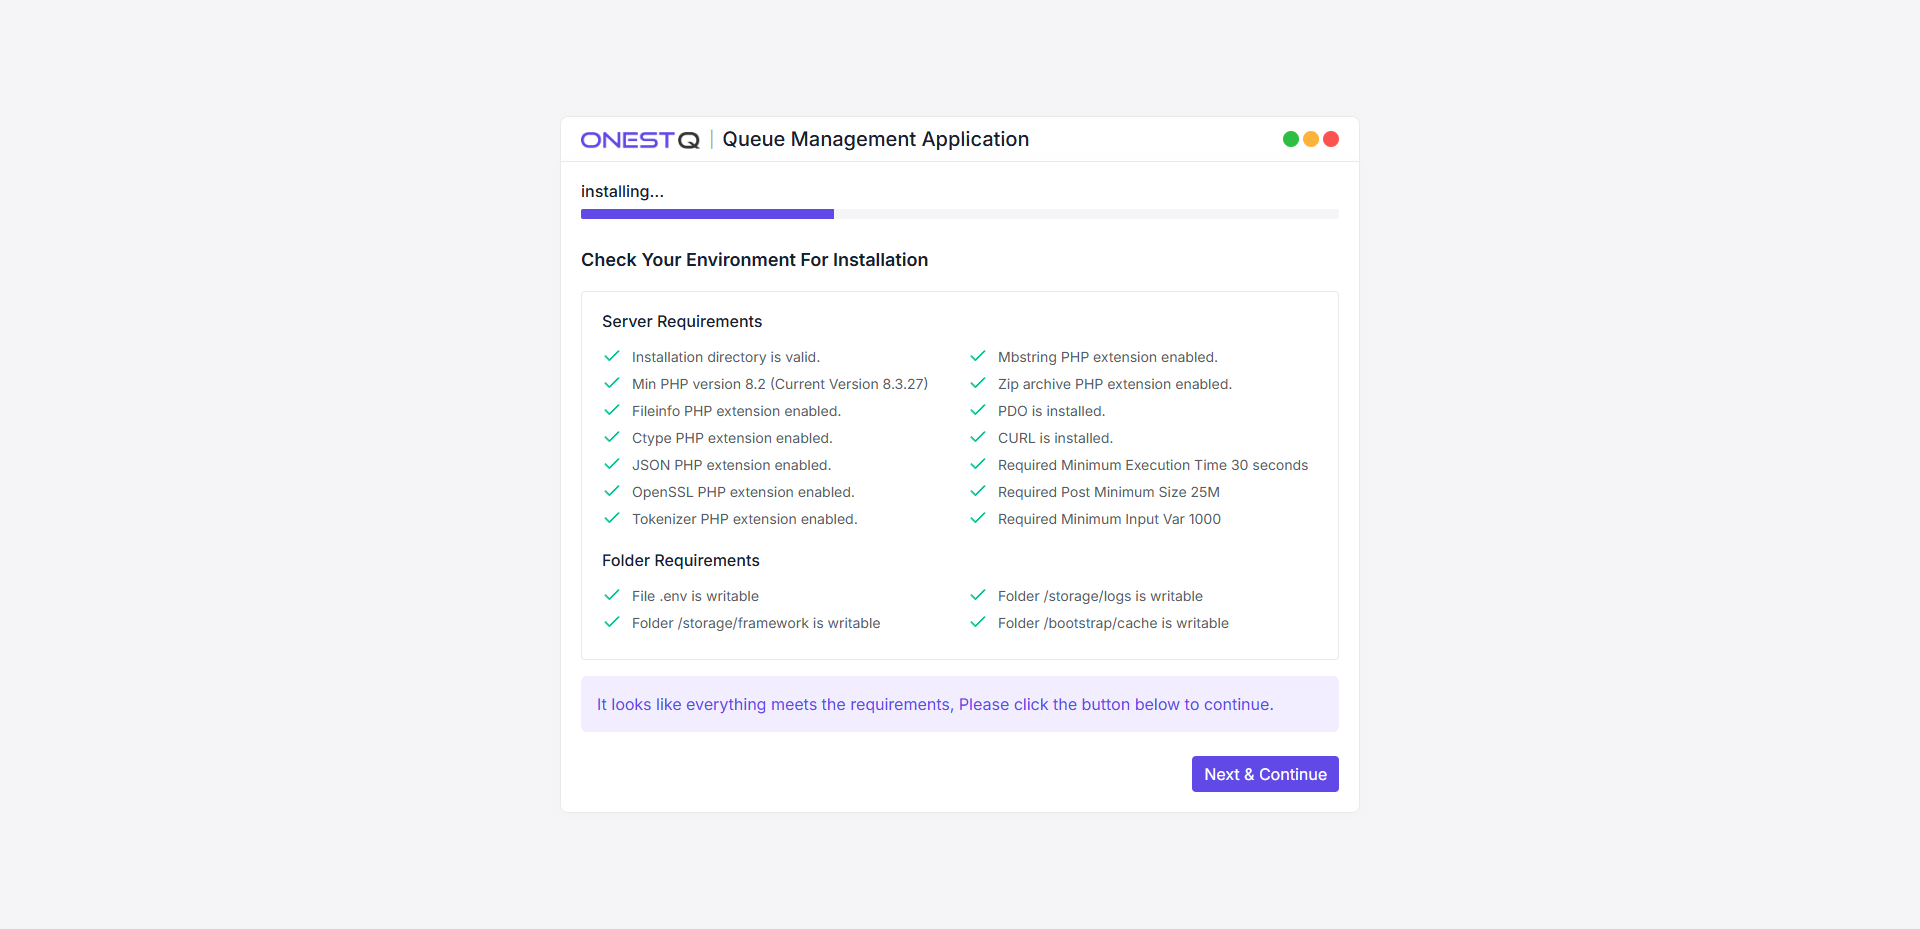
Step 2: Check Environment
The system automatically checks your server environment.
- Server Requirements: PHP version, extensions, and configurations.
- Folder Requirements: Write permissions for necessary directories.
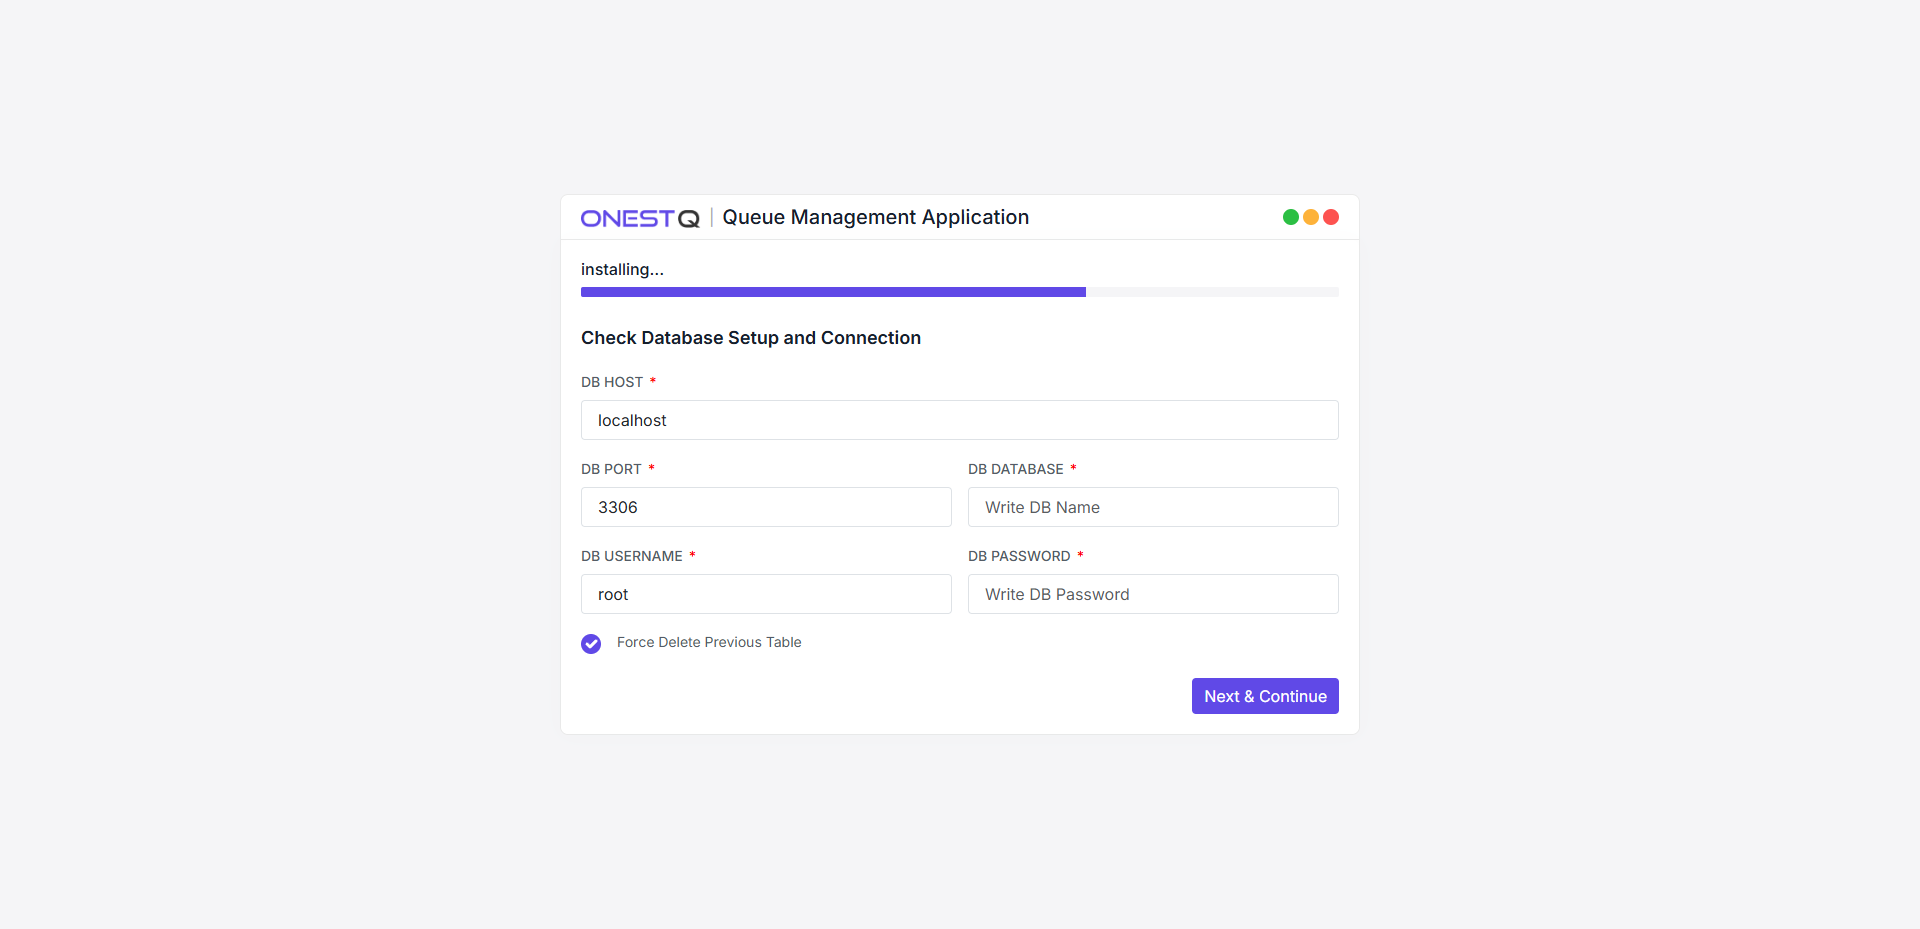
Step 3: Database Setup
Enter your database connection details.
-
DB Host: Usually
127.0.0.1orlocalhost. - DB Port: Default is
3306. - DB Database: The name of the database you created.
- DB Username: The username for the database.
- DB Password: The password for the database user.
Force Delete Previous Table: Check this if you are reinstalling on an existing database and want to wipe old data.
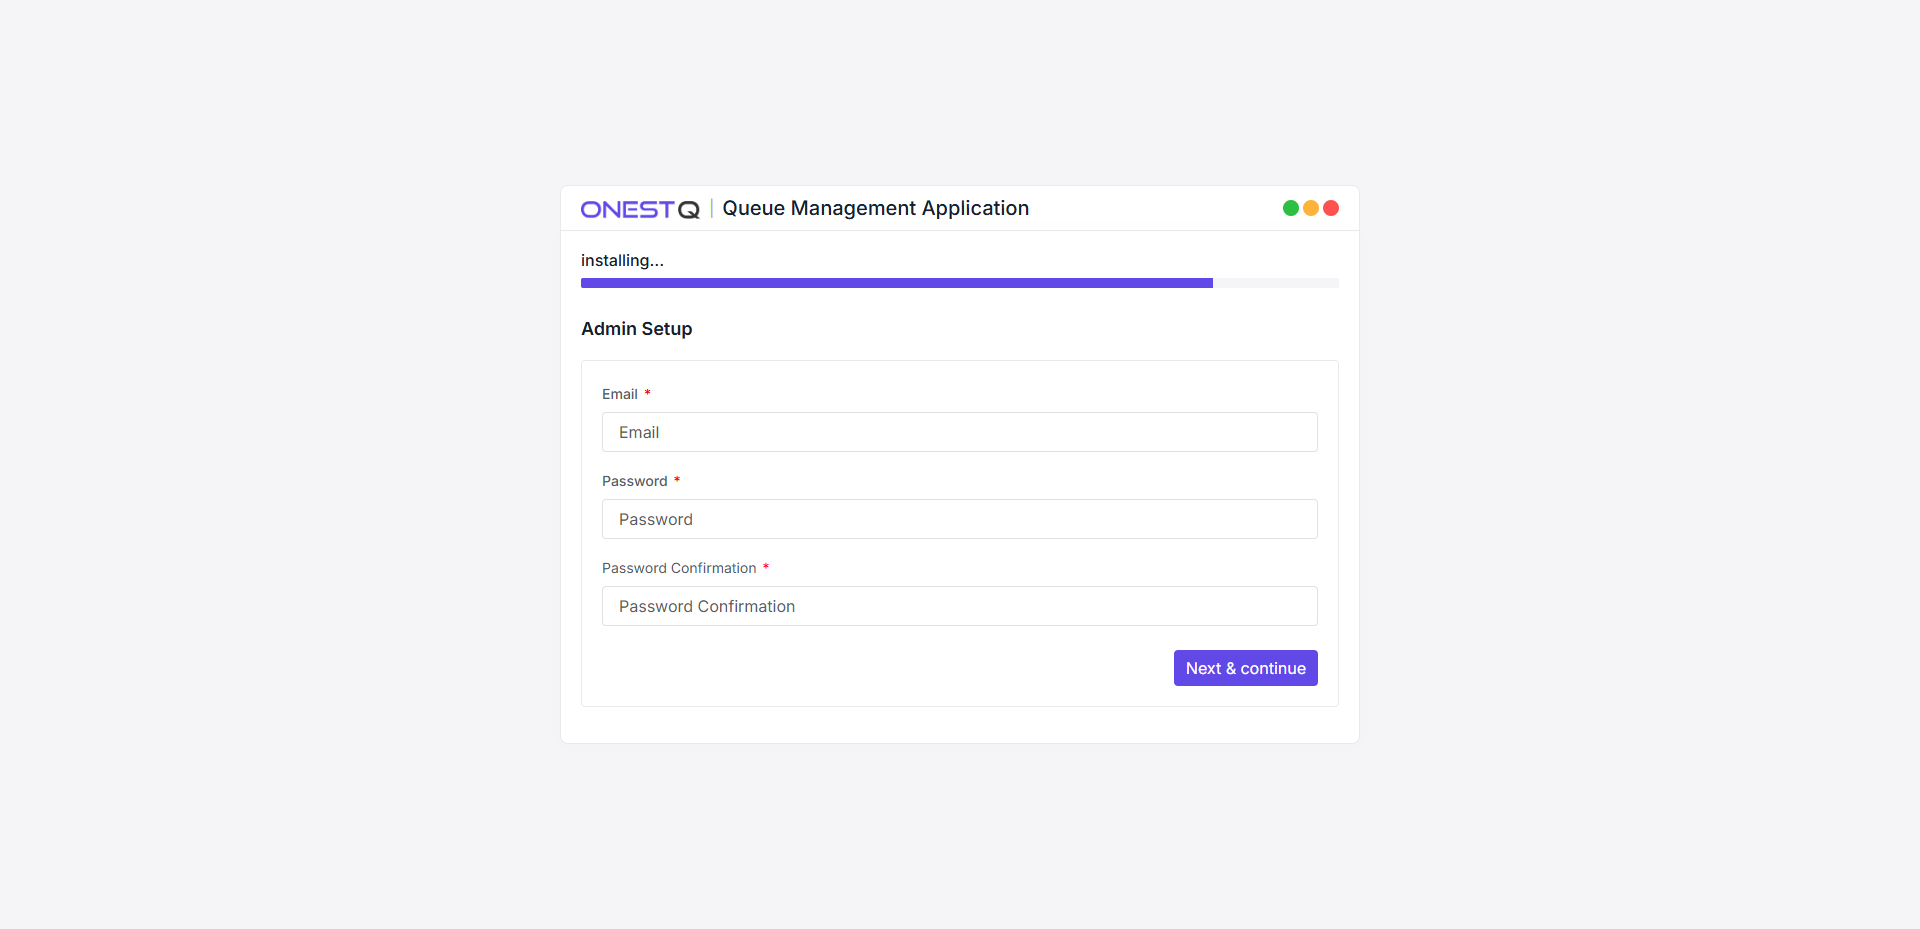
Step 4: Admin Setup
Enter your super-admin account details.
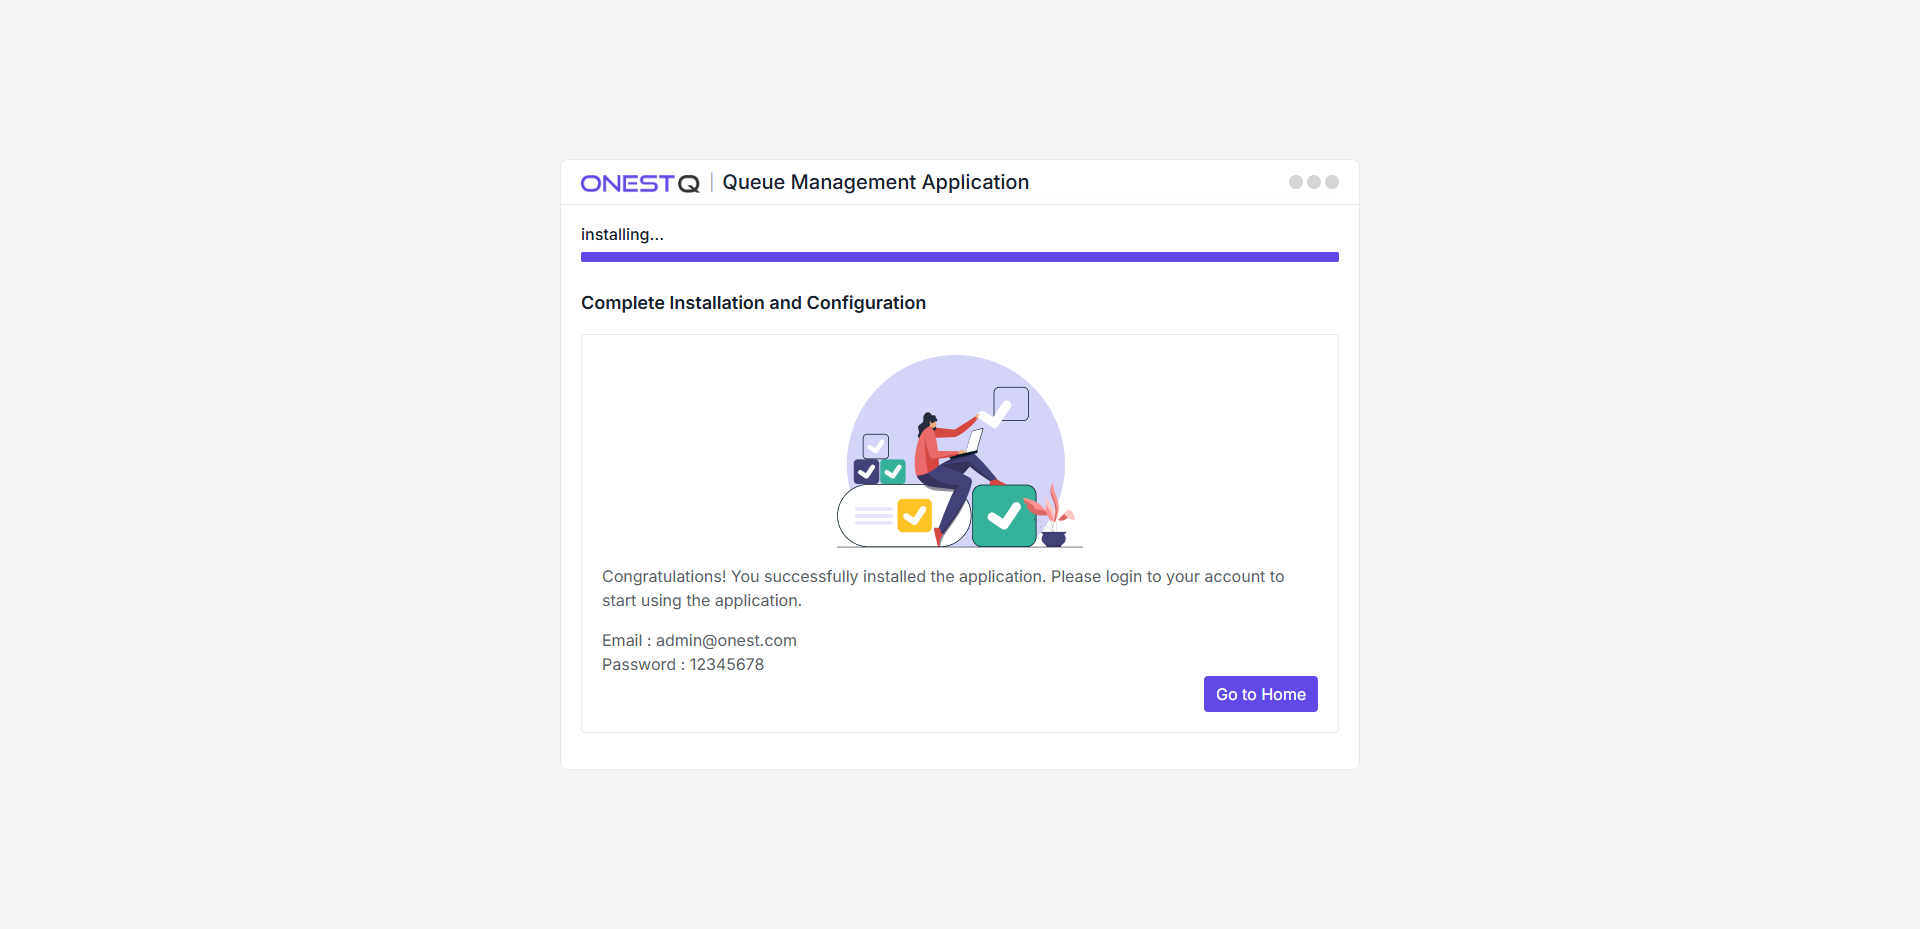
Step 5: Complete
Congratulations! The installation is complete.
You can now login with your admin credentials.
Run Background Jobs
OnestQ uses Laravel's queue worker and scheduler to process tasks like token notifications (SMS, email) and daily token reset. Make sure background jobs are running in your environment.
Queues: Start a Worker
Use one of the following options to run the queue worker continuously.
Option A — Terminal (Linux/macOS)
php artisan queue:workRecommended to run under a process manager (Supervisor/systemd) so it restarts automatically.
Supervisor (Linux)
# /etc/supervisor/conf.d/onestq-queue.conf
[program:onestq-queue]
process_name=%(program_name)s_%(process_num)02d
command=php /path/to/your/project/artisan queue:work
autostart=true
autorestart=true
user=www-data
numprocs=1
redirect_stderr=true
stdout_logfile=/var/log/supervisor/onestq-queue.log
sudo supervisorctl reread
sudo supervisorctl update
sudo supervisorctl start onestq-queue:*Option B — Windows (Task Scheduler)
- Open Task Scheduler → Create Task
- Action: Start a Program
- Program/script:
php - Add arguments:
artisan queue:work - Start in:
C:\\path\\to\\your\\project - Trigger: At startup or on logon; set to run whether user is logged on or not
Option C — Shared Hosting (cPanel)
Create a Cron Job with the following command (runs the worker in the background):
cd /home/USERNAME/public_html && php artisan queue:work > /dev/null 2>&1 &
Note: Replace /home/USERNAME/public_html with your
project path.
Scheduler: Run Cron
Scheduler should be triggered once per day to run due reset tokens according to service settings.
Linux Cron
* * * * * php /path/to/your/project/artisan app:token-reset > /dev/null 2>&1cPanel Cron
- cPanel → Cron Jobs → Add New Cron Job
- Common Settings: Once Per Day
- Command:
php /home/USERNAME/public_html/artisan app:token-reset > /dev/null 2>&1Troubleshooting
-
Ensure
php artisan queue:workis running -
Check
QUEUE_CONNECTIONin.env(e.g.,database,redis) -
Review logs:
storage/logs/laravel.log - Verify Supervisor/Task Scheduler is active
- Confirm a system cron is running every minute
-
Run manually to test:
php artisan schedule:run - Check server time/timezone aligns with app config
Recommendation
Use Supervisor (Linux) or a reliable service manager so queue workers auto-restart and survive deploys. Always enable the scheduler cron every minute.
Getting started (admin)
- Create/verify Branch: Go to Branch and ensure your branch details are correct.
- Create Services: Go to Services and create services under the branch (starting letter/number control how token numbers are generated).
- Create Counters: Go to Counter and create counters (desk locations).
- Assign services to counters: Configure counter settings and select allowed service(s) per counter.
- Create users/staff: Go to Users/Staff to add staff, roles, and permissions.
Navigation (main menu & submenus)
The dashboard UI has two navigation layers:
- Main menu (icon bar): The vertical icon bar at the far left (the rectangle area in your screenshot).
- Submenus: The expanded list (arrow area in your screenshot). This list changes depending on which main menu icon you selected.
The most important submenus you'll use daily are the Others Menu group: Token, Services, Counter, Display, Kiosk, Branch, and Statistical Report.
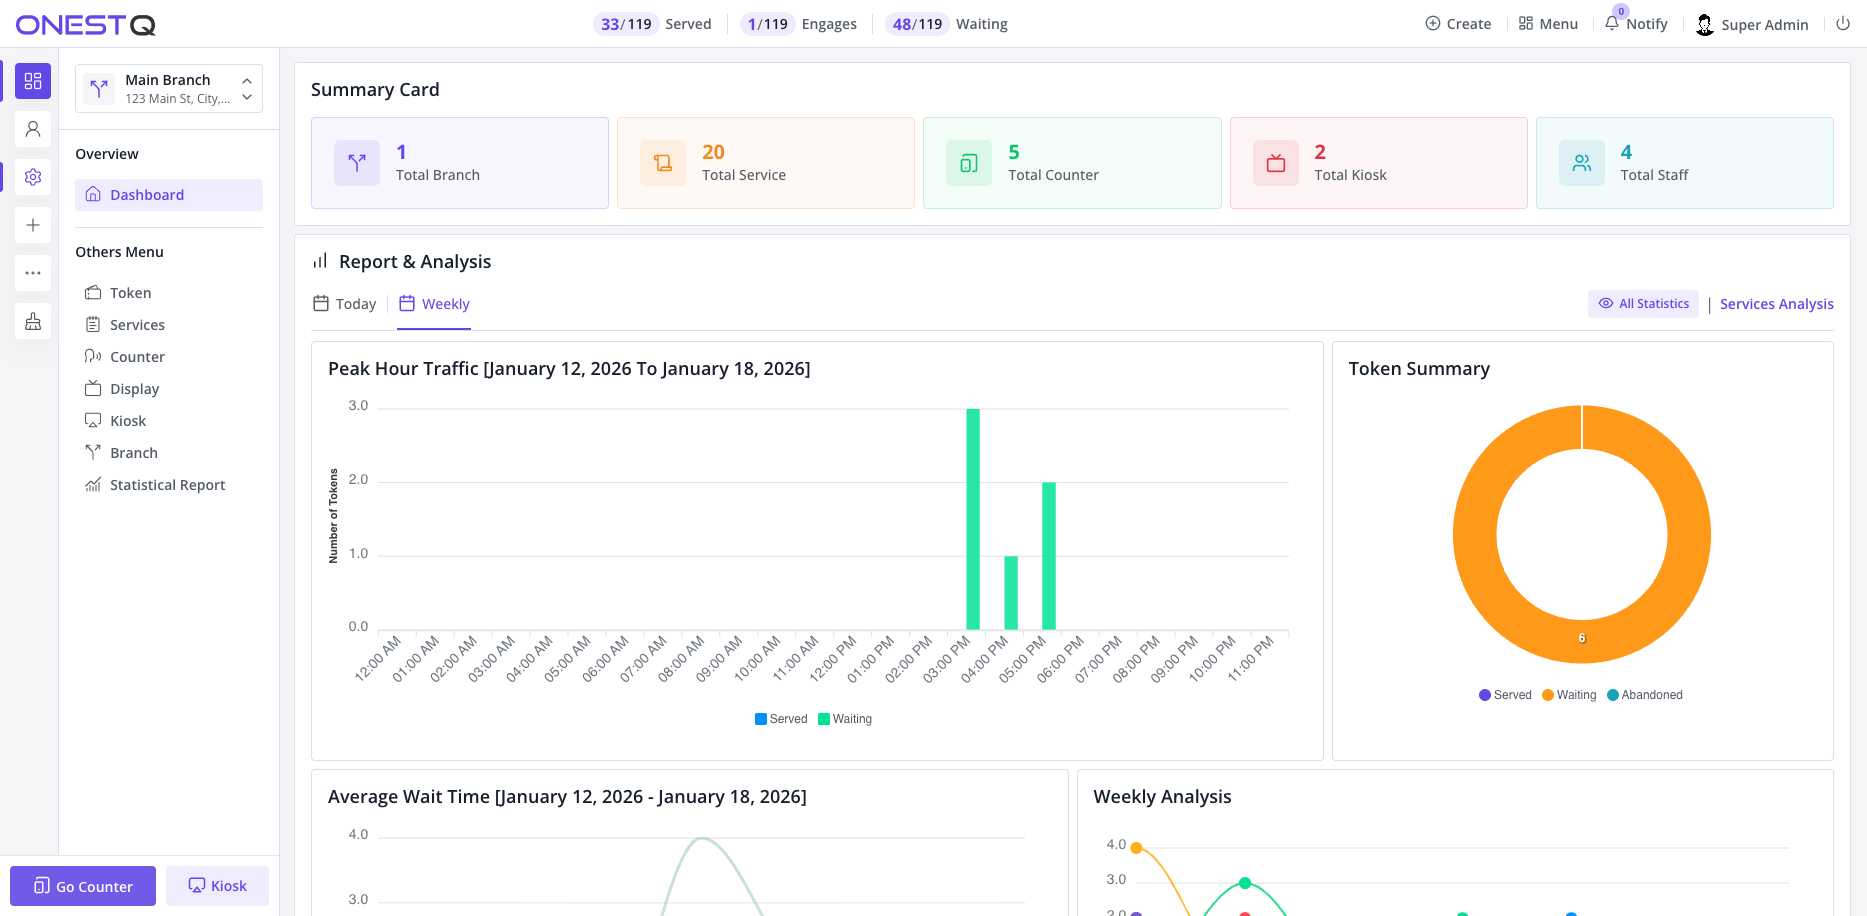
Dashboard showing the main menu icon bar and the submenu list.
Working with list tables (filters + actions)
Most admin screens in OnestQ are "list tables": you search/filter records, then perform operations from the row action menu or bulk actions.
- Filters: use the search fields and dropdowns at the top of the table to narrow results. Always filter by Branch first if you're not seeing expected records.
- Row actions (⋮ in the Action column): per-row context menu for Details, Edit, Delete, Settings, Logs, etc.
- Bulk actions (More Action): applies a command to multiple selected rows (when available). Use carefully—this can update many records at once.
Row actions (⋮ menu)
The "Action" column button (⋮) opens a context menu for that specific record. This is a core feature across almost every list in the system.
- Details/View: opens a read-only view to verify record information.
- Edit: opens a form to change configuration fields (name, prefix, mapping, etc.).
- Settings: opens deeper configuration for the record (rules, mappings, UI settings).
- Logs: audit trail showing changes and activity for the record.
- Delete: removes the record (often restricted). Use only if you are sure the record is safe to delete.
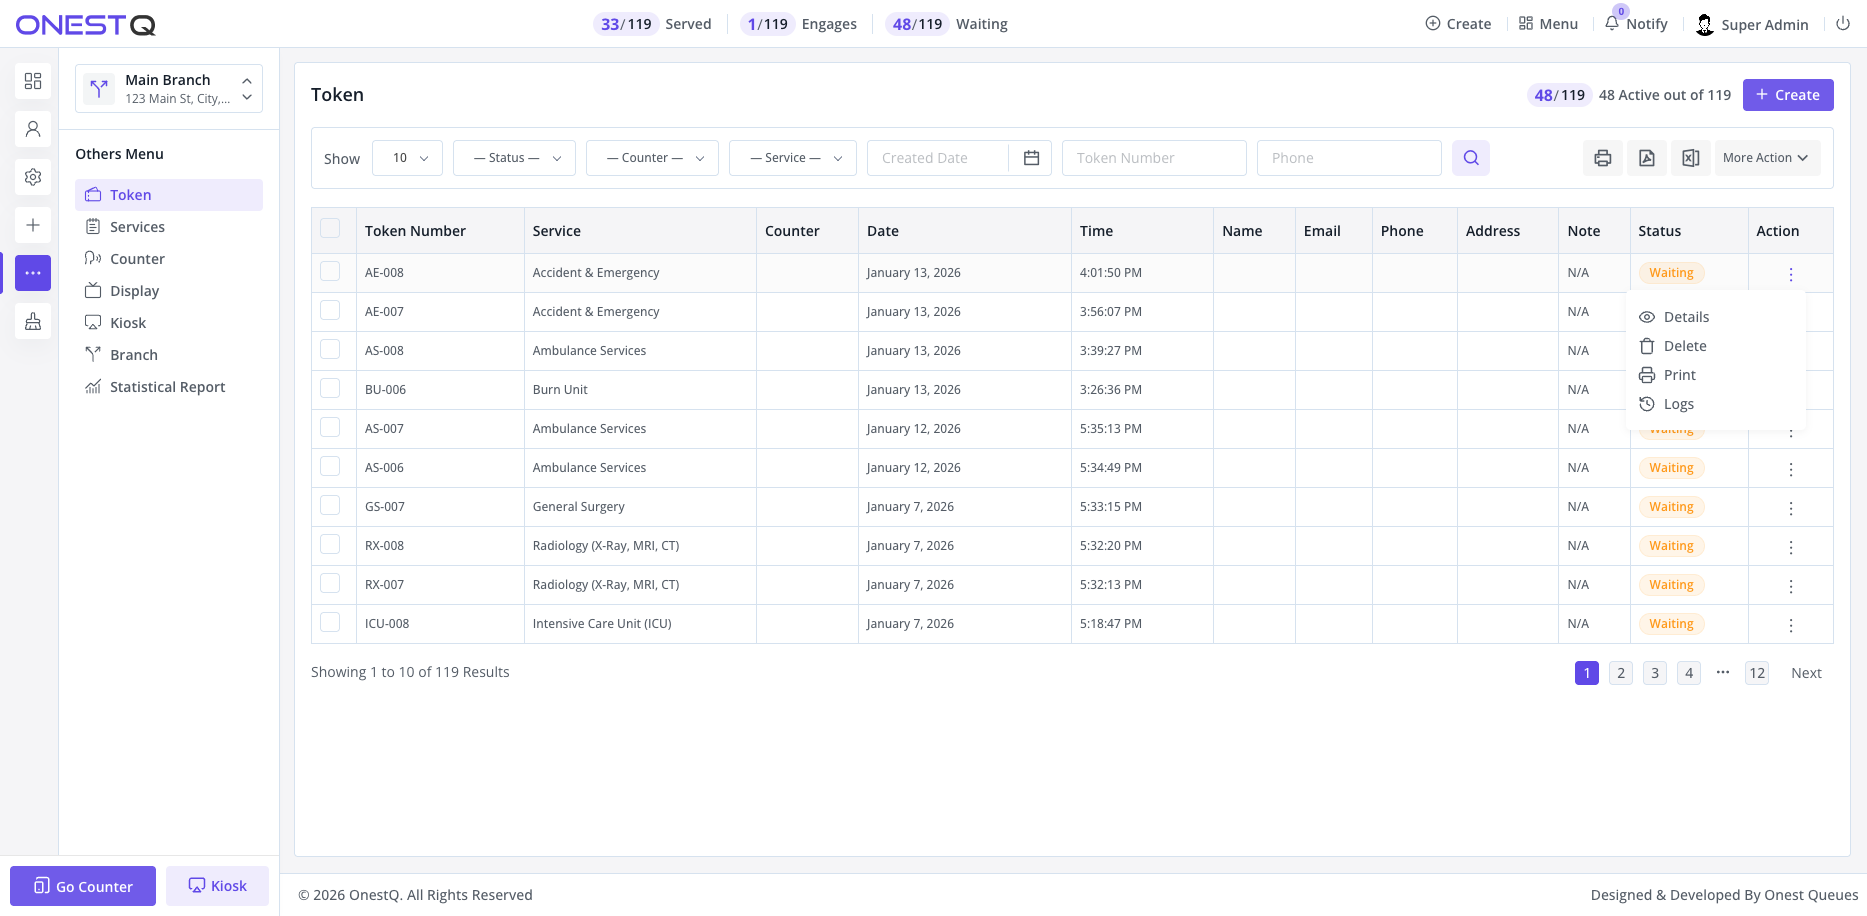
Example: Token row Action menu (Details / Delete / Print / Logs).
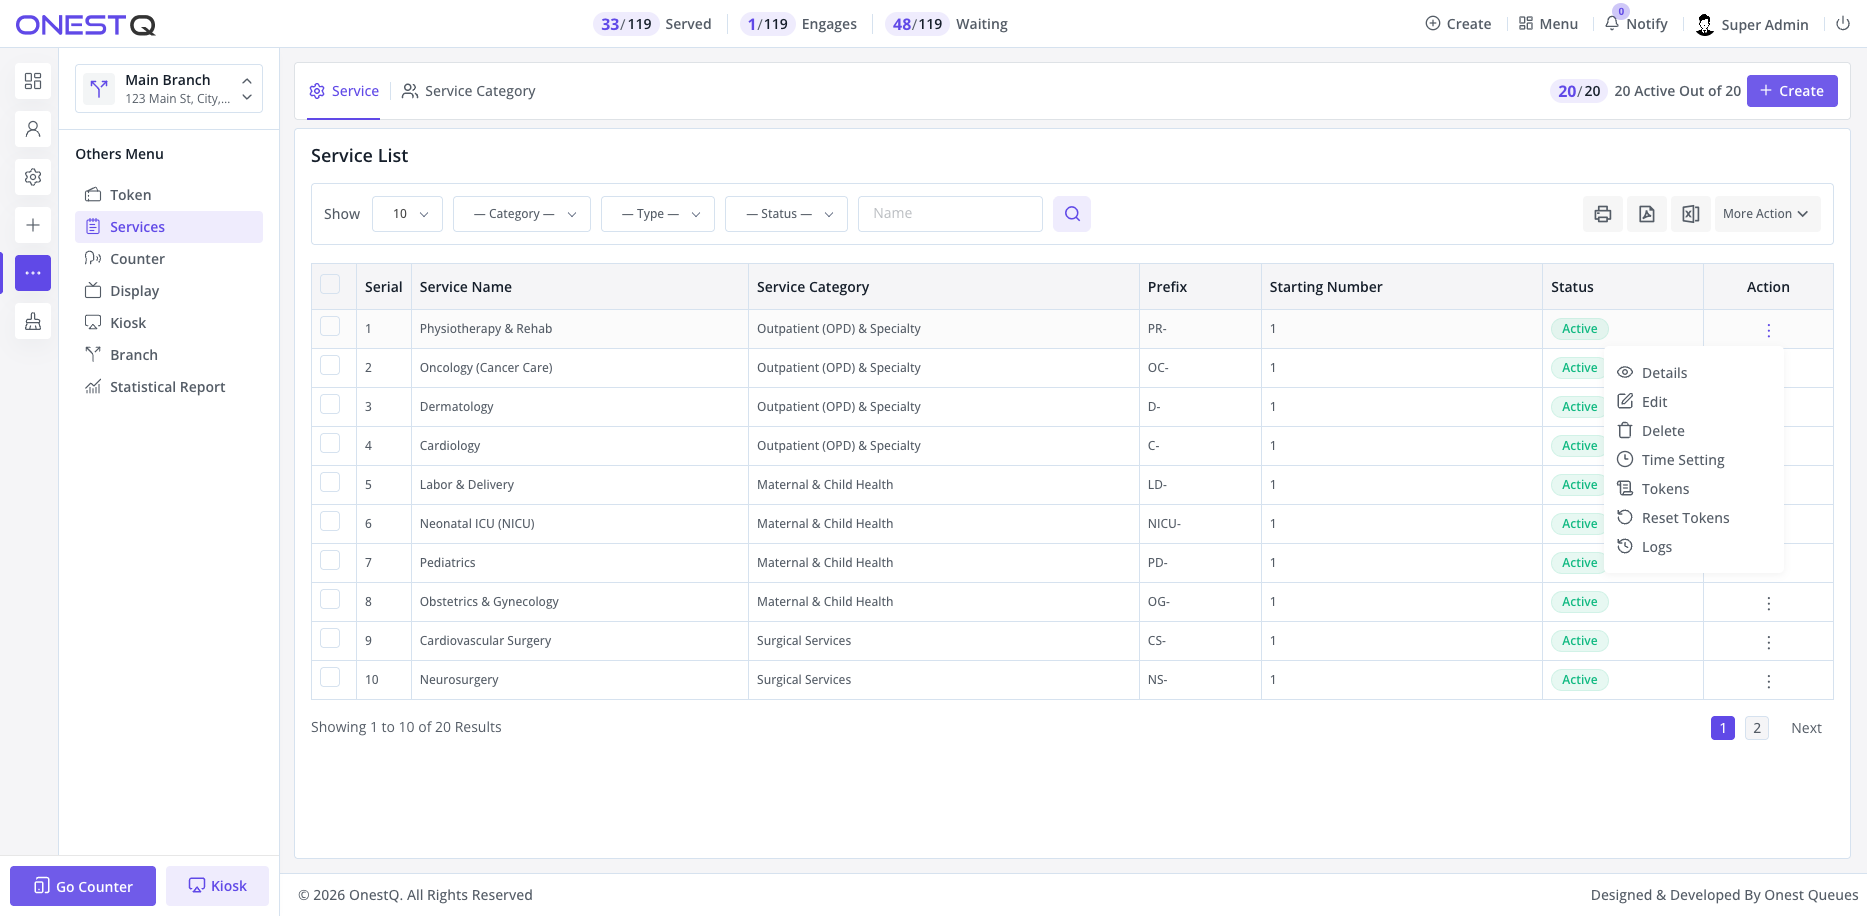
Example: Service row Action menu (Time Setting / Tokens / Reset Tokens).
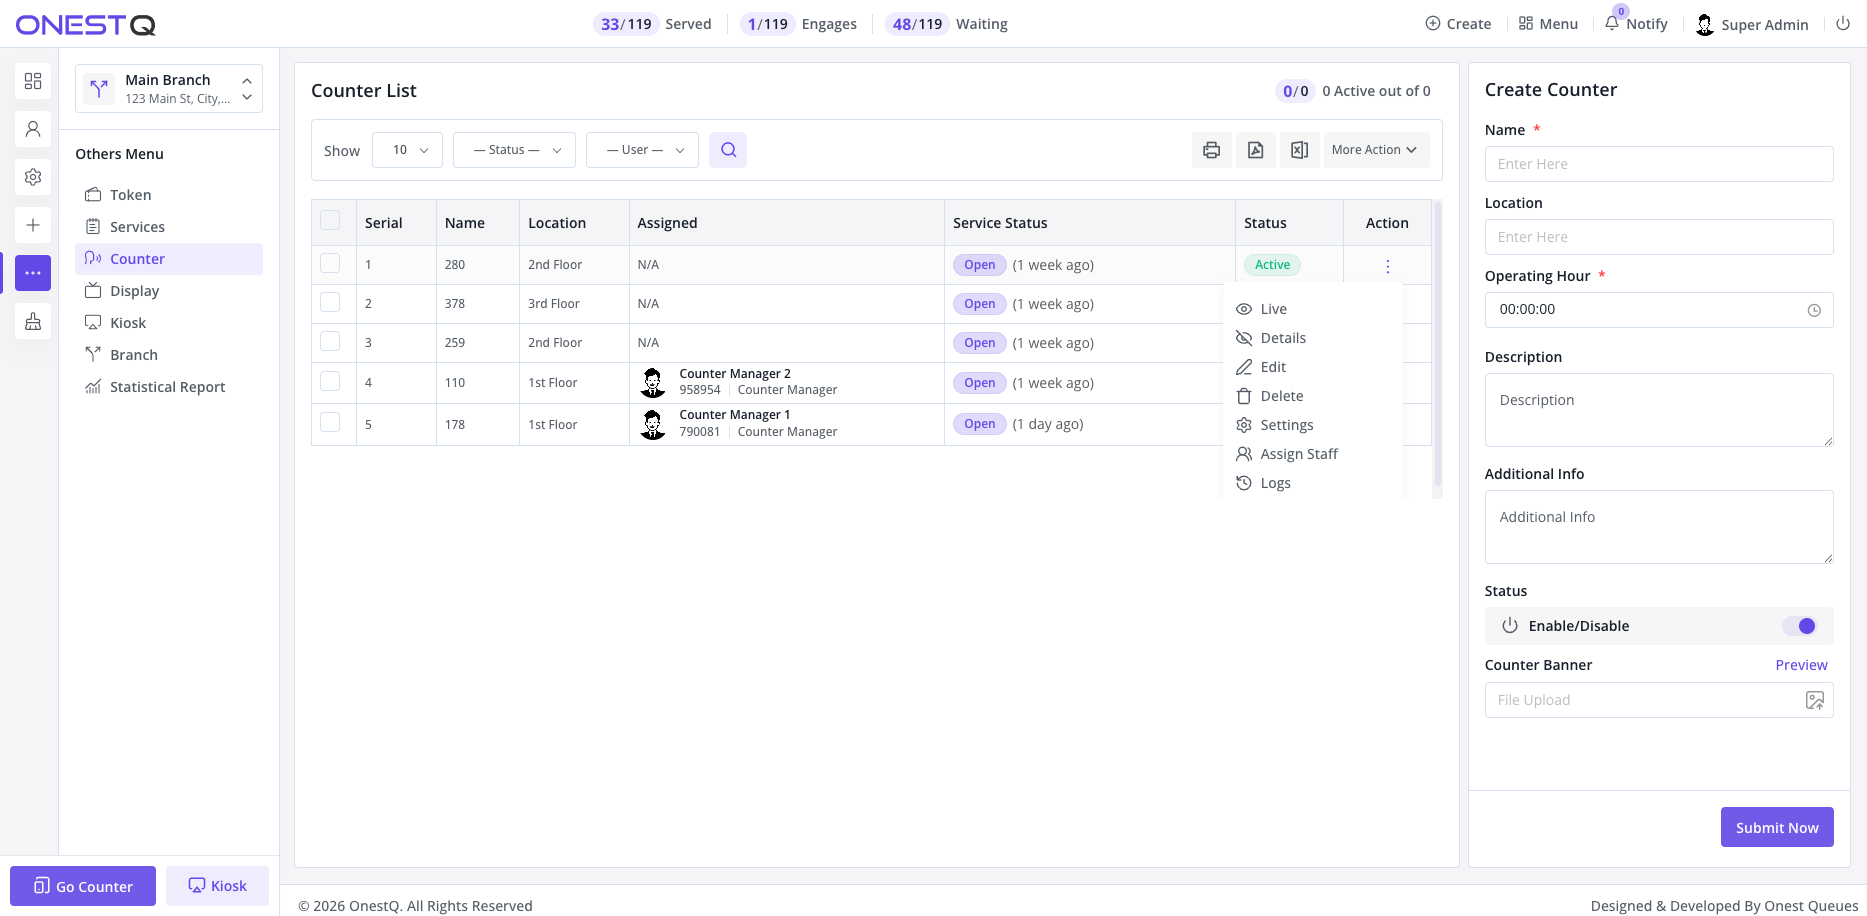
Example: Counter row Action menu (Live / Settings / Assign Staff).
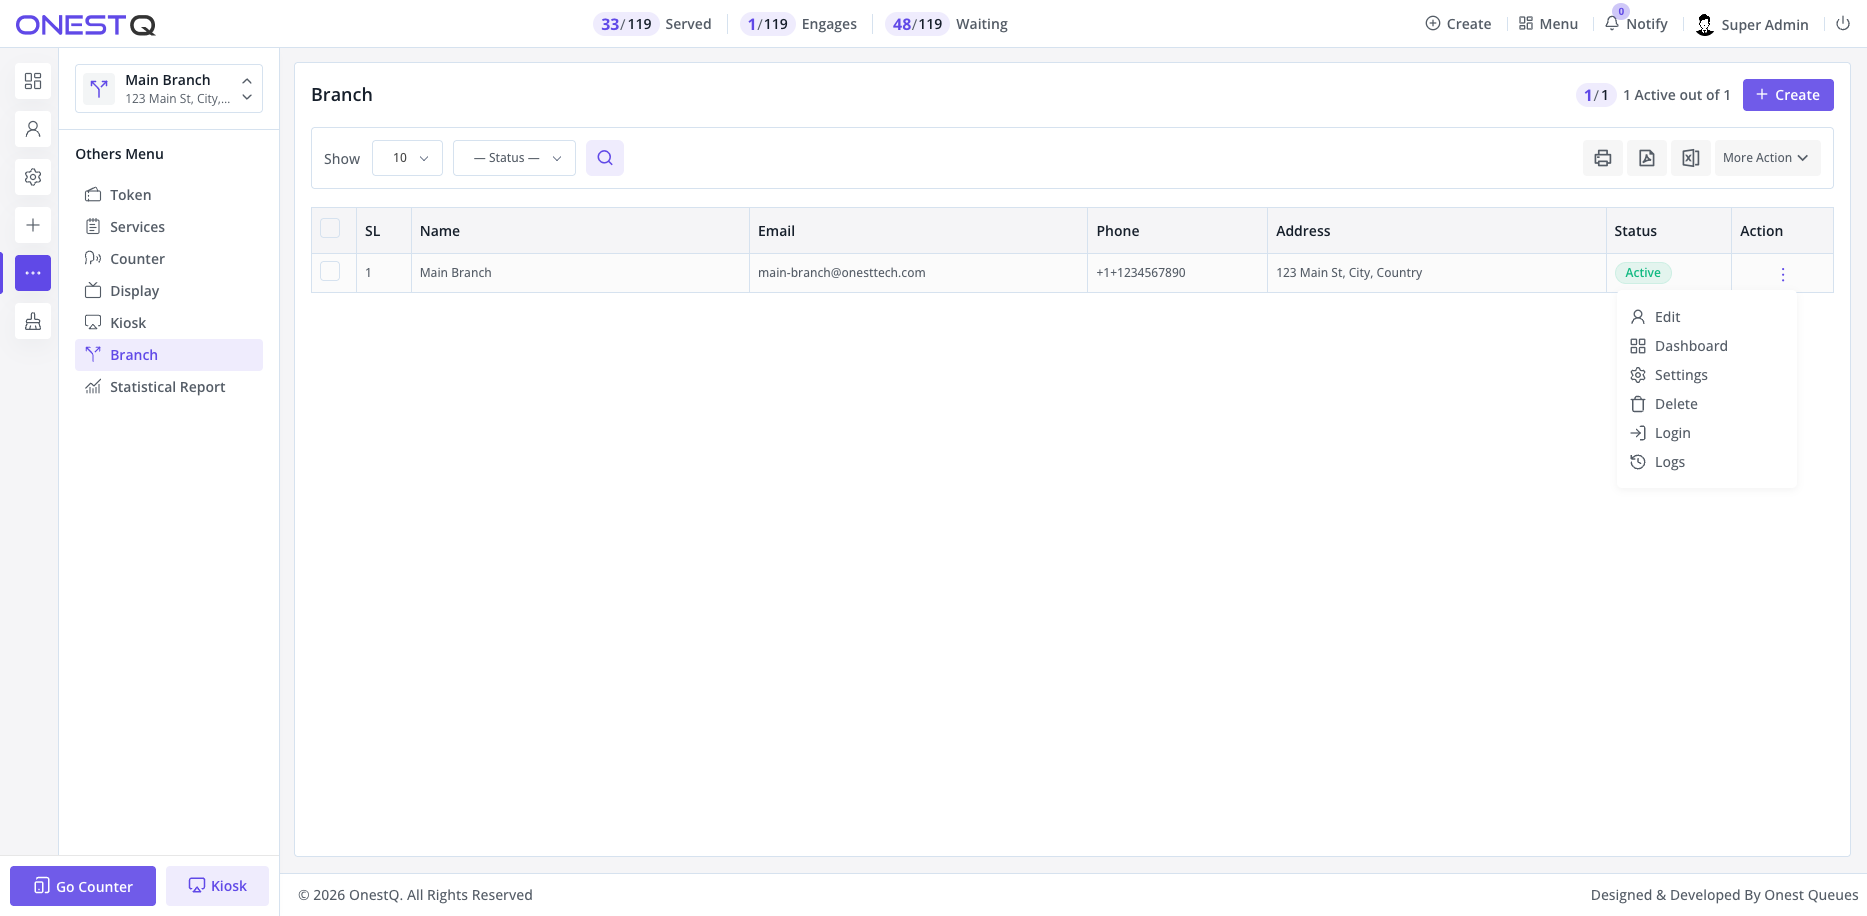
Example: Branch row Action menu (Dashboard / Settings / Login).
Bulk actions (More Action)
Some tables include a More Action dropdown that applies actions to multiple selected rows (for example: bulk status changes). Always select rows carefully before using bulk actions.
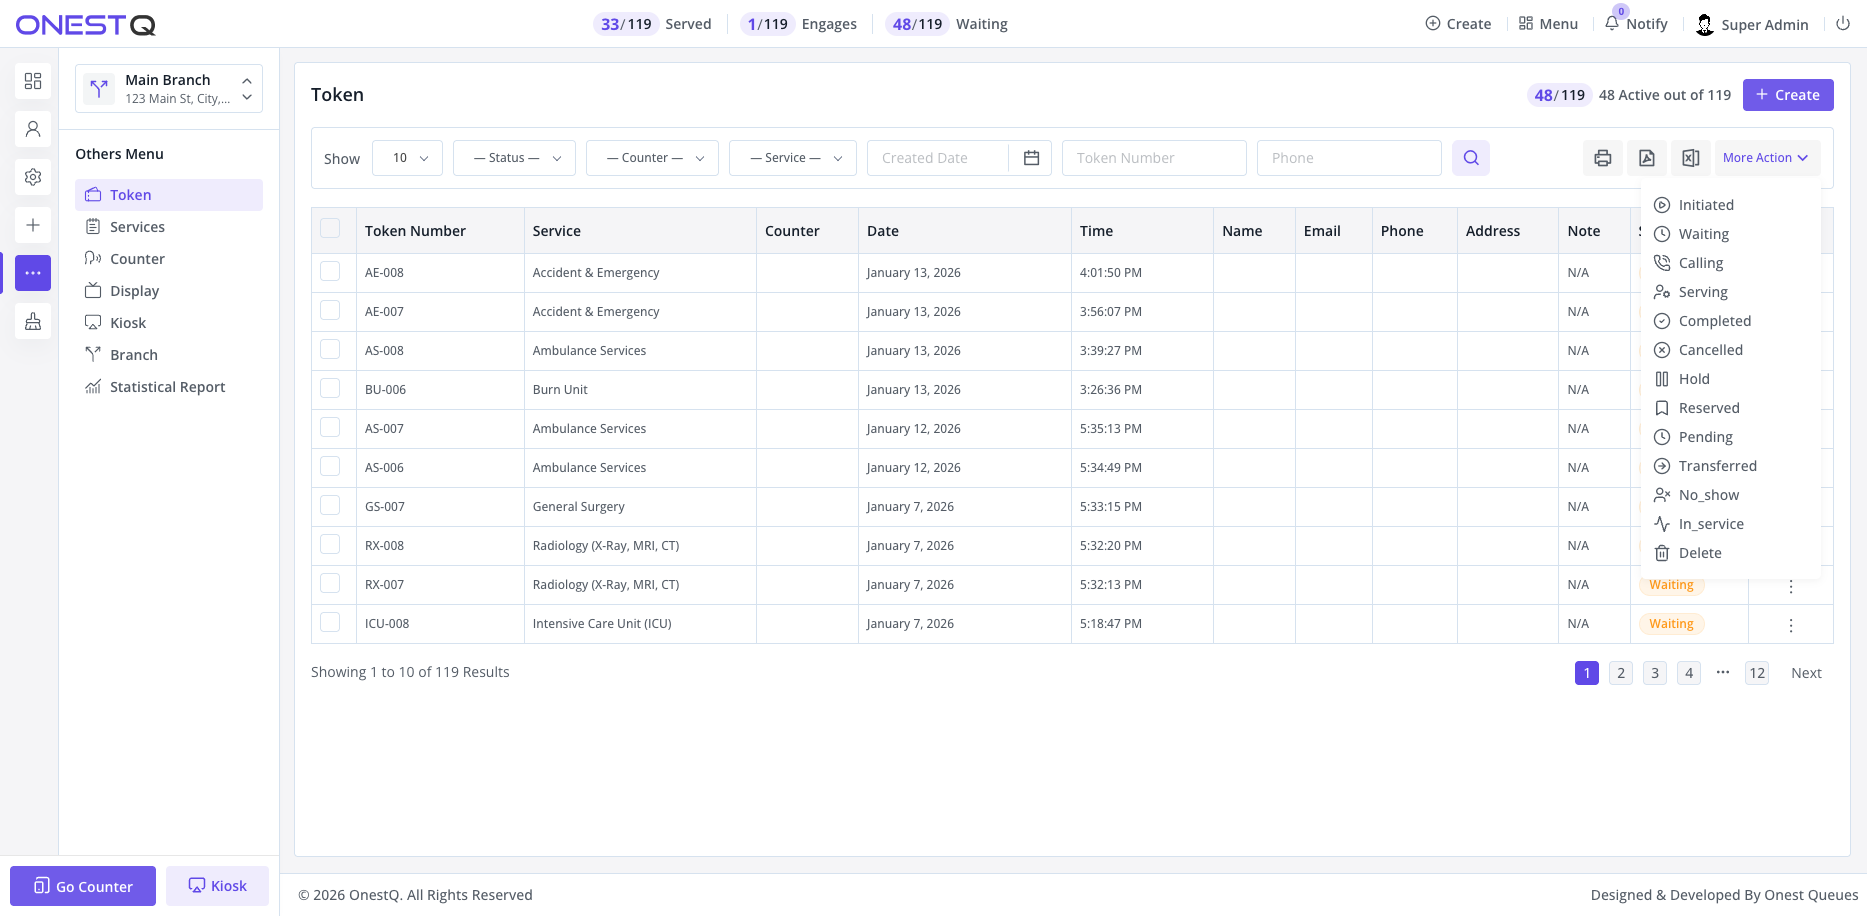
Example: Token list bulk status actions (More Action).
Daily operations
- Kiosk (customer): Customers select a service and generate a token. Depending on kiosk settings, the system can ask for name/phone/email, print a ticket (thermal/laser), and optionally show/print QR or barcode.
- Counter (staff): Staff calls the next token, serves the customer, and can transfer/recall/skip based on service/counter settings.
- Display (public): Shows currently serving tokens and queue information; can play sound/voice announcements and show ticker notifications.
Dashboard
The dashboard shows key totals (services/counters/kiosks/staff), daily/weekly analytics, and quick links into reports.
Dashboard navigation overview (main menu + submenus)
Quick create
Use Quick Create to jump directly into creating common entities (Token, Service, Display, Counter, Kiosk, Branch, Printer, User, etc.).
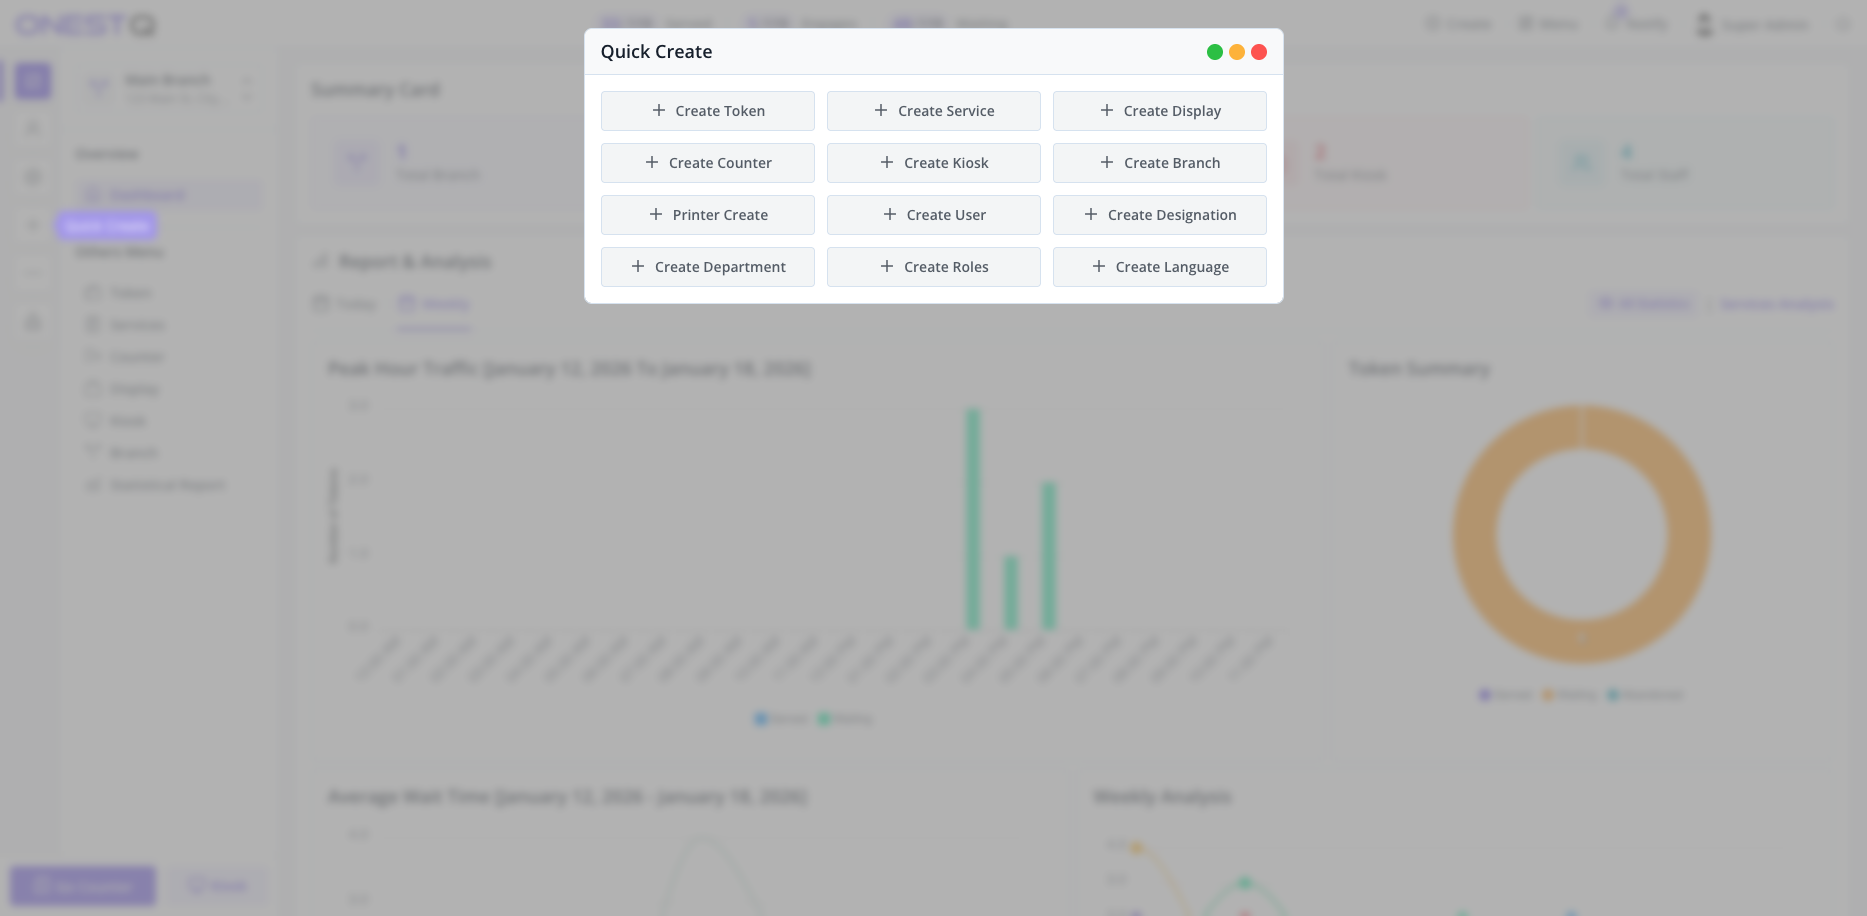
Quick Create modal (opened from the main menu icon bar).
Users & staff management
The Users & Staff management system provides comprehensive control over your organization's user accounts, roles, permissions, departments, and designations. This centralized module allows you to manage who has access to the system and what they can do.
Navigate to Staff in the Others Menu to access the following submenus:
- User: Create and manage staff accounts
- Designation: Define job titles and positions
- Department: Organize users by department
- Role: Configure roles with specific permissions
- Permission: Assign granular permissions to roles and users
User Management
The User Management screen displays all staff members in your system. From here, you can create new staff accounts, edit existing users, assign roles, and manage their status. Each user can be assigned to specific branches, departments, and designations.
Key features:
- Filter users by status, department, role, or branch
- View user details including email, phone, designation, and department
- Create new staff with customizable fields
- Assign users to specific counters for service operations
- Manage user permissions individually or through roles
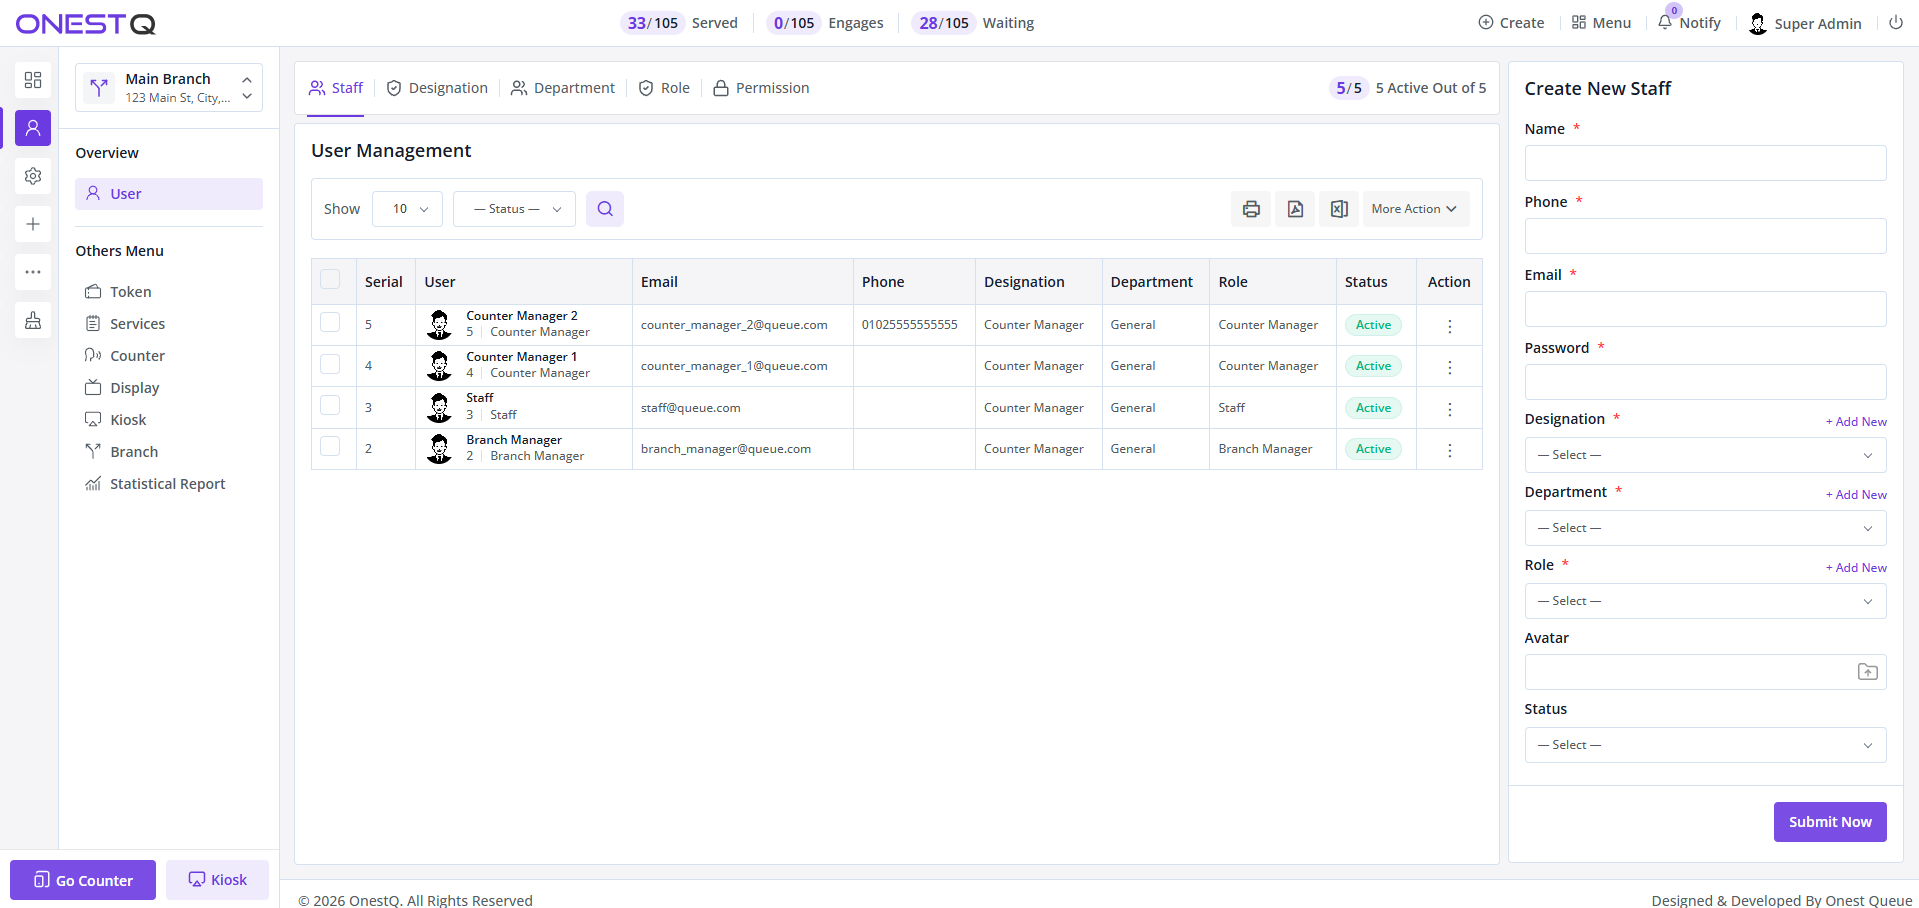
User management screen showing staff list with filters and create options.
Department & Designation Management
Departments help you organize users based on their functional areas. Create departments like HR, Finance, Operations, Customer Service, etc. Each user can be assigned to one department, making it easier to filter staff lists and reports.
Designations define job titles and positions within your organization, helping establish hierarchy and organizational structure.
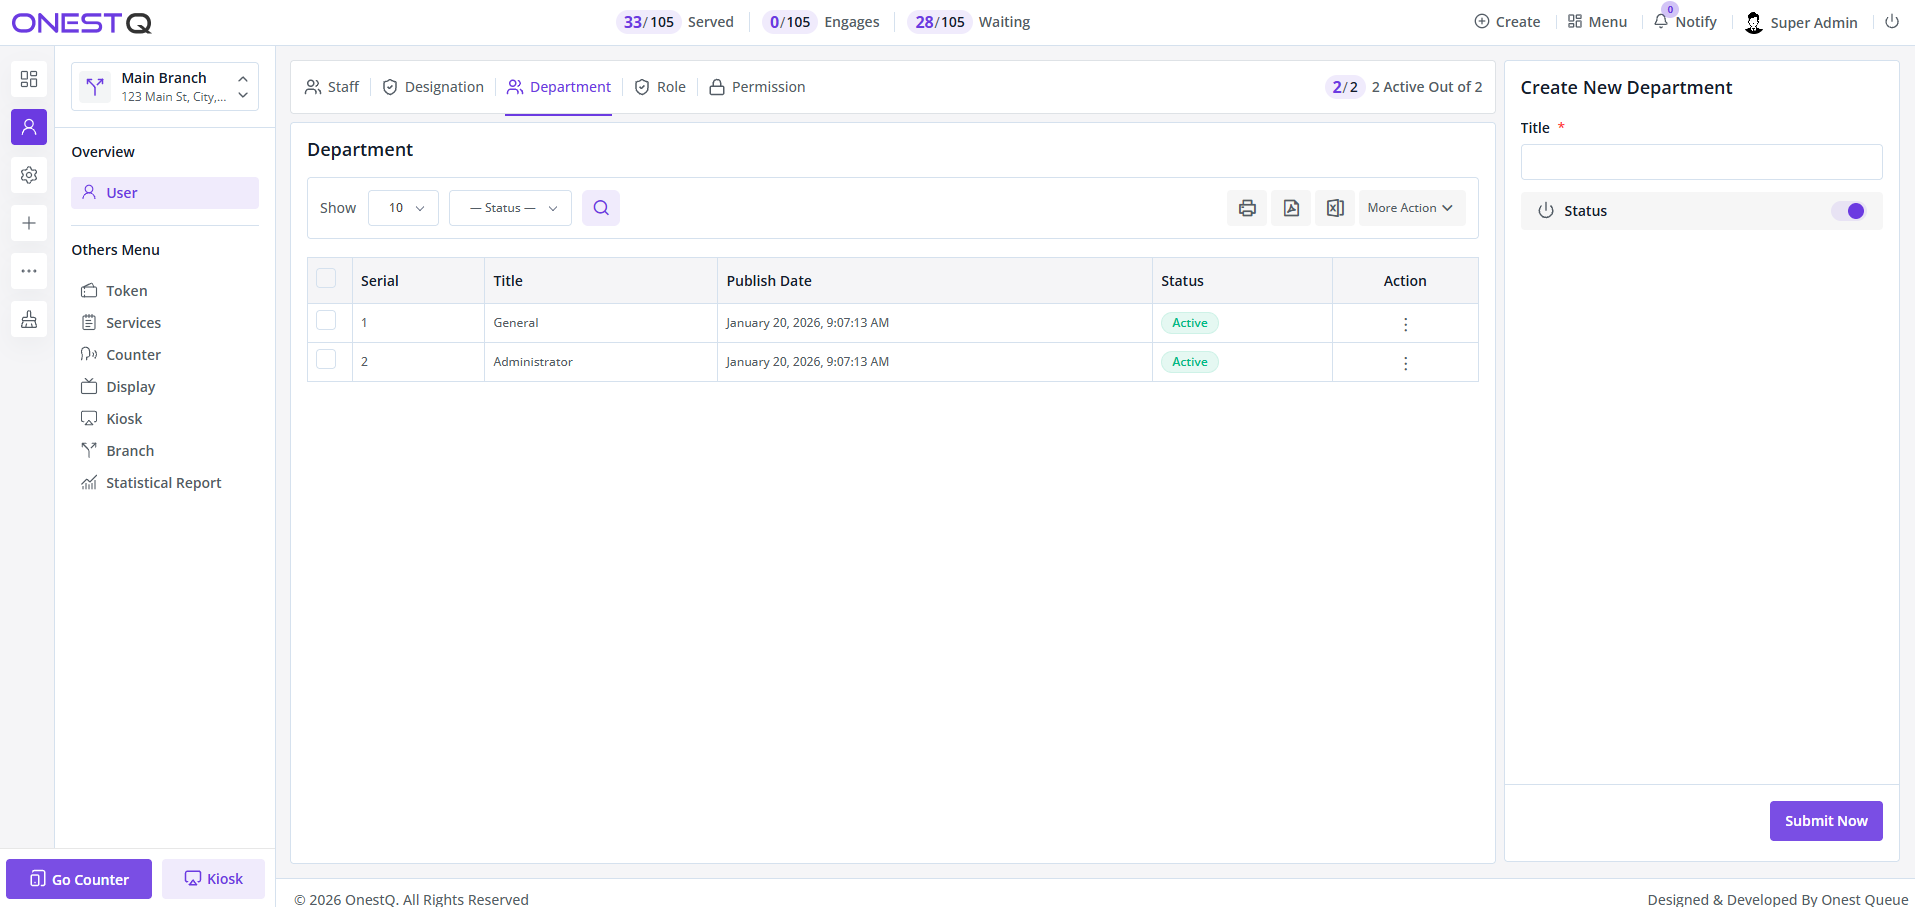
Department management screen for organizing users by functional areas.
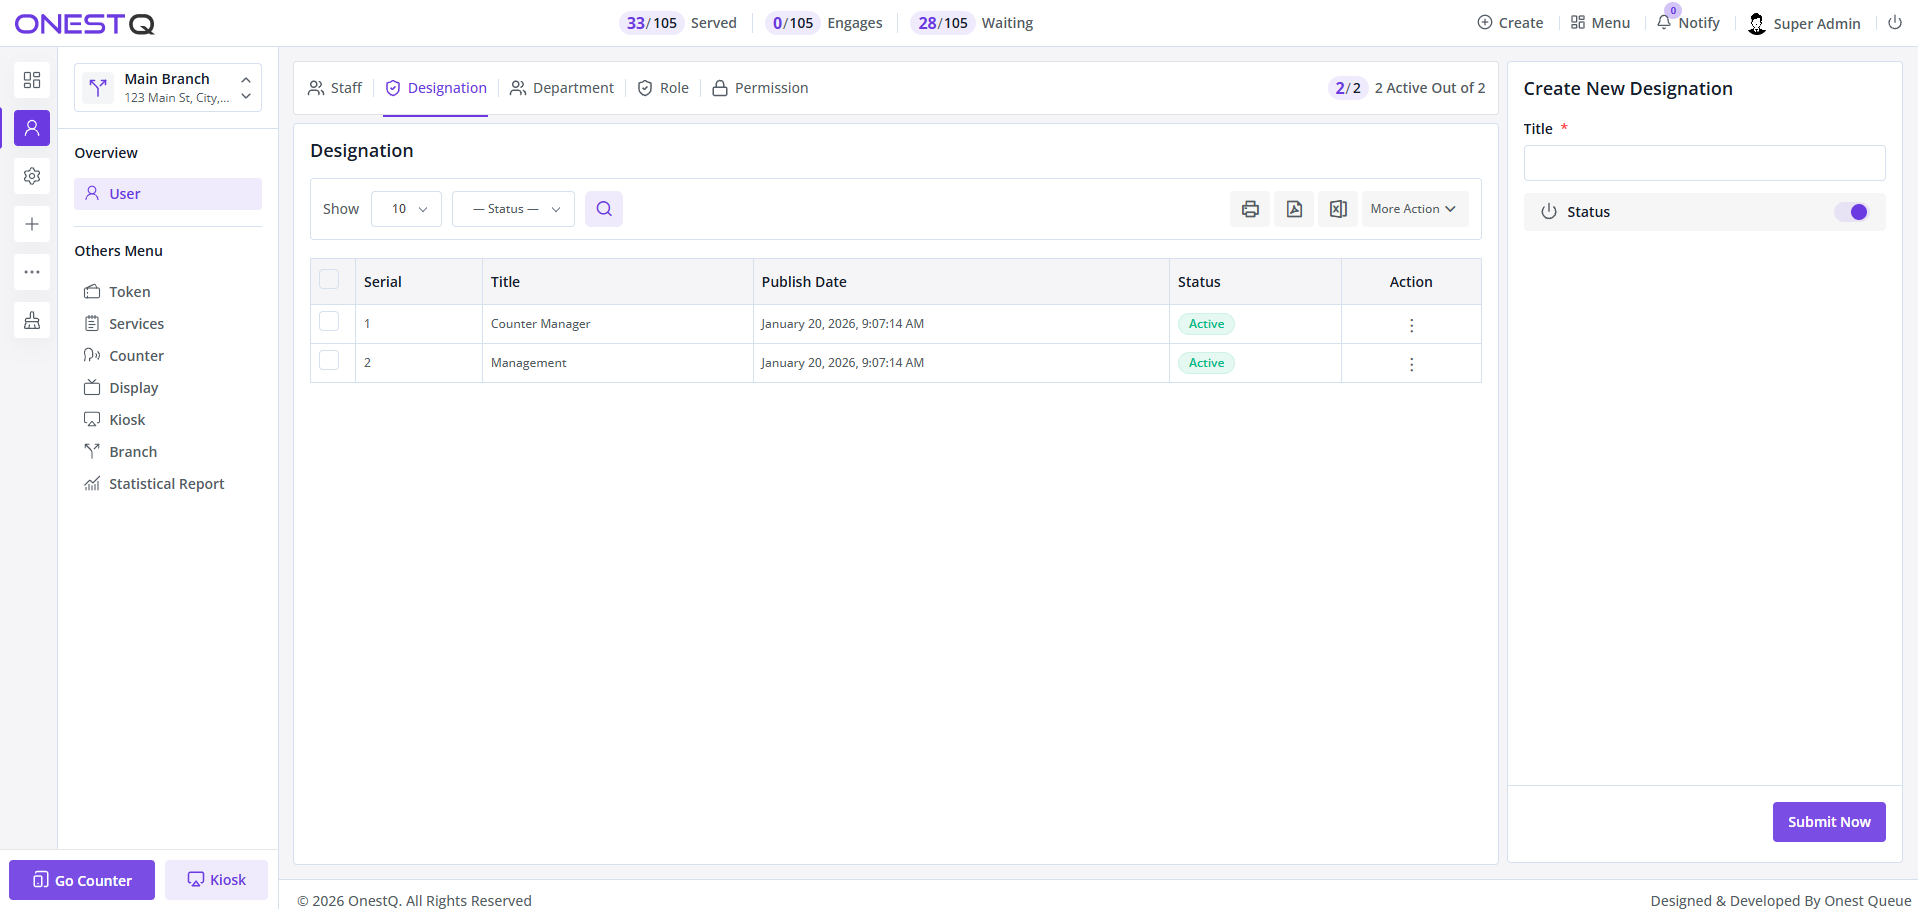
Designation management for defining job titles and positions.
Role & Permission Management
OnestQ includes a powerful role-based access control (RBAC) system. Roles define what actions users can perform in the system. Each role can have multiple permissions assigned, controlling access to specific features and operations.
Role management workflow:
- Create a new role (e.g., "Branch Manager", "Counter Staff", "Supervisor")
- Assign permissions to the role from the available permission list
- Assign the role to users who need those permissions
- Optionally assign additional permissions directly to specific users
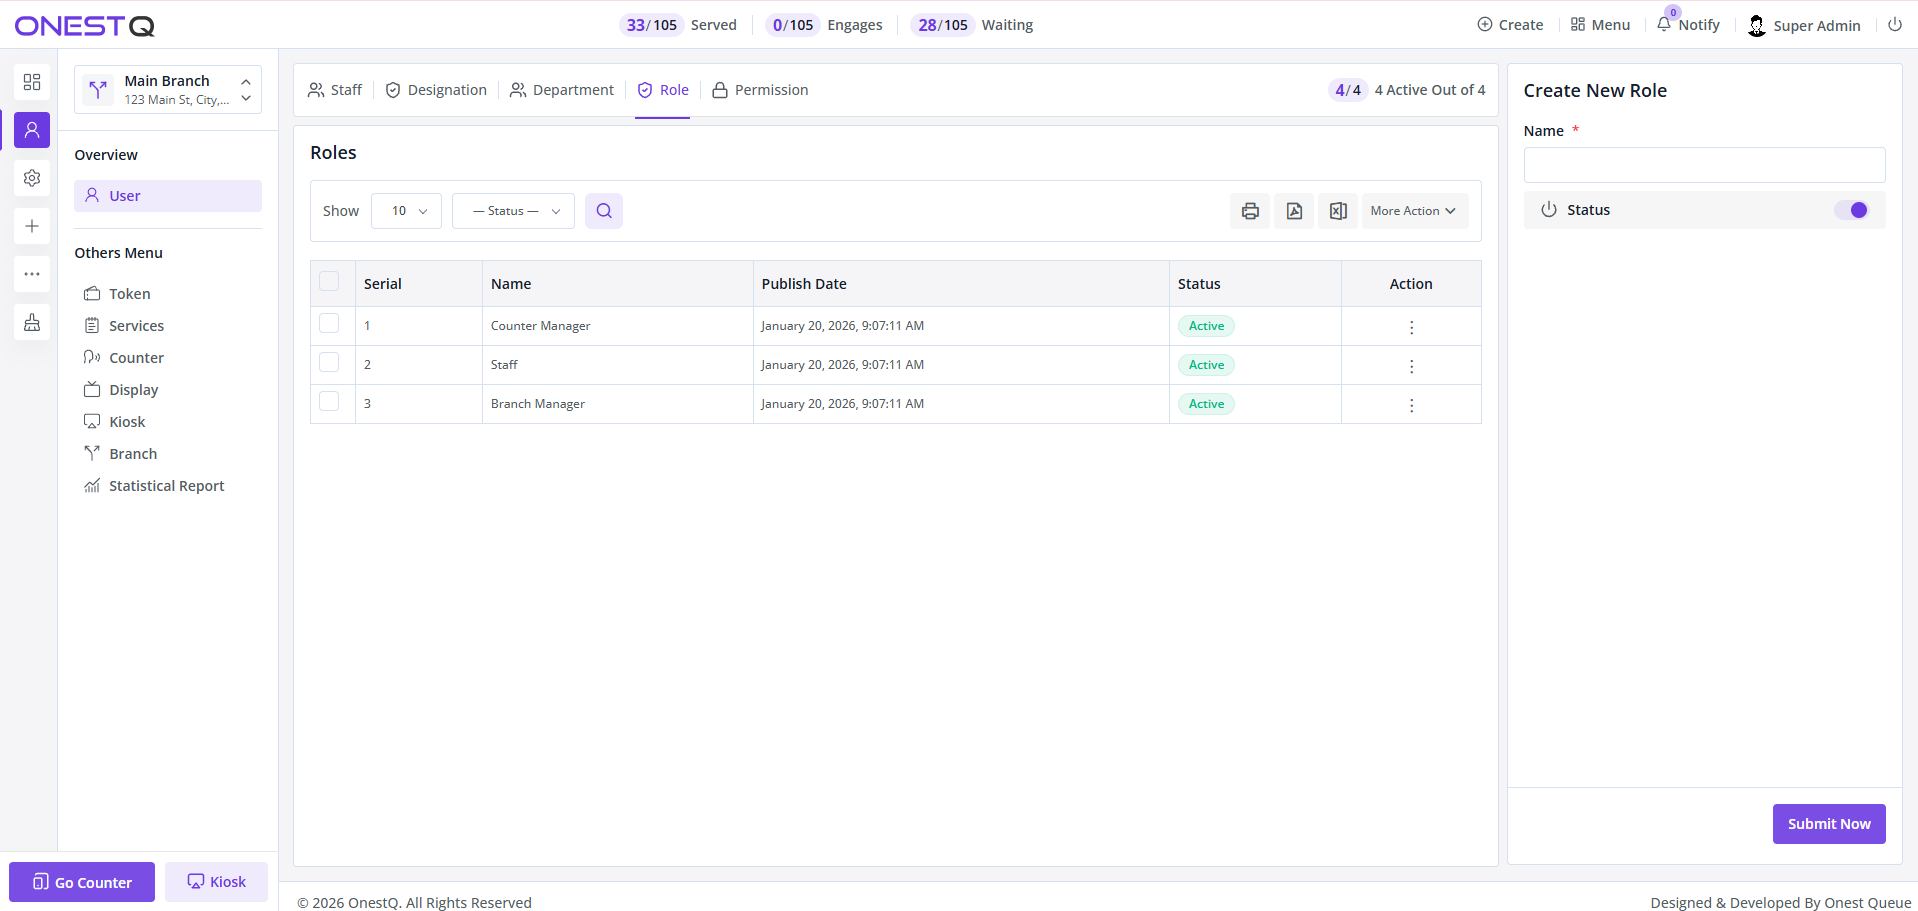
Role management screen showing available roles in the system.
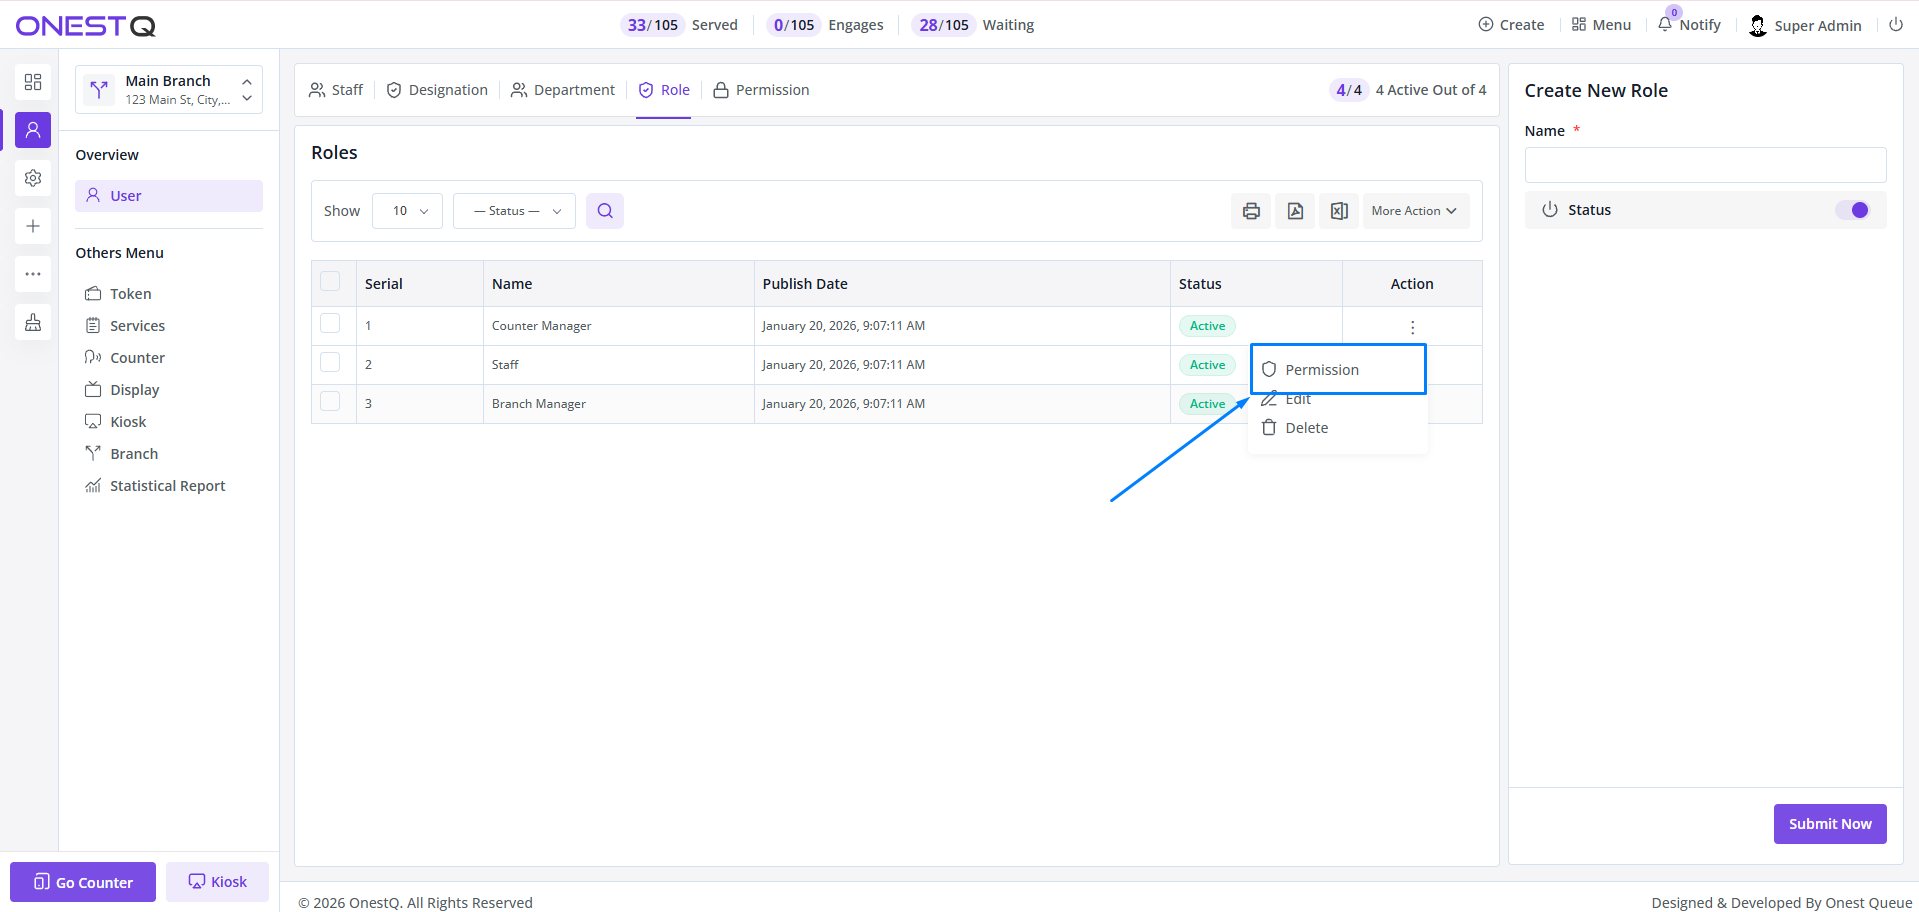
Permission management interface showing available system permissions.
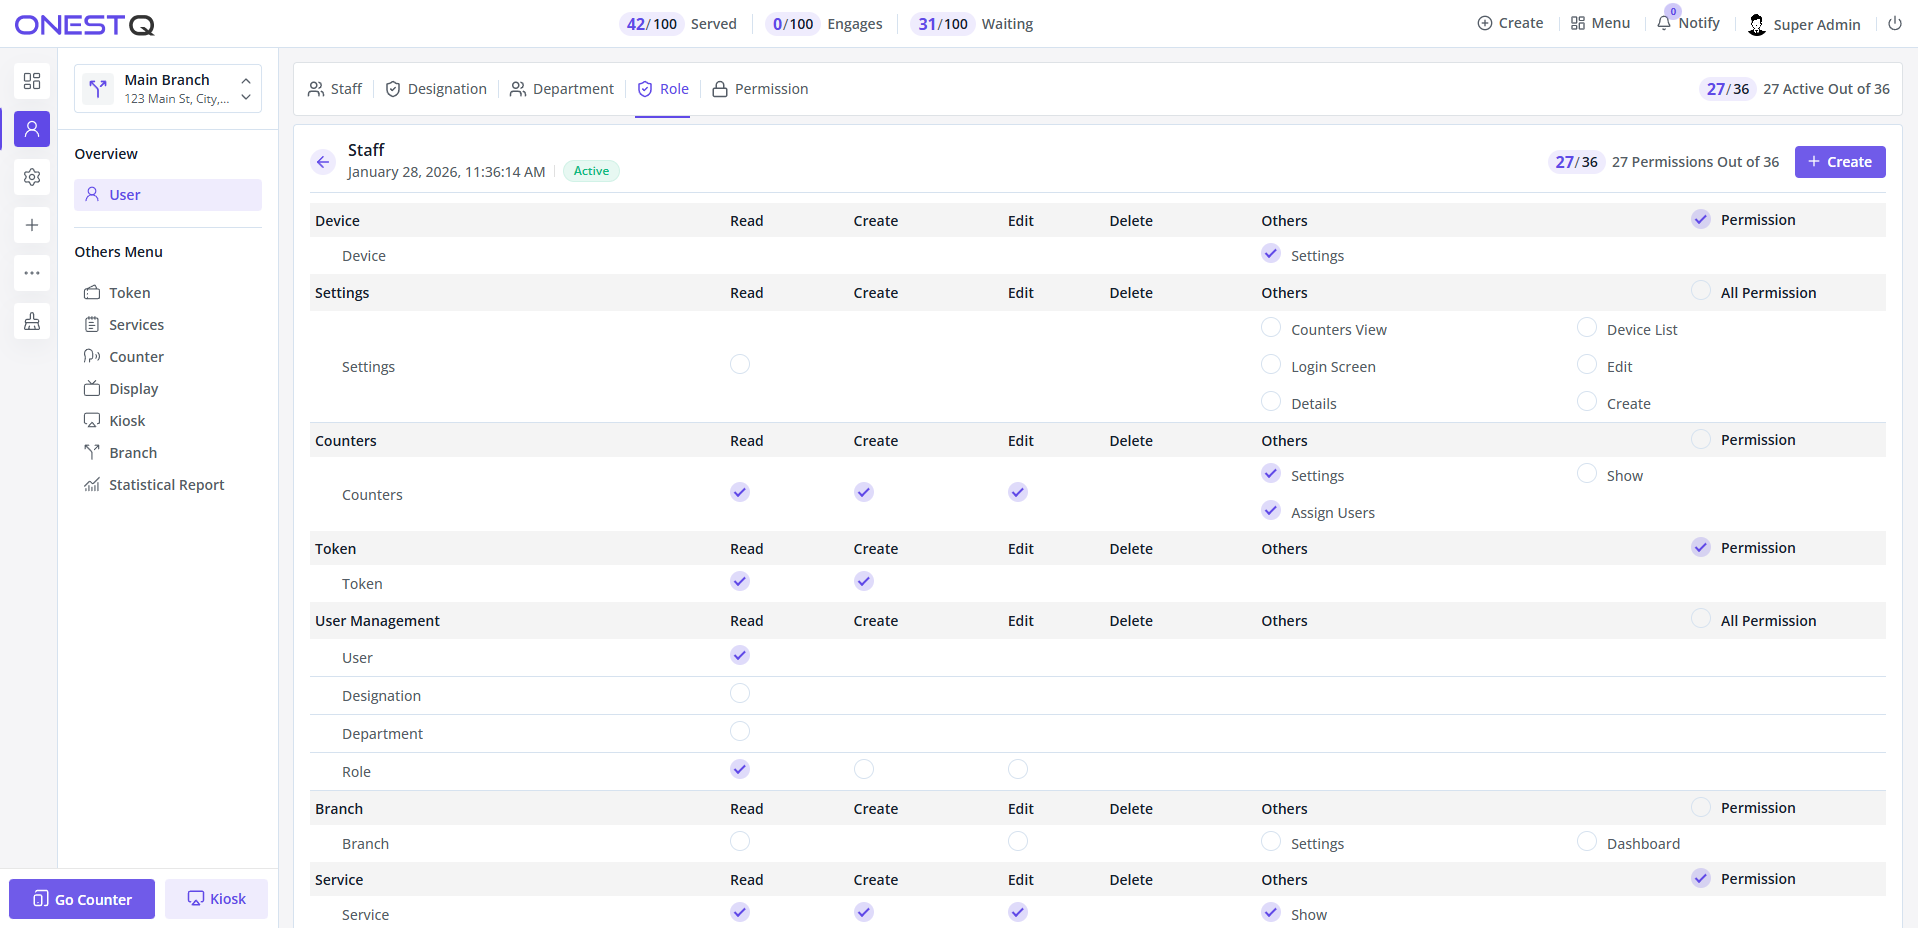
Assigning permissions to a role - select which modules and actions the role can access.
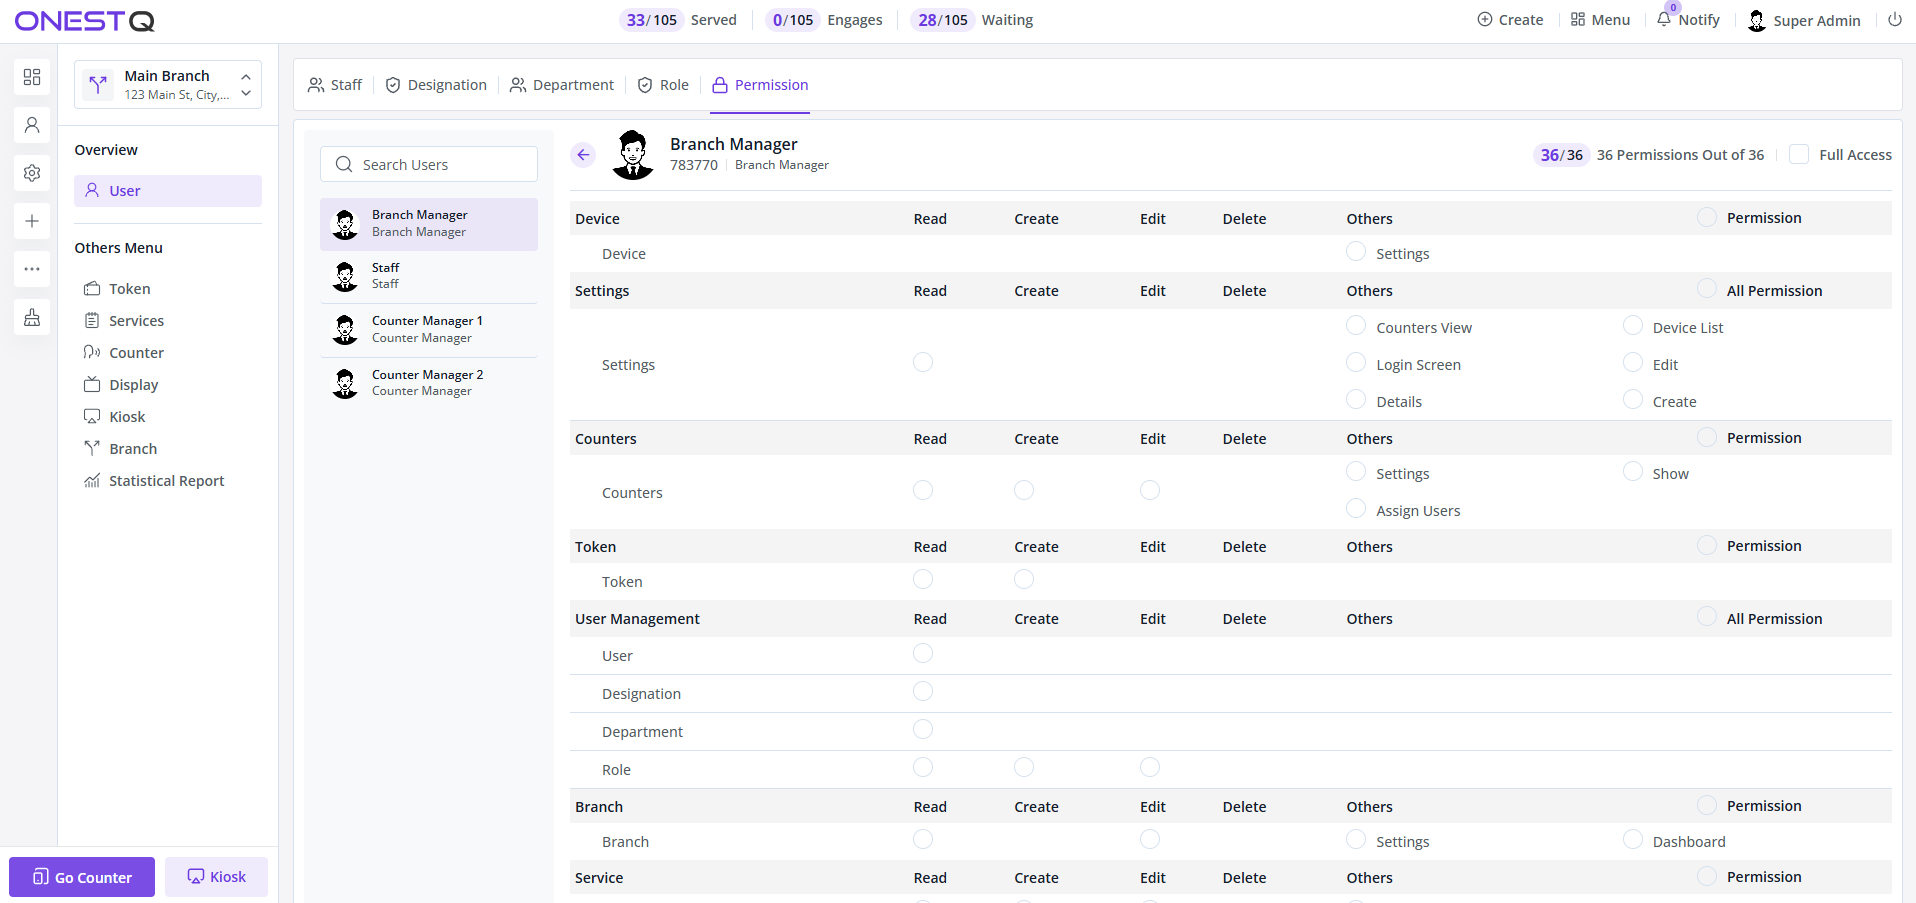
Assigning specific permissions directly to individual users for granular access control.
Best Practices
- Create roles based on job functions rather than individuals
- Assign permissions to roles, not individual users (except for special cases)
- Regularly review user access and remove unnecessary permissions
- Use departments and designations for organizational structure and reporting
Token management
The Token module is the heart of the queue management system. Every customer interaction begins with a token - a unique identifier that tracks the customer's journey from arrival to service completion.
Navigate to Token in the Others Menu to access the token management interface. From here, you can view all tokens across your system, filter by status, service, branch, date, and perform various actions.
Token List & Filters
The Token list displays comprehensive information about each token including:
- Token Number: Unique identifier (e.g., A-001, B-022)
- Service: Which service the token was issued for
- Counter: Assigned counter number
- Date & Time: When the token was created
- Customer Info: Name, email, phone (if collected)
- Status: Current state (Waiting, Called, Serving, Served, No-Show, Cancelled)
- Action Menu: Quick access to details, print, and other operations
Use the filter options at the top to search by token number, customer details, date range, service, counter, branch, or status. This makes it easy to find specific tokens or generate custom lists.
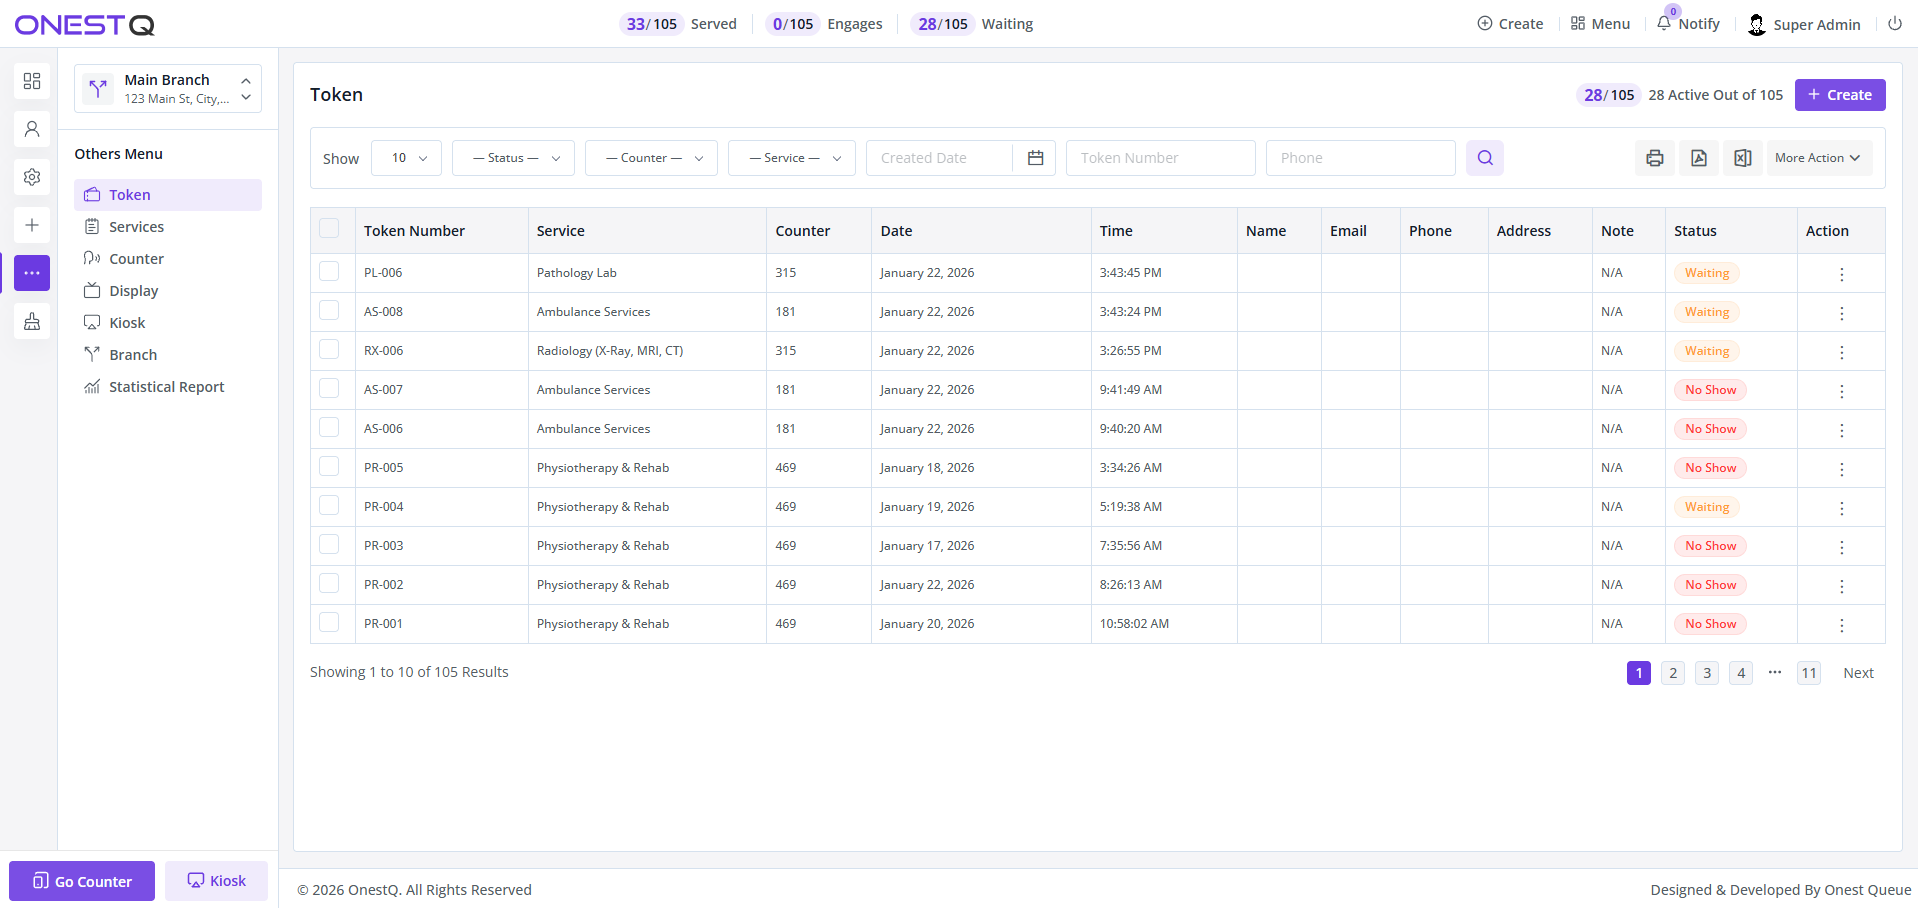
Token list showing all tokens with comprehensive filters and action options.
Token Details & Actions
Click the action menu (⋮) on any token row to access detailed information and perform operations:
- Details: View complete token information including timeline, status history, and customer data
- Print: Reprint the token ticket (useful if customer lost their original)
- Delete: Remove the token (use with caution - restricted by permissions)
- Logs: View audit trail of all actions performed on this token
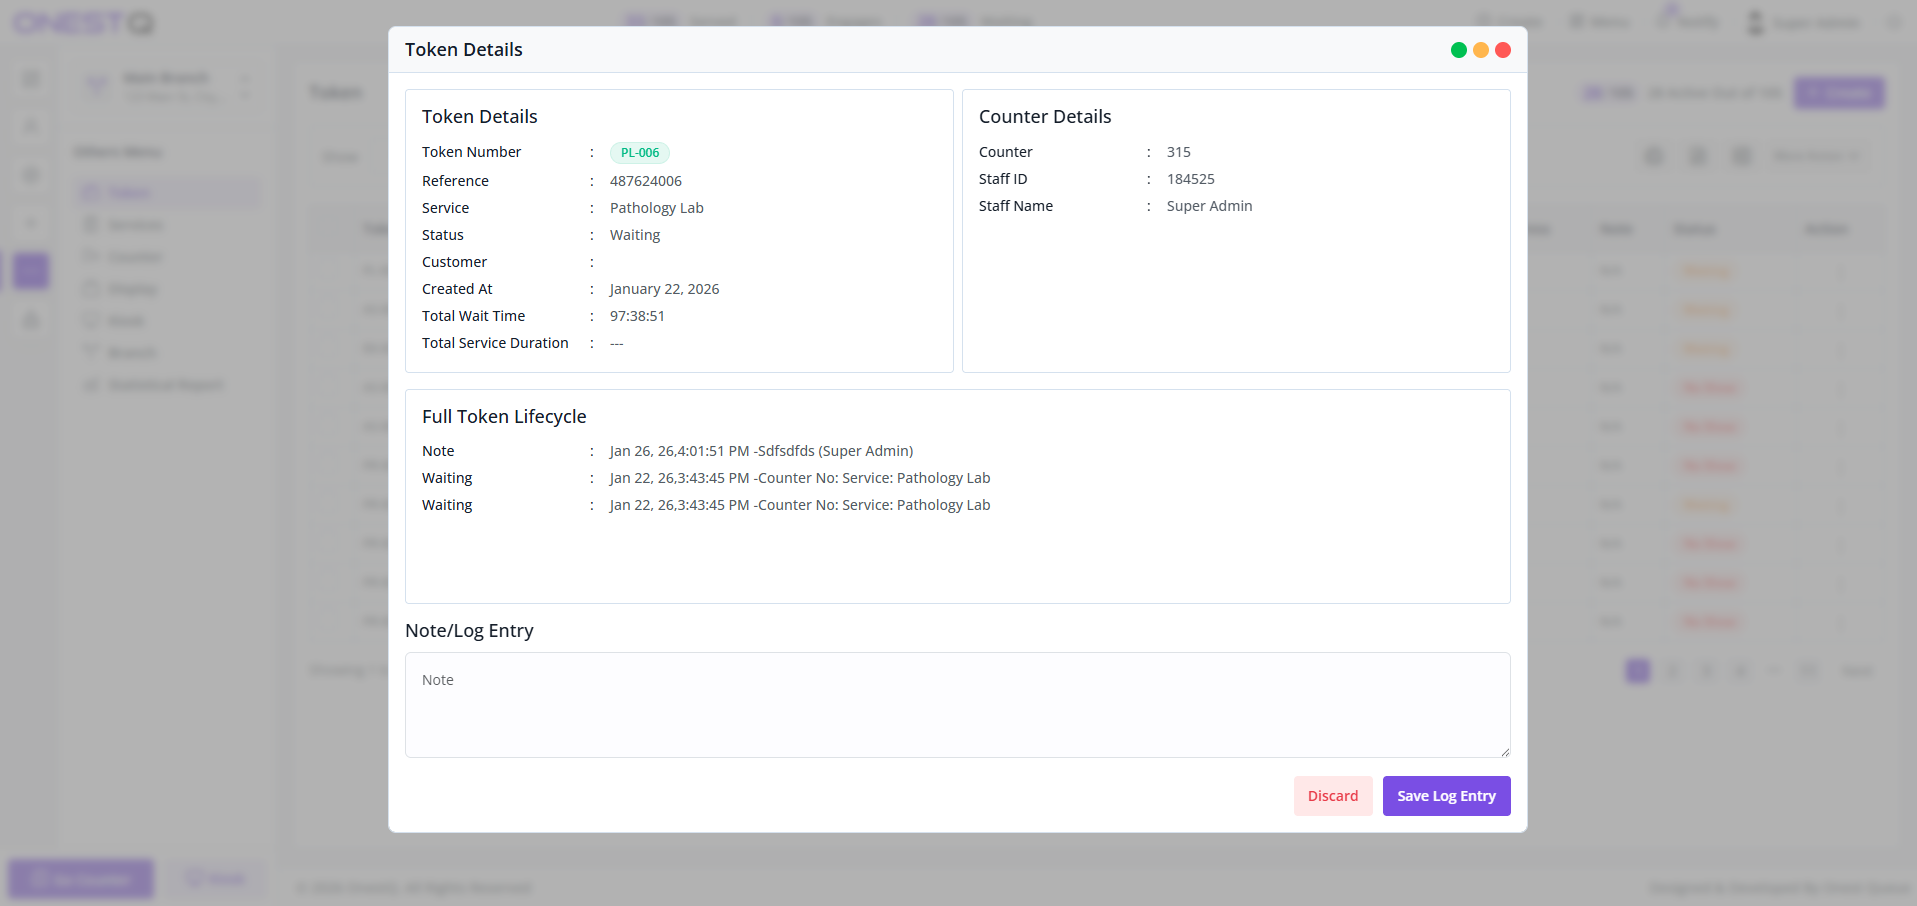
Token details showing comprehensive information and status timeline.
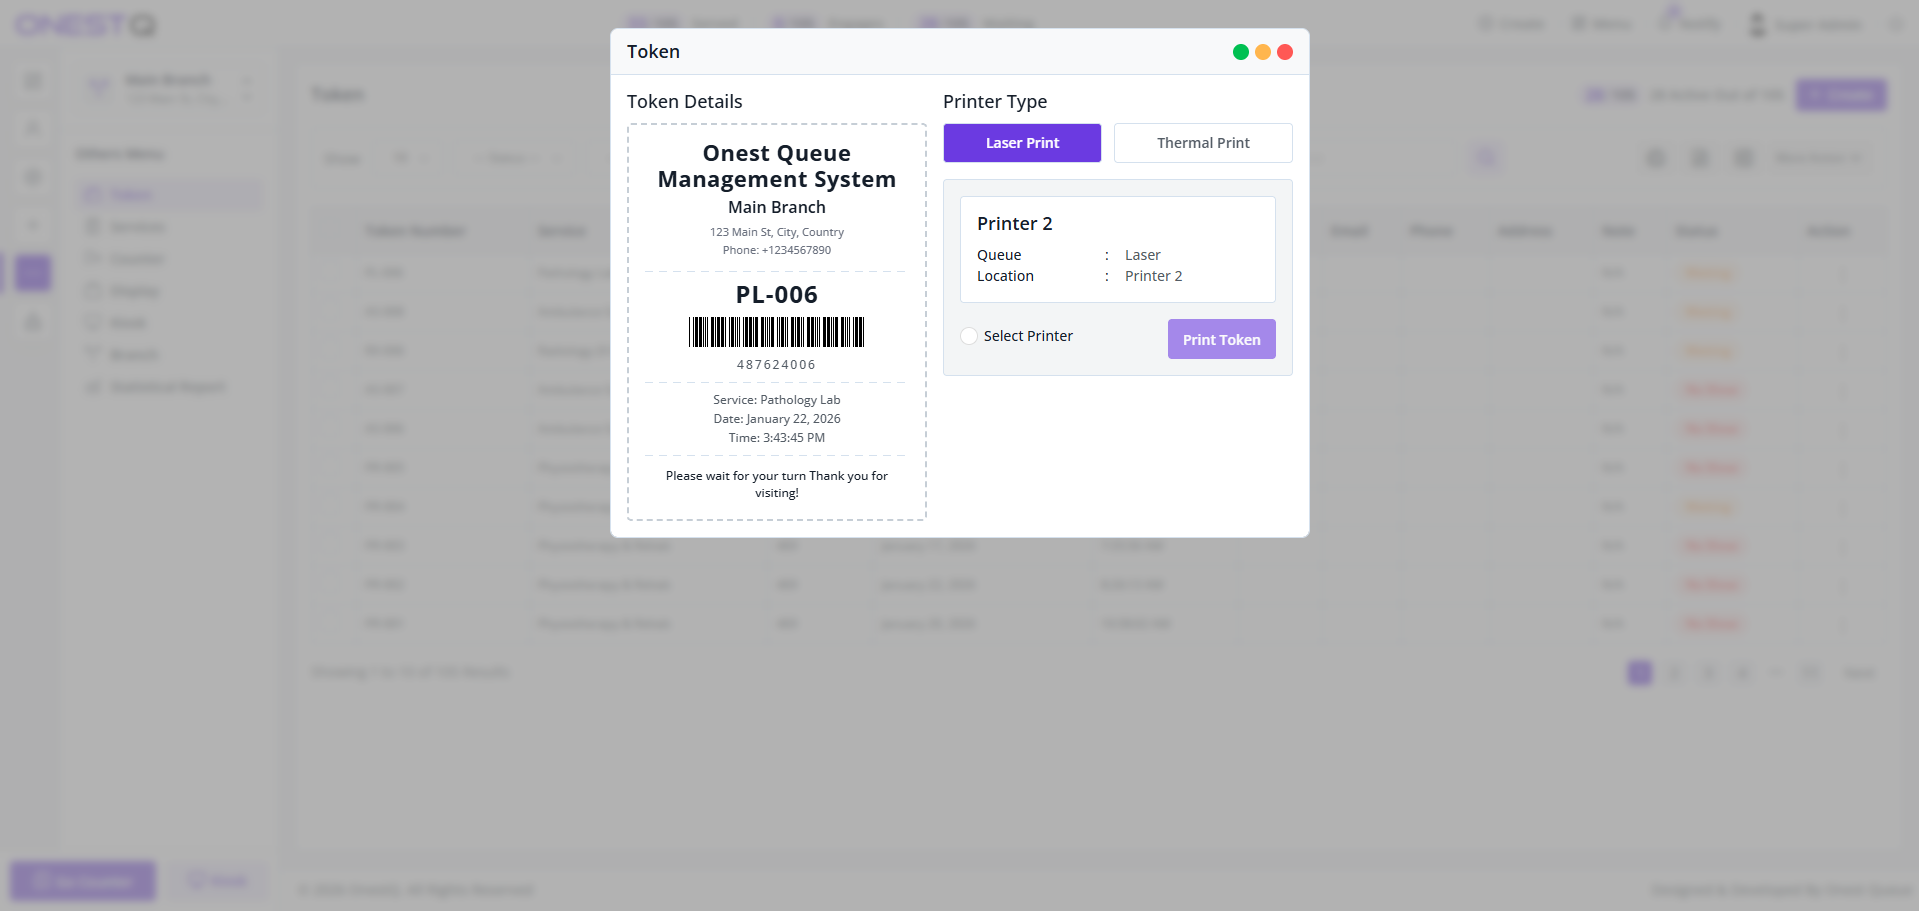
Print token preview showing formatted ticket ready for printing.
Token Status Lifecycle
Tokens move through several statuses: Waiting (customer in queue) → Called (announced to customer) → Serving (actively being served) → Served (completed). Exceptions include No-Show (customer didn't arrive), Cancelled (token cancelled by staff), and Transferred (moved to different service).
Service management
Services define the types of customer assistance available at your facility. Each service represents a queue type that customers can select when generating a token. Services are the foundation of your queue management workflow.
Navigate to Services in the Others Menu to manage services, service categories, and service-specific settings.
Service List & Configuration
The Service list shows all available services with key information:
- Service Name: Display name shown to customers
- Service Category: Grouping for related services
- Prefix: Letter/number prefix for token numbering (e.g., A, B, C1)
- Starting Number: Initial token sequence number
- Status: Active or Inactive
- Branch: Which branch this service belongs to
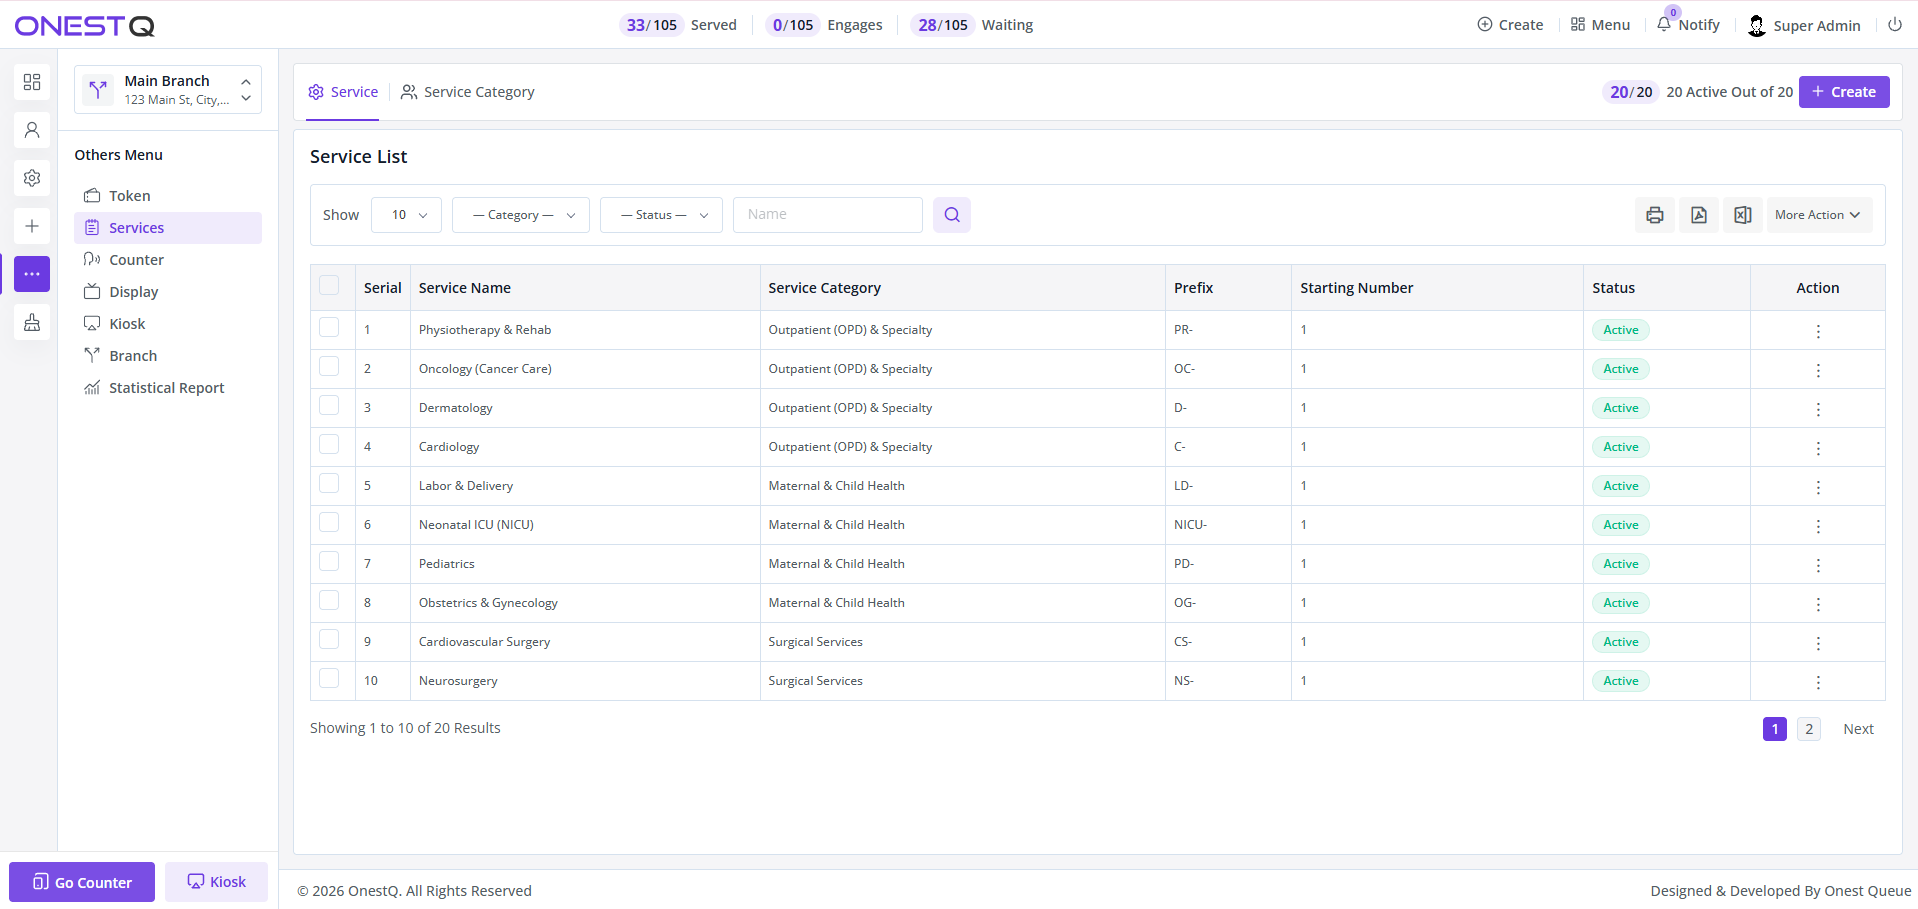
Service list showing all configured services with categories and prefixes.
Creating a New Service
When creating a service, you'll configure:
- Basic Info: Service name, description, branch assignment
- Category: Select or create a service category for organization
- Token Prefix: Define the letter/number that appears on tokens (e.g., "A" generates A-001, A-002...)
- Starting Number: Set initial sequence (usually 1)
- Status: Set active/inactive (only active services appear in Kiosk)
- Additional Settings: Optional configurations like estimated service time, priority, etc.
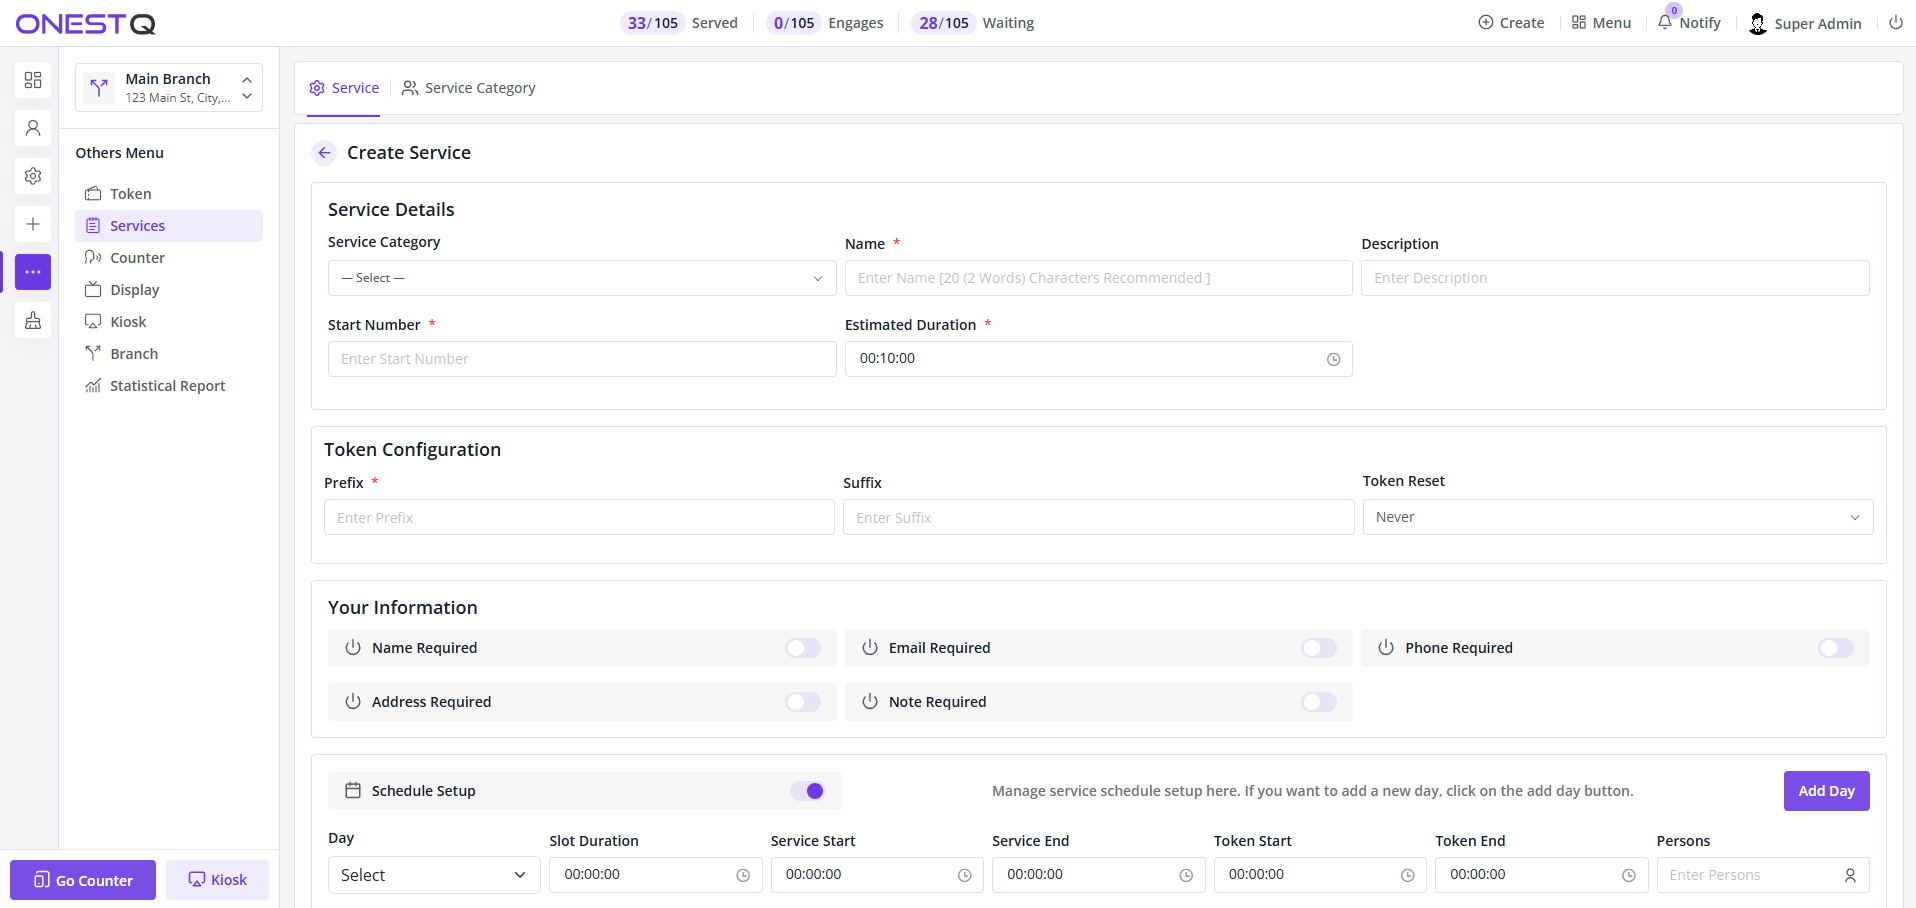
Create new service form with all configuration options.
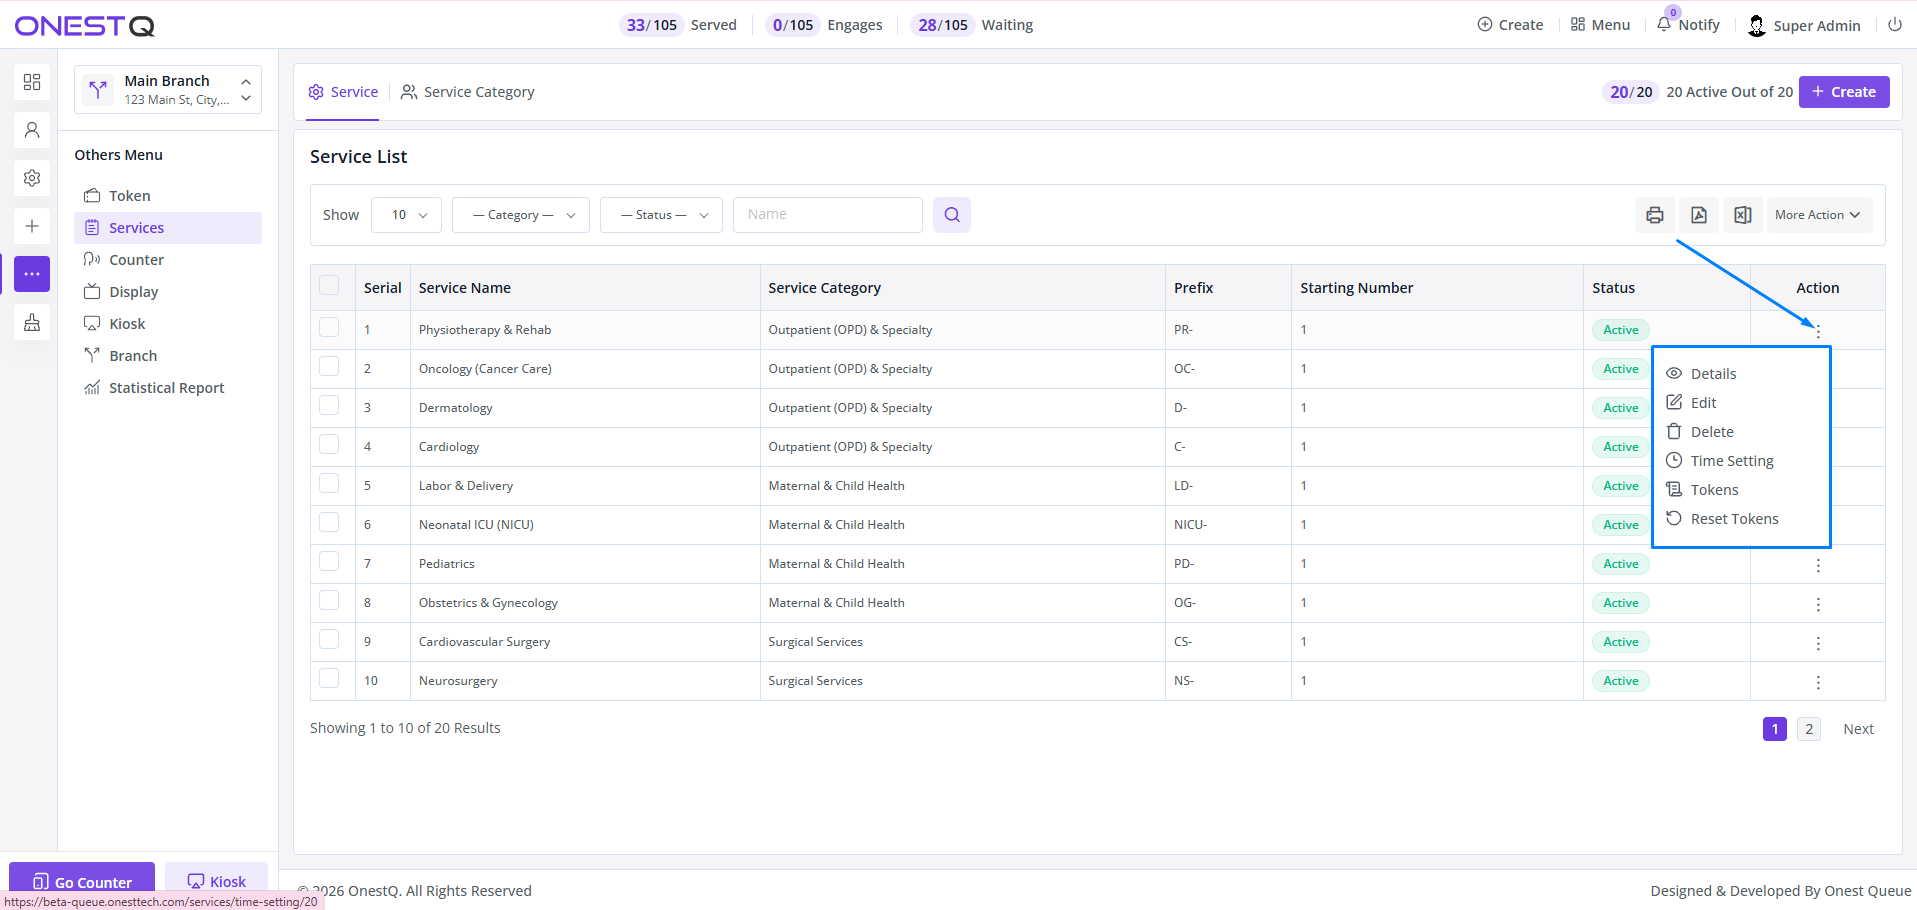
Service action menu with options for time settings, viewing tokens, and resetting.
Service Categories
Service categories help organize services into logical groups, making it easier for customers to find the right service on the Kiosk. For example, a hospital might have categories like "Emergency & Trauma", "Diagnostic & Imaging", "Surgical Services", etc., with multiple specific services under each category.
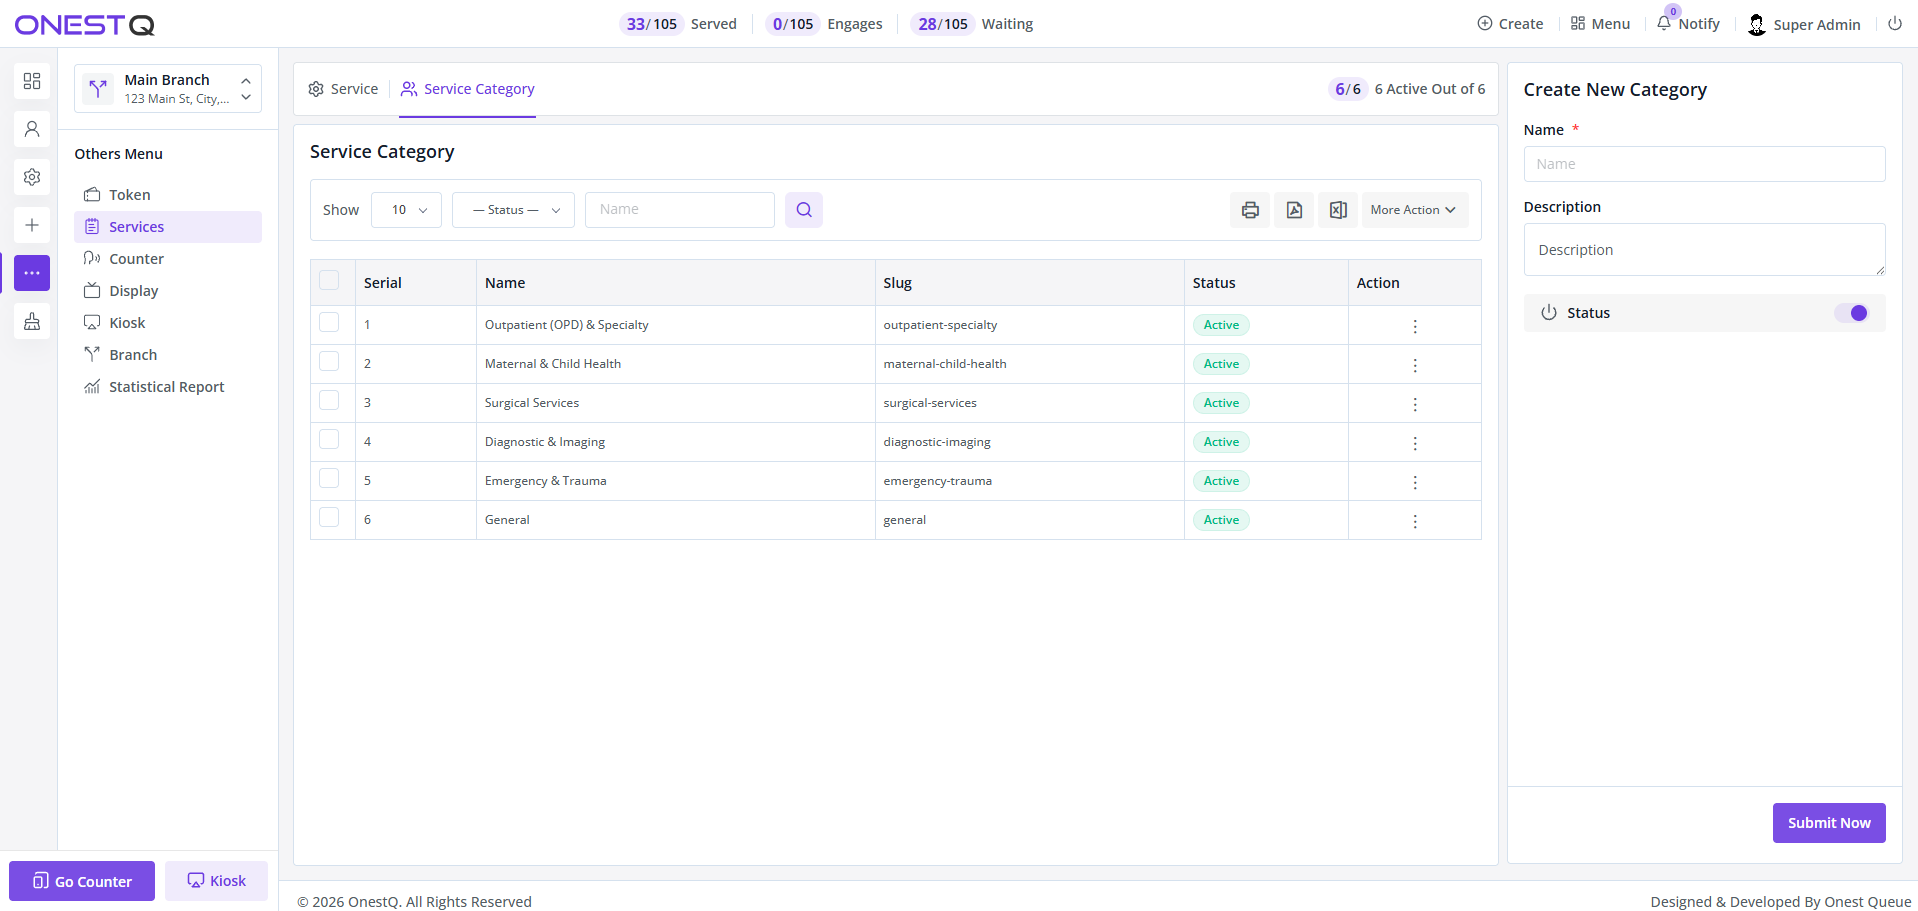
Service category management for organizing services into groups.
Service Planning Tips
- Use distinct prefixes for different service types (A, B, C, etc.)
- Group related services under categories for better customer experience
- Set realistic estimated service times for accurate wait time predictions
- Regularly review and deactivate unused services to keep the Kiosk interface clean
Counter management
Counters represent the physical service points (desks, windows, stations) where staff members serve customers. Each counter can handle one or multiple services and must be assigned to staff members who operate it.
Navigate to Counter in the Others Menu to manage counters, assign services, and configure counter settings.
Counter List & Overview
The Counter list provides a comprehensive view of all service points:
- Serial: Counter number/identifier
- Name: Counter display name
- Location: Physical location description
- Assigned Staff: Users authorized to operate this counter
- Service Status: Which services this counter can handle
- Status: Active or Inactive
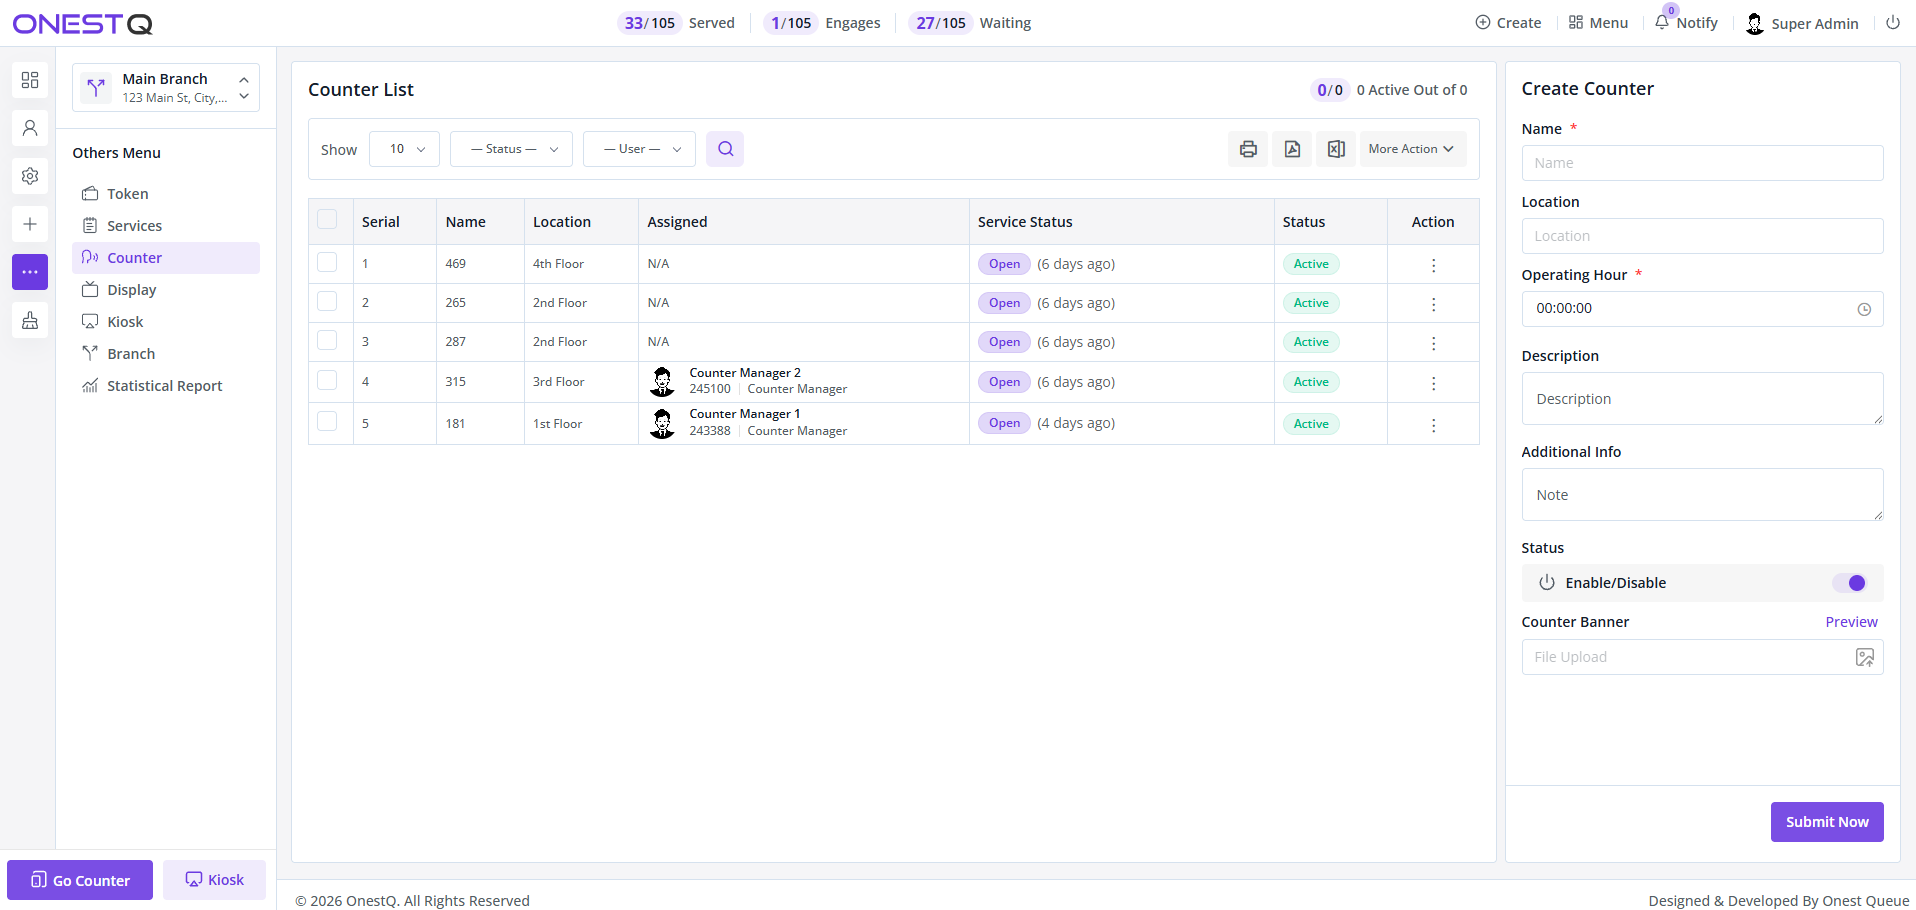
Counter list showing all configured counters with their details and create option.
Counter Actions & Details
From the action menu (⋮), you can access various counter management functions:
- Details: View complete counter information and current status
- Settings: Configure service assignments and operational parameters
- Assign Staff: Manage which users can operate this counter
- Edit: Update counter name, location, and basic info
- Delete: Remove counter (if not in use)
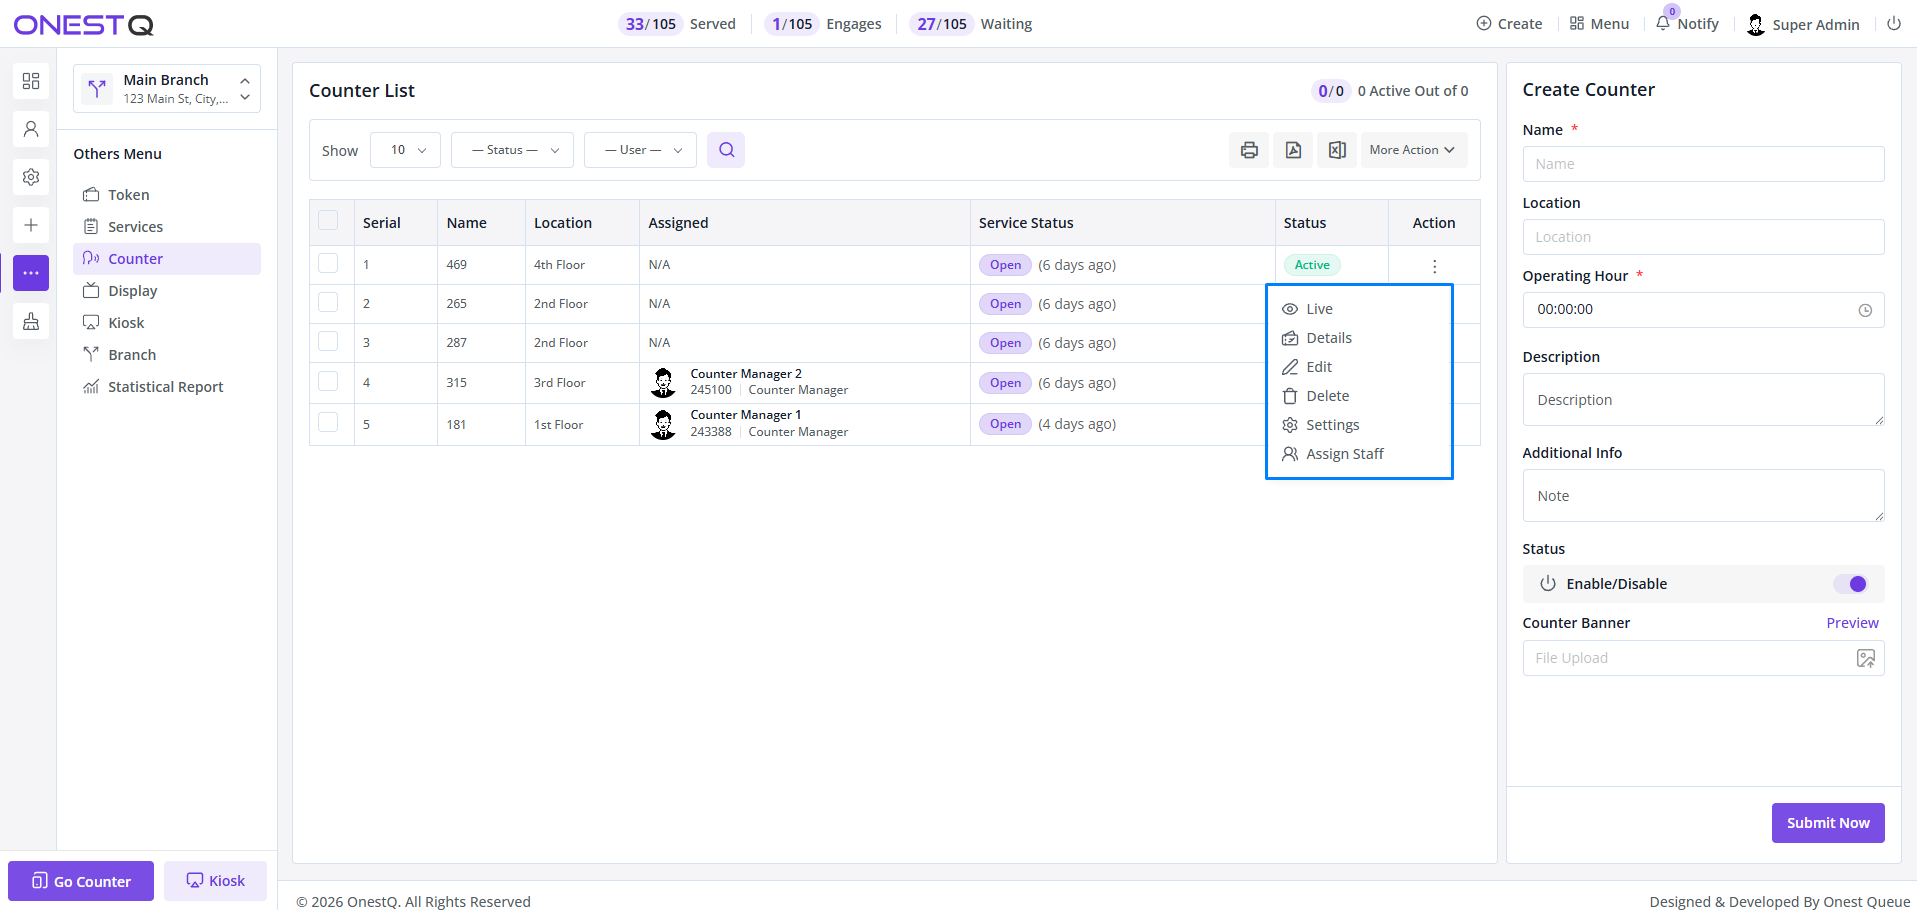
Counter action menu showing available operations.
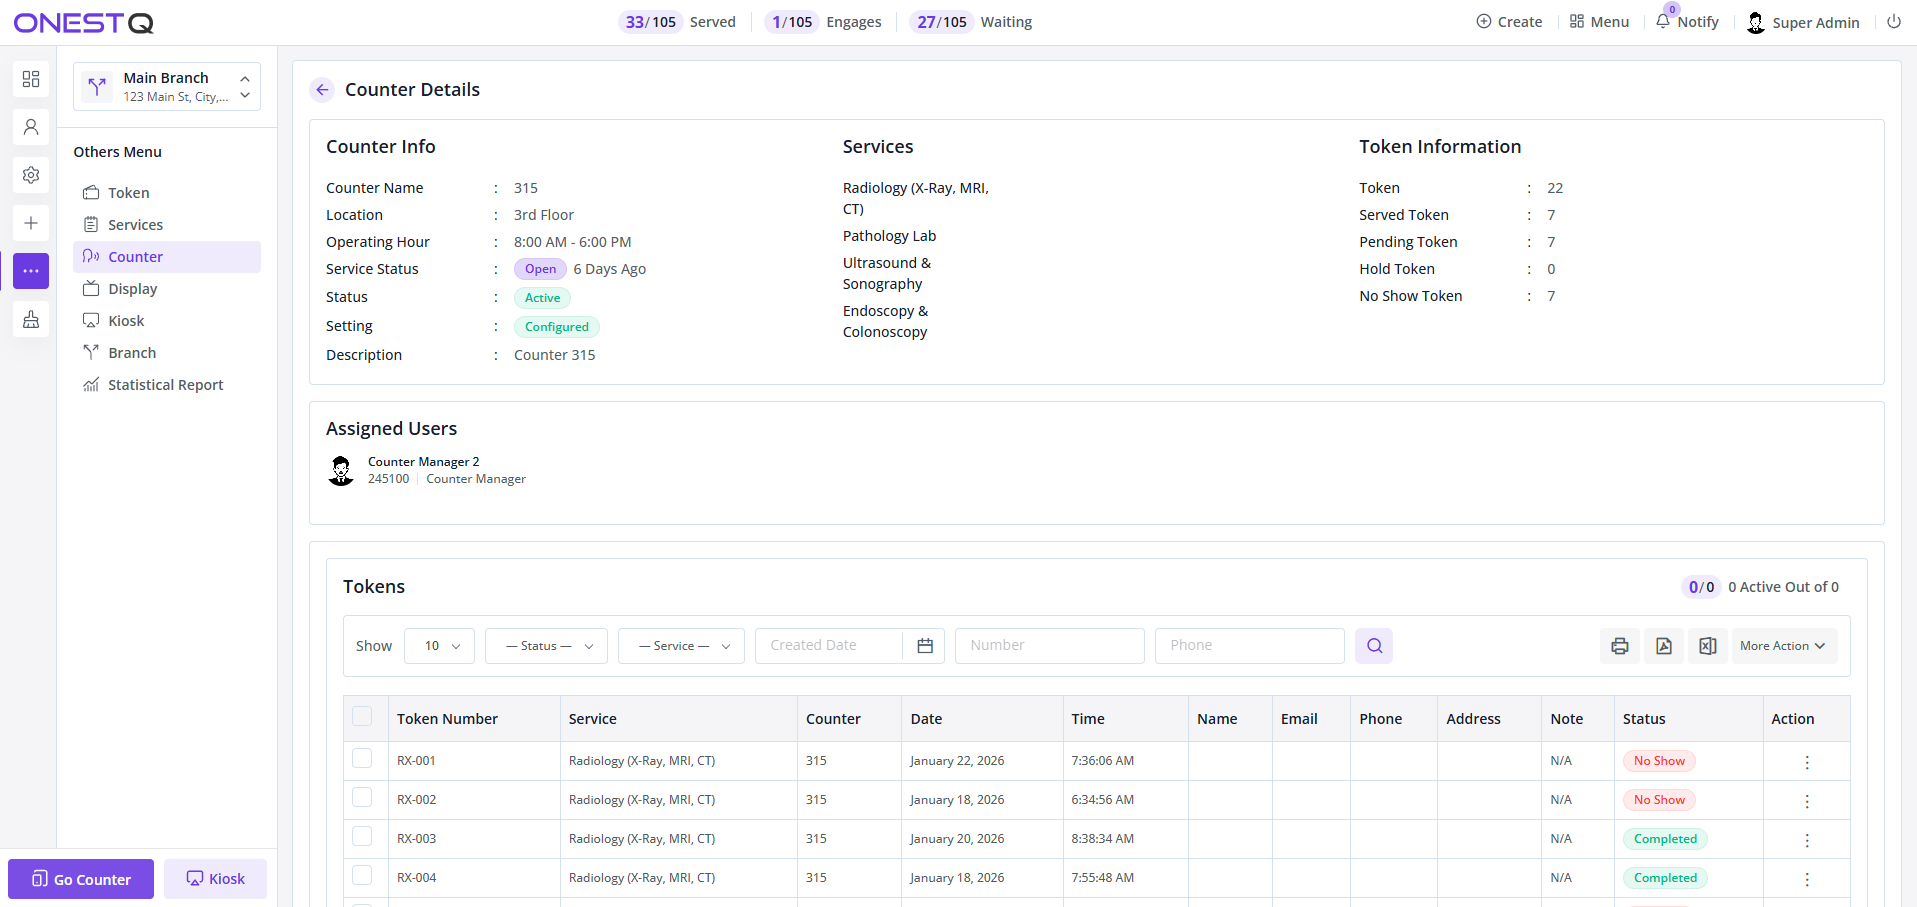
Counter details view showing comprehensive configuration and status.
Service Assignment
One of the most important counter configurations is service assignment. This determines which services a counter can handle. You can configure a counter to:
- Handle a single specific service (specialized counter)
- Handle multiple services (multi-purpose counter)
- Handle all services from the branch (flexible counter)
The system will only route tokens to counters configured for that service. This ensures customers are directed to the appropriate service point.
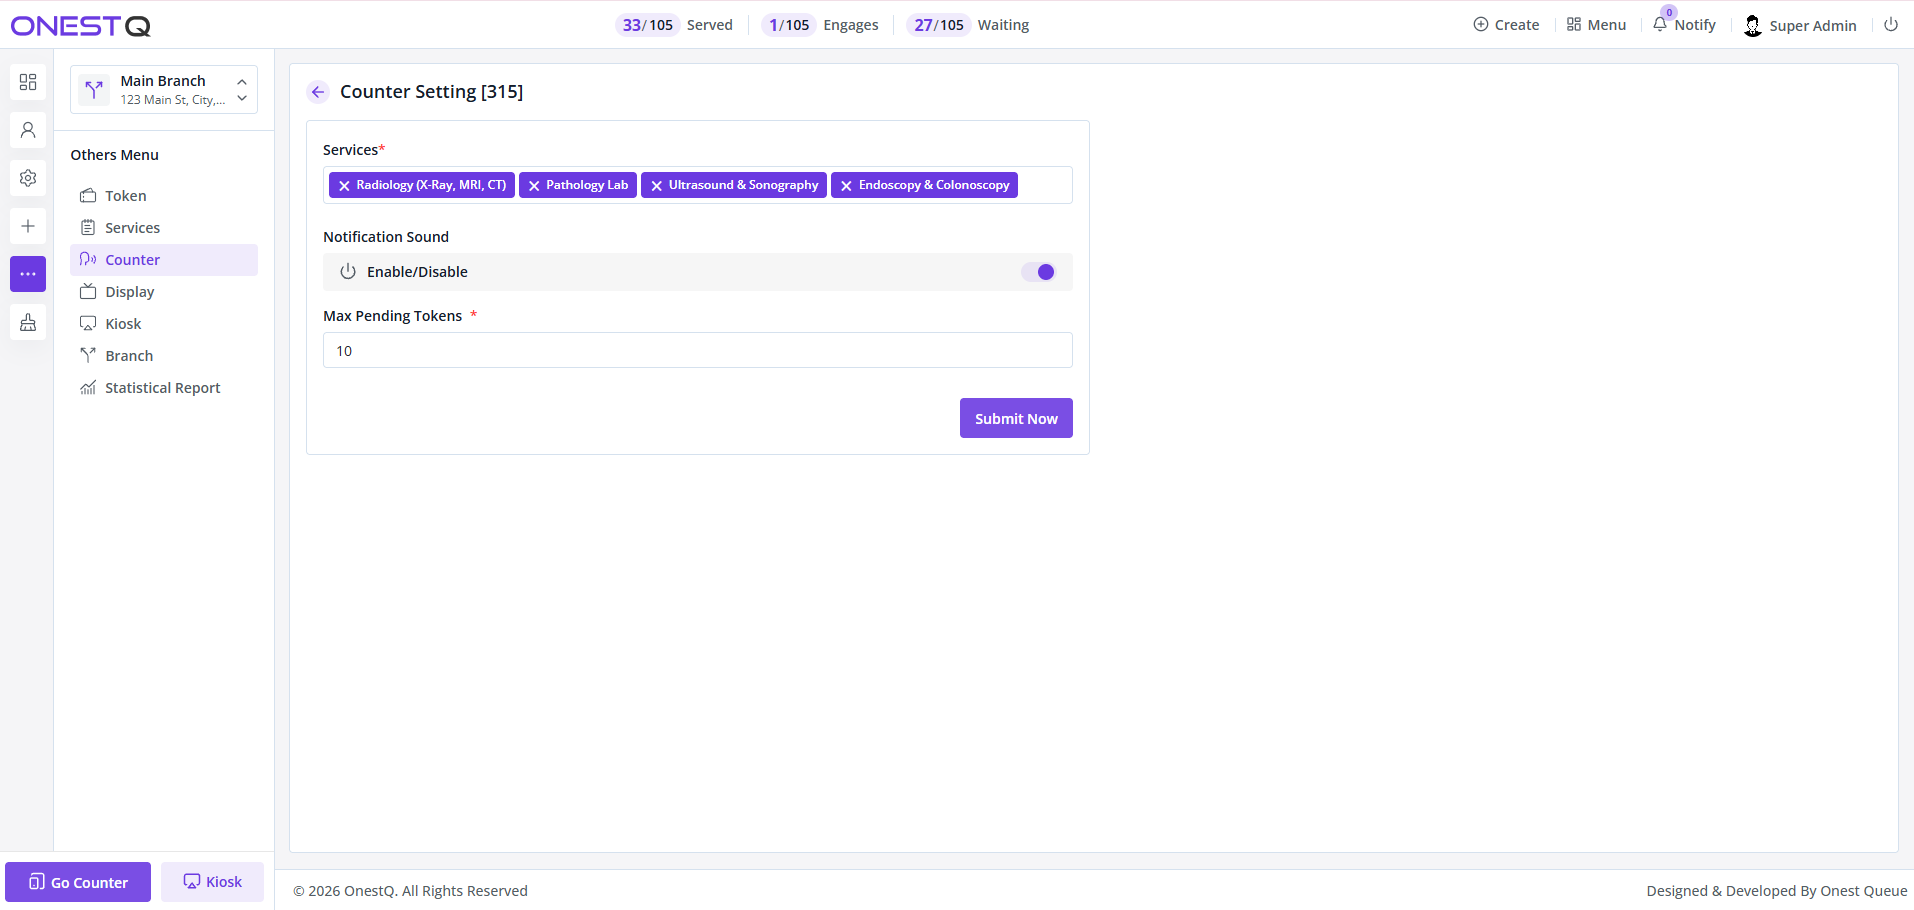
Service assignment configuration - select which services this counter can handle.
Staff Assignment
Assign specific staff members to each counter. Only assigned staff can log into the counter panel and serve customers from that counter. This provides accountability and helps track individual staff performance.
You can assign multiple staff members to a single counter (for shift rotations) and a single staff member to multiple counters (for flexible staffing).
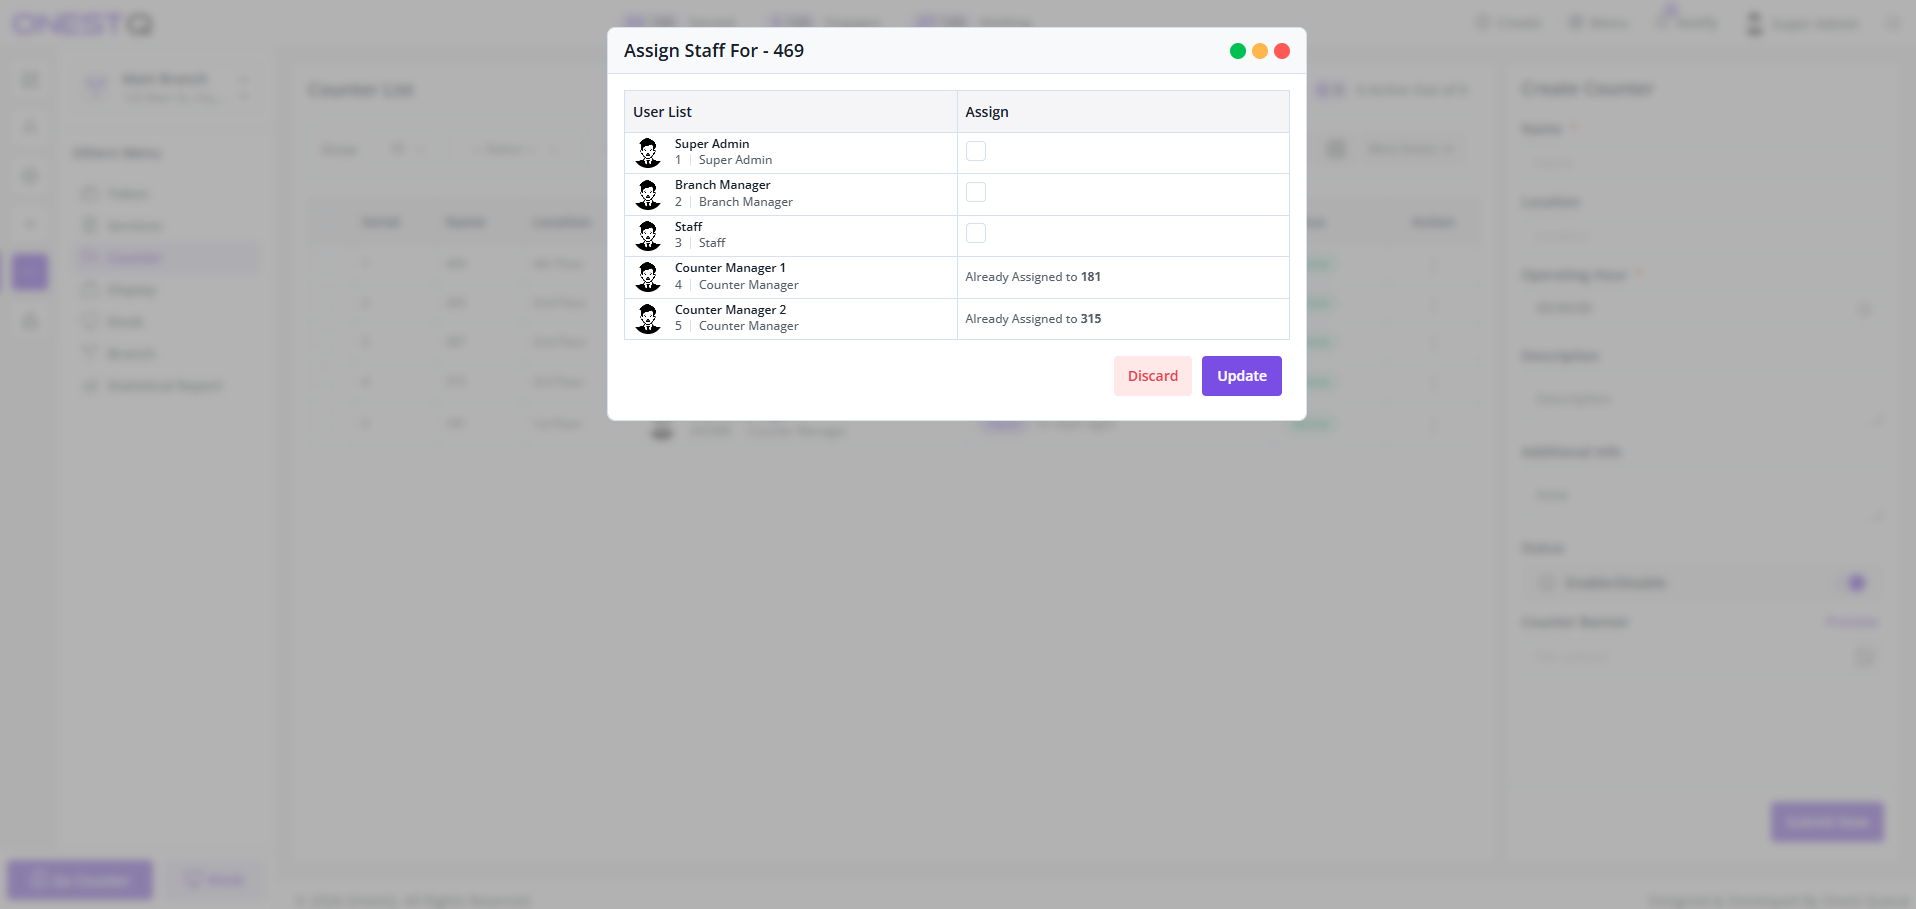
Staff assignment interface showing available users and assigned staff members.
Branch management
Branches represent different physical locations or operational units of your organization. Multi-branch support allows you to manage queues, services, counters, and staff separately for each location while maintaining centralized oversight.
Navigate to Branch in the Others Menu to manage branches, configure branch settings, and view branch-specific dashboards.
Branch List & Overview
The Branch list displays all operational locations:
- Branch Name: Display name for the location
- Address & Contact: Physical location and contact information
- Status: Active or Inactive
- Services: Number of services available at this branch
- Counters: Number of service points configured
- Staff: Users assigned to this branch
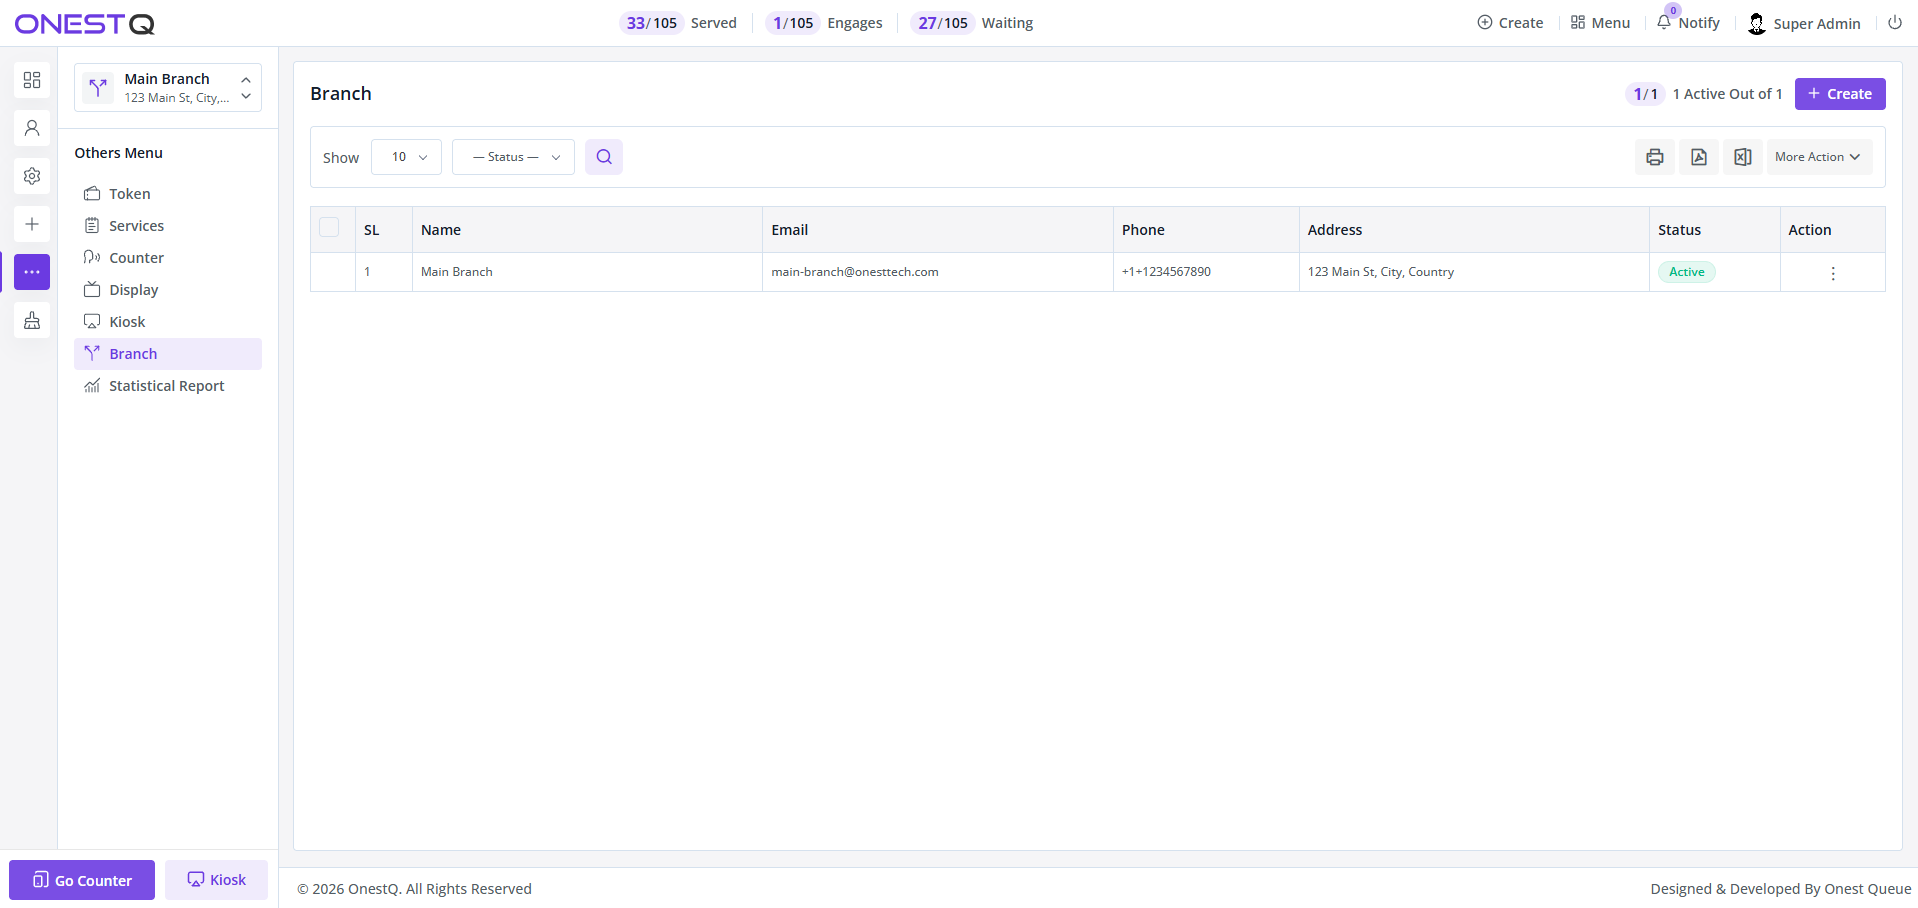
Branch list showing all configured branches with status and action options.
Branch Actions & Management
Each branch has dedicated management features accessible through the action menu:
- Dashboard: View branch-specific analytics and current operations
- Settings: Configure branch-specific parameters and preferences
- Edit: Update branch information, address, and contact details
- Delete: Remove branch (if no active services or staff assigned)
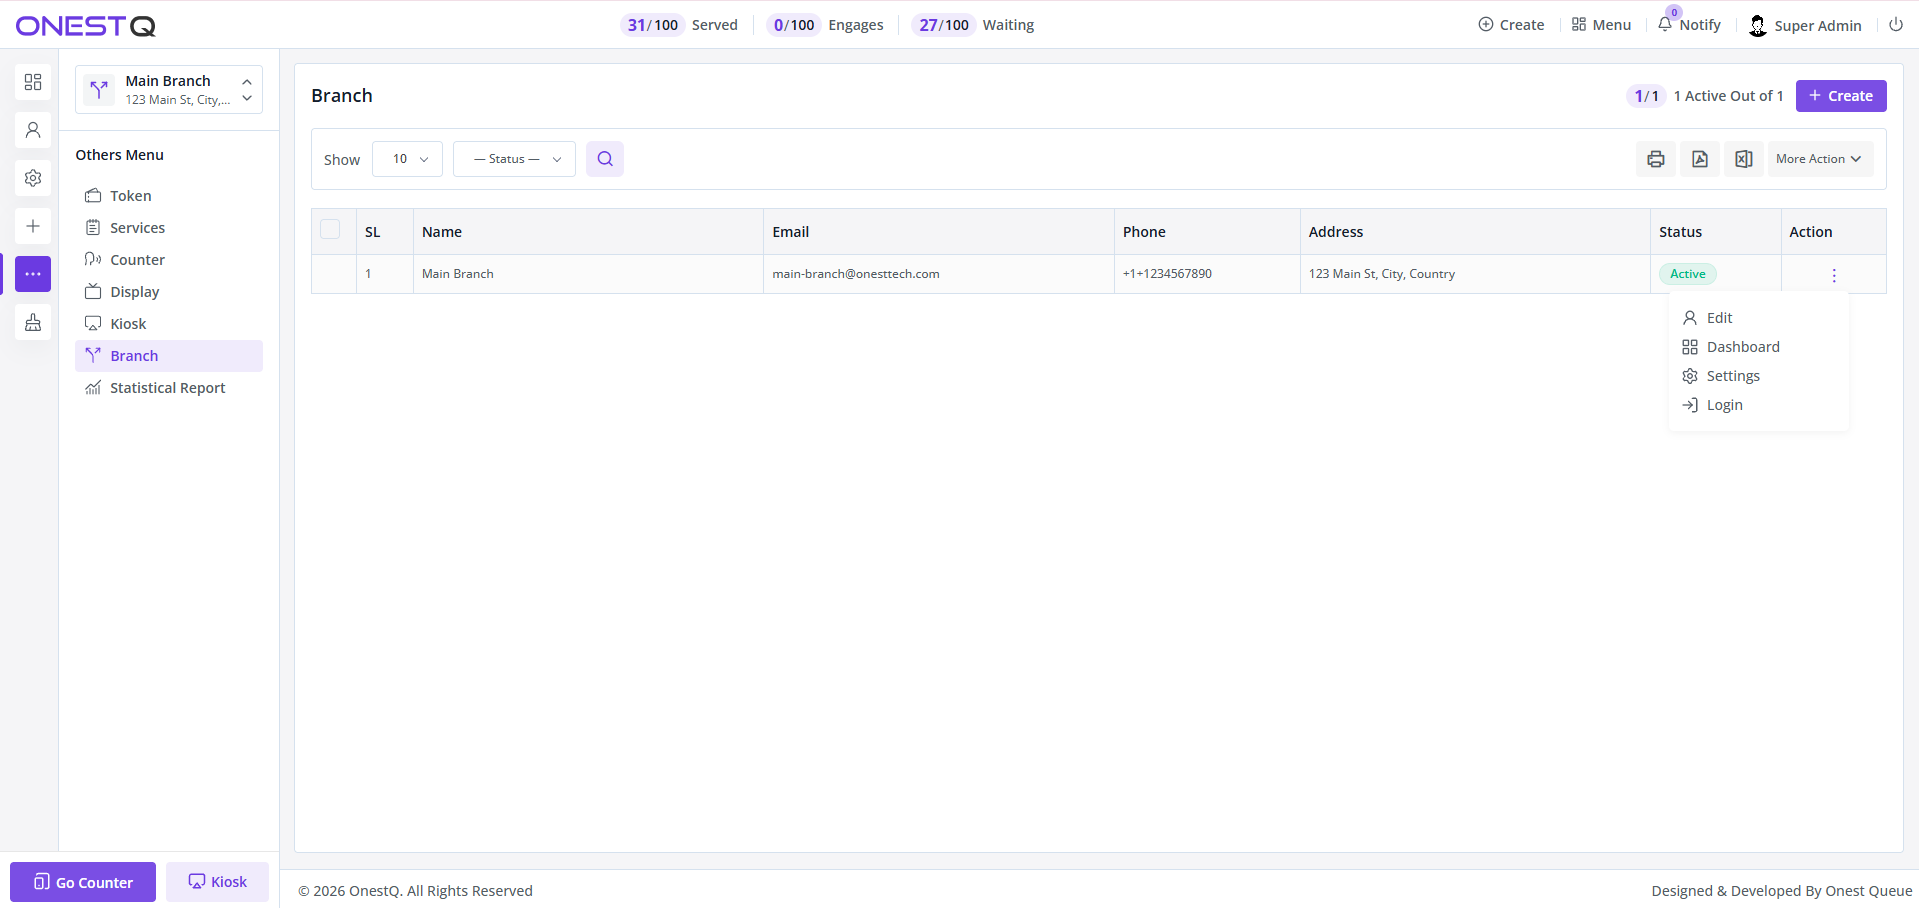
Branch action menu showing available management operations.
Creating a New Branch
When adding a new branch location:
- Provide basic information (name, code, address)
- Set contact details (phone, email)
- Configure operational hours
- Assign initial services and counters
- Set branch-specific preferences
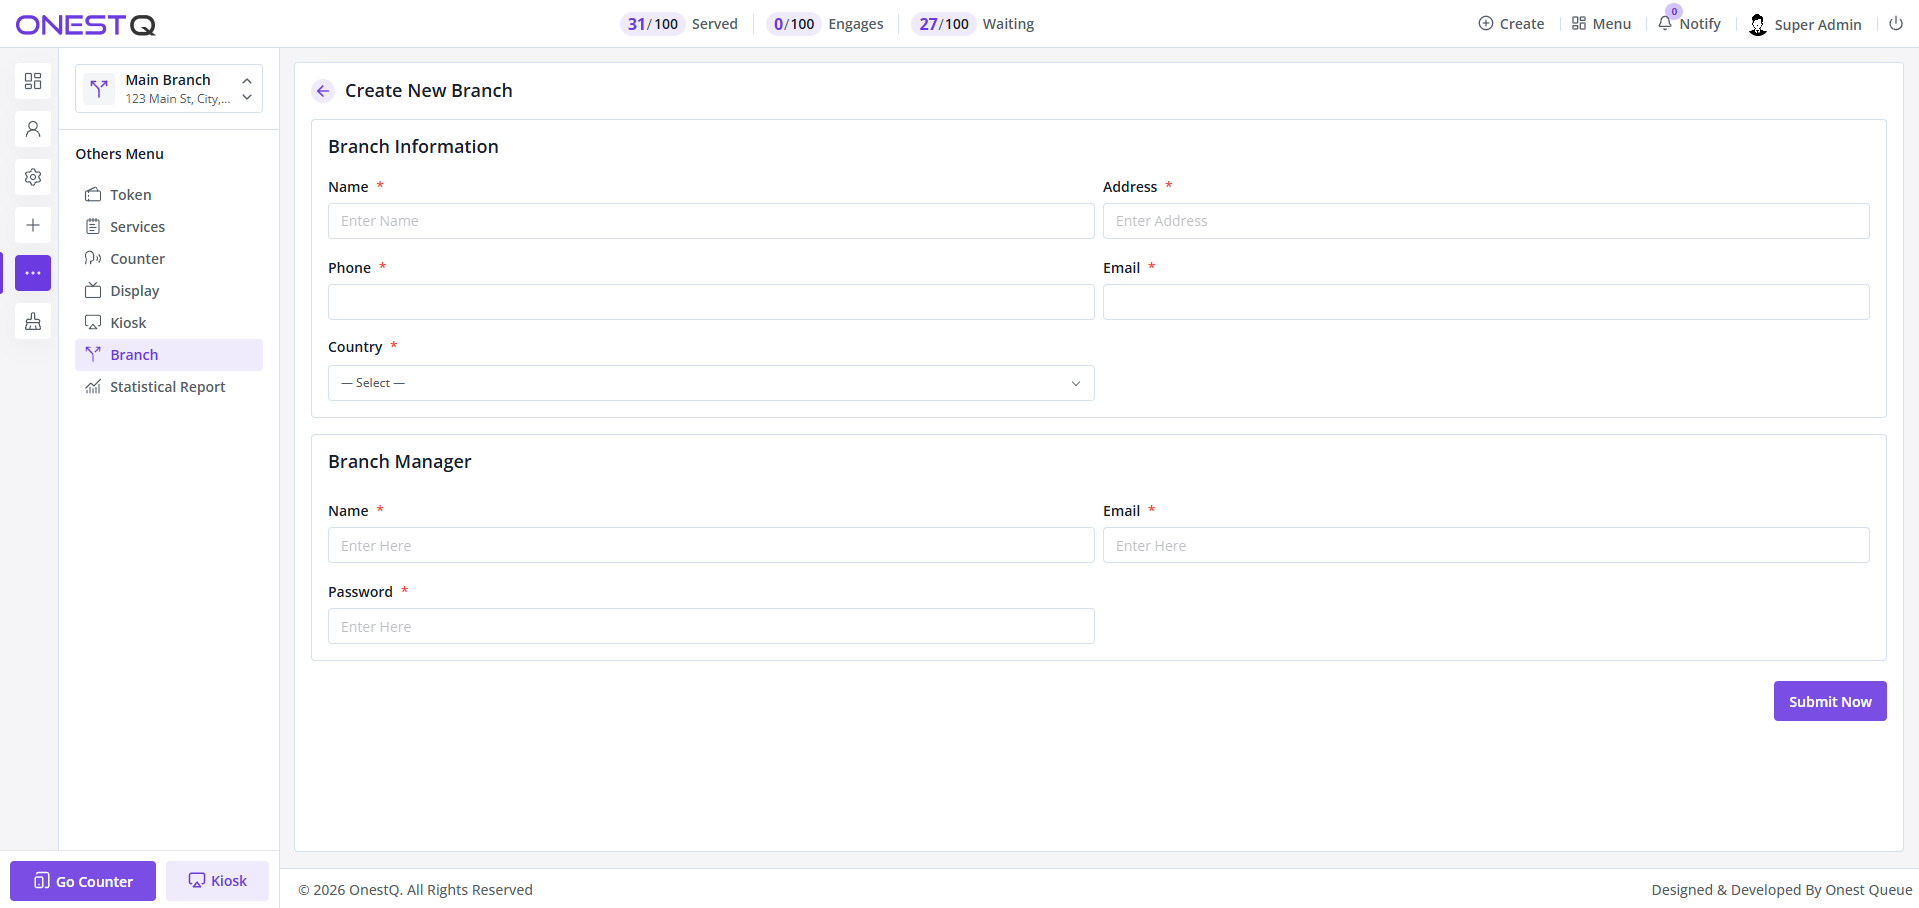
Create new branch form with all configuration fields.
Branch Dashboard
Each branch has a dedicated dashboard showing real-time statistics and operational metrics specific to that location. This helps branch managers monitor their location's performance independently.
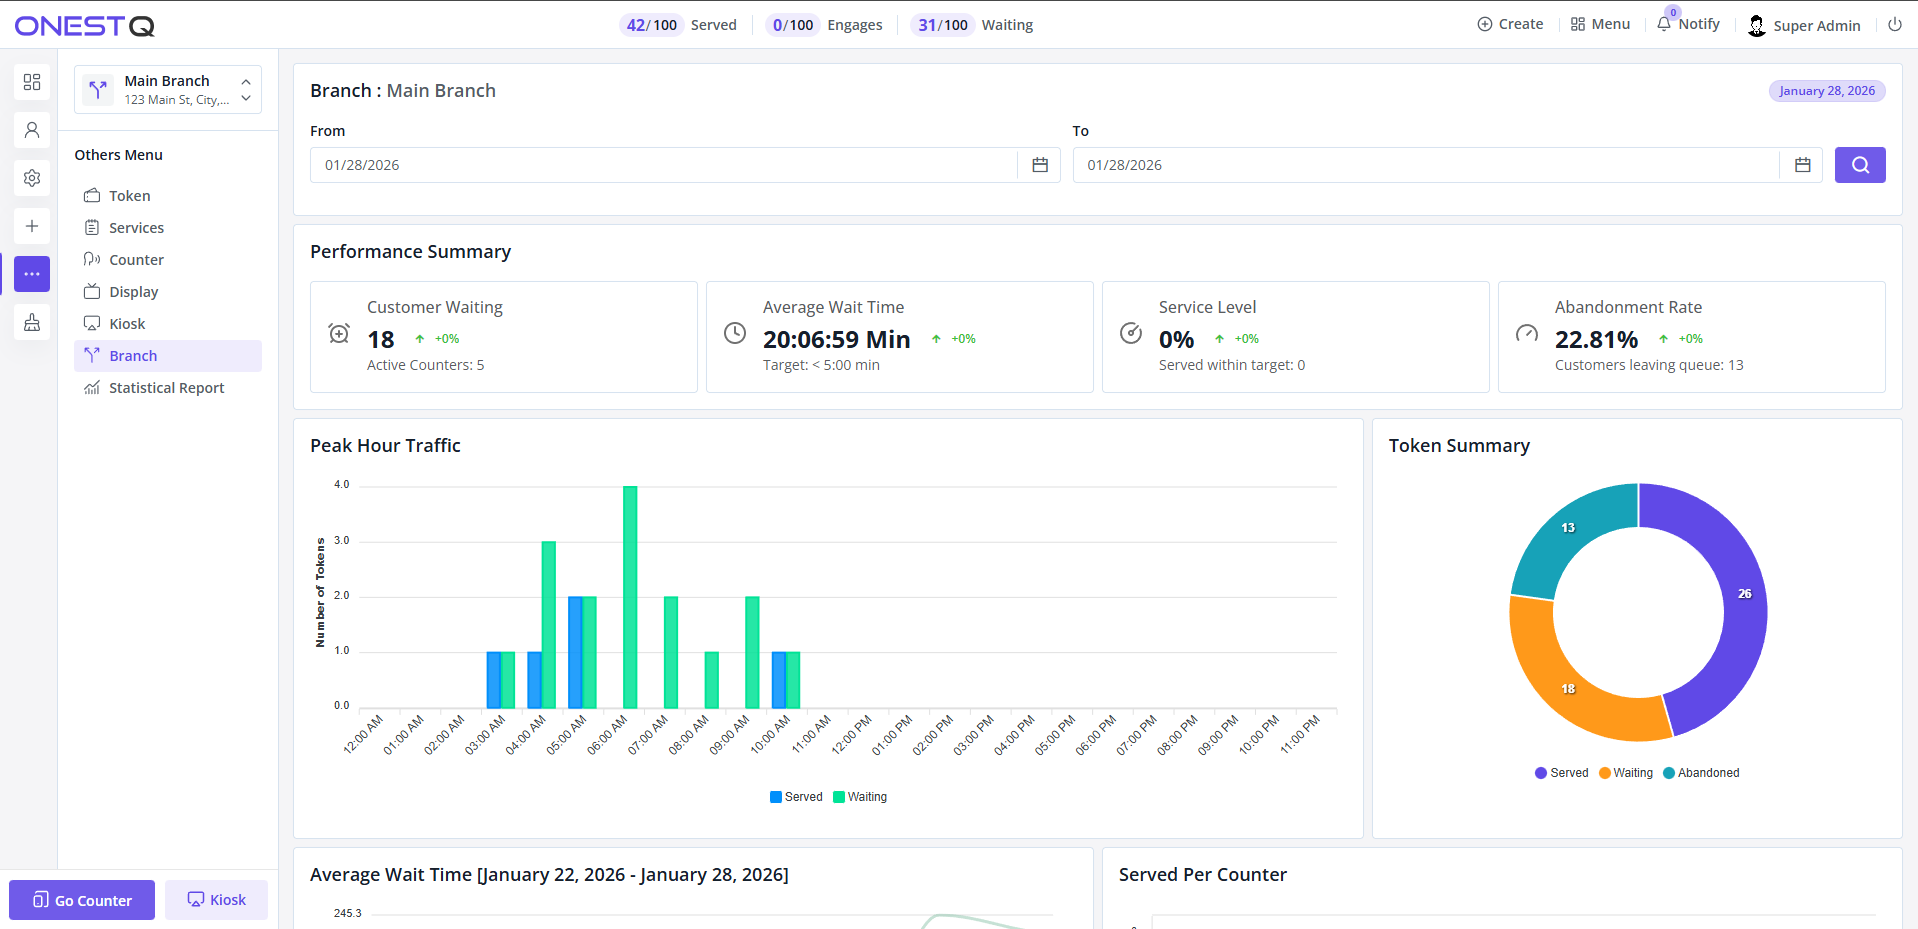
Branch-specific dashboard showing key metrics and operations.
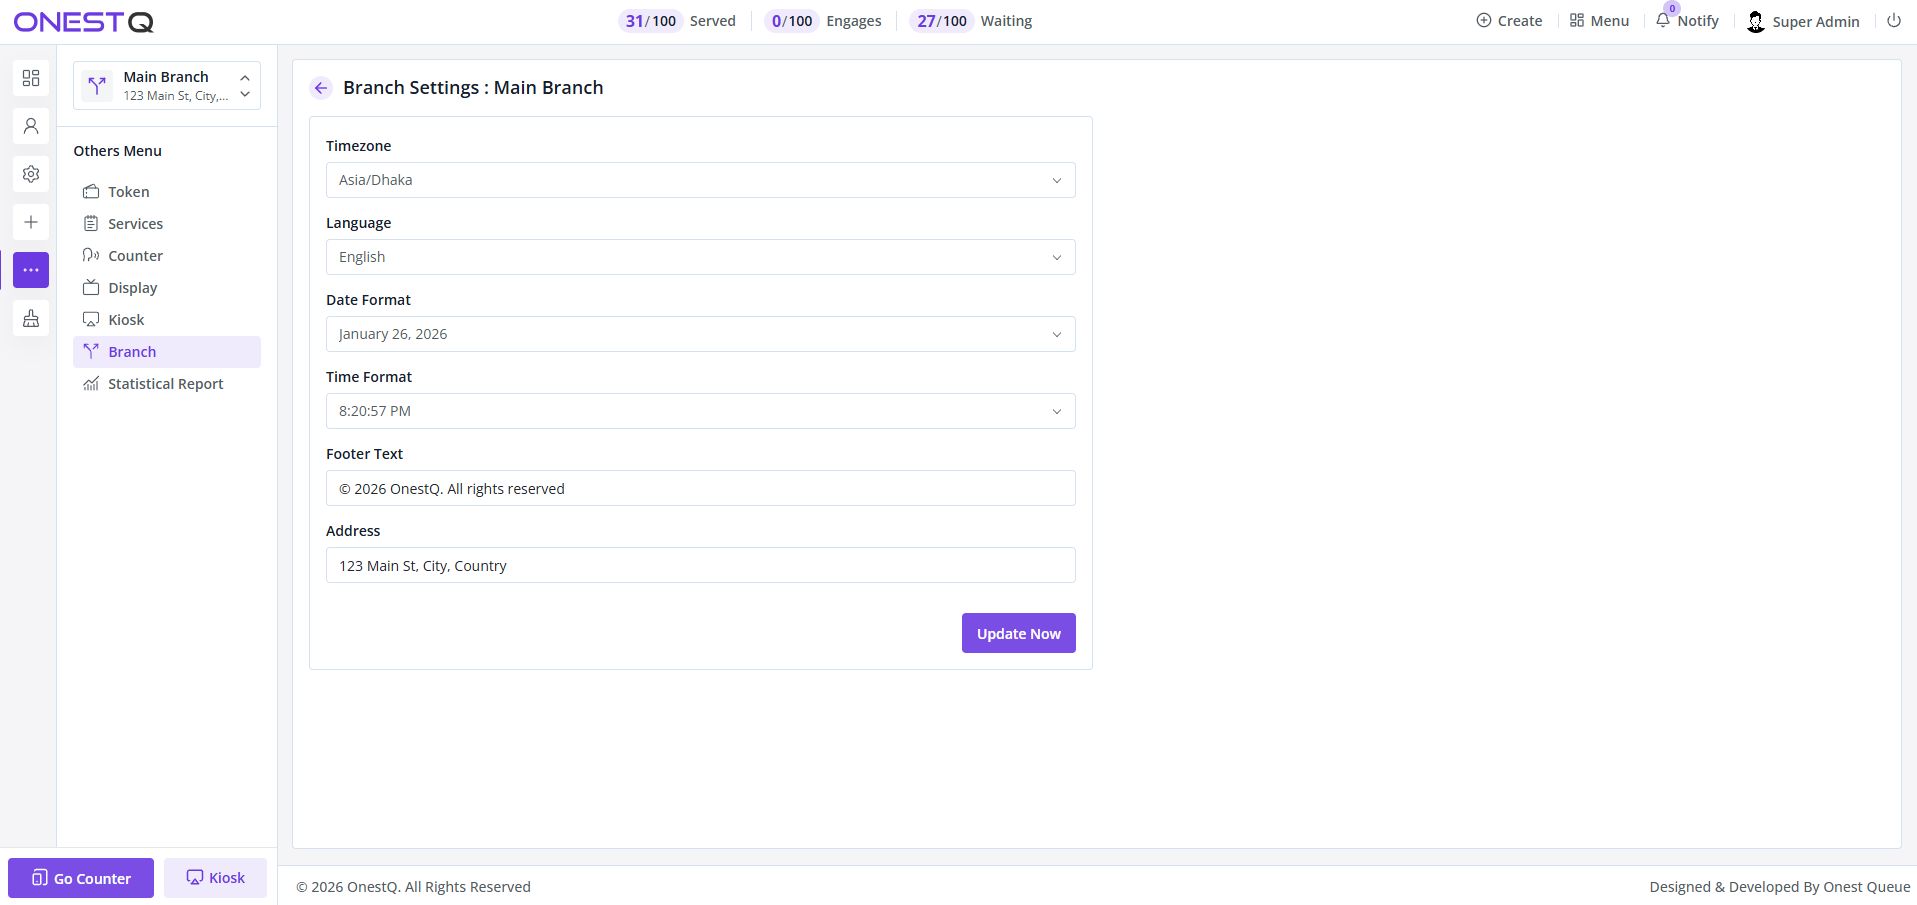
Branch settings configuration for location-specific preferences.
Multi-Branch Benefits
- Independent queue management for each location
- Location-specific reporting and analytics
- Centralized oversight with local autonomy
- Staff and service assignment by branch
Reports & analytics
The Reports & Analytics module provides comprehensive insights into your queue management operations. Use statistical reports and dashboard charts to monitor performance, identify bottlenecks, and make data-driven decisions.
Navigate to Reports in the menu to access various report types including KPI Dashboard, Staff Performance, Service Efficiency, and Counter Utilization.
KPI Dashboard Report
The KPI (Key Performance Indicator) Dashboard provides a comprehensive overview of your queue management system's performance:
- Token Volume: Total tokens generated, served, and pending over selected time periods
- Wait Times: Average and maximum wait times across services and branches
- Service Times: Average service duration by service type and counter
- No-Show Rates: Percentage of customers who didn't arrive after taking a token
- Trend Analysis: Visual charts showing performance trends over time
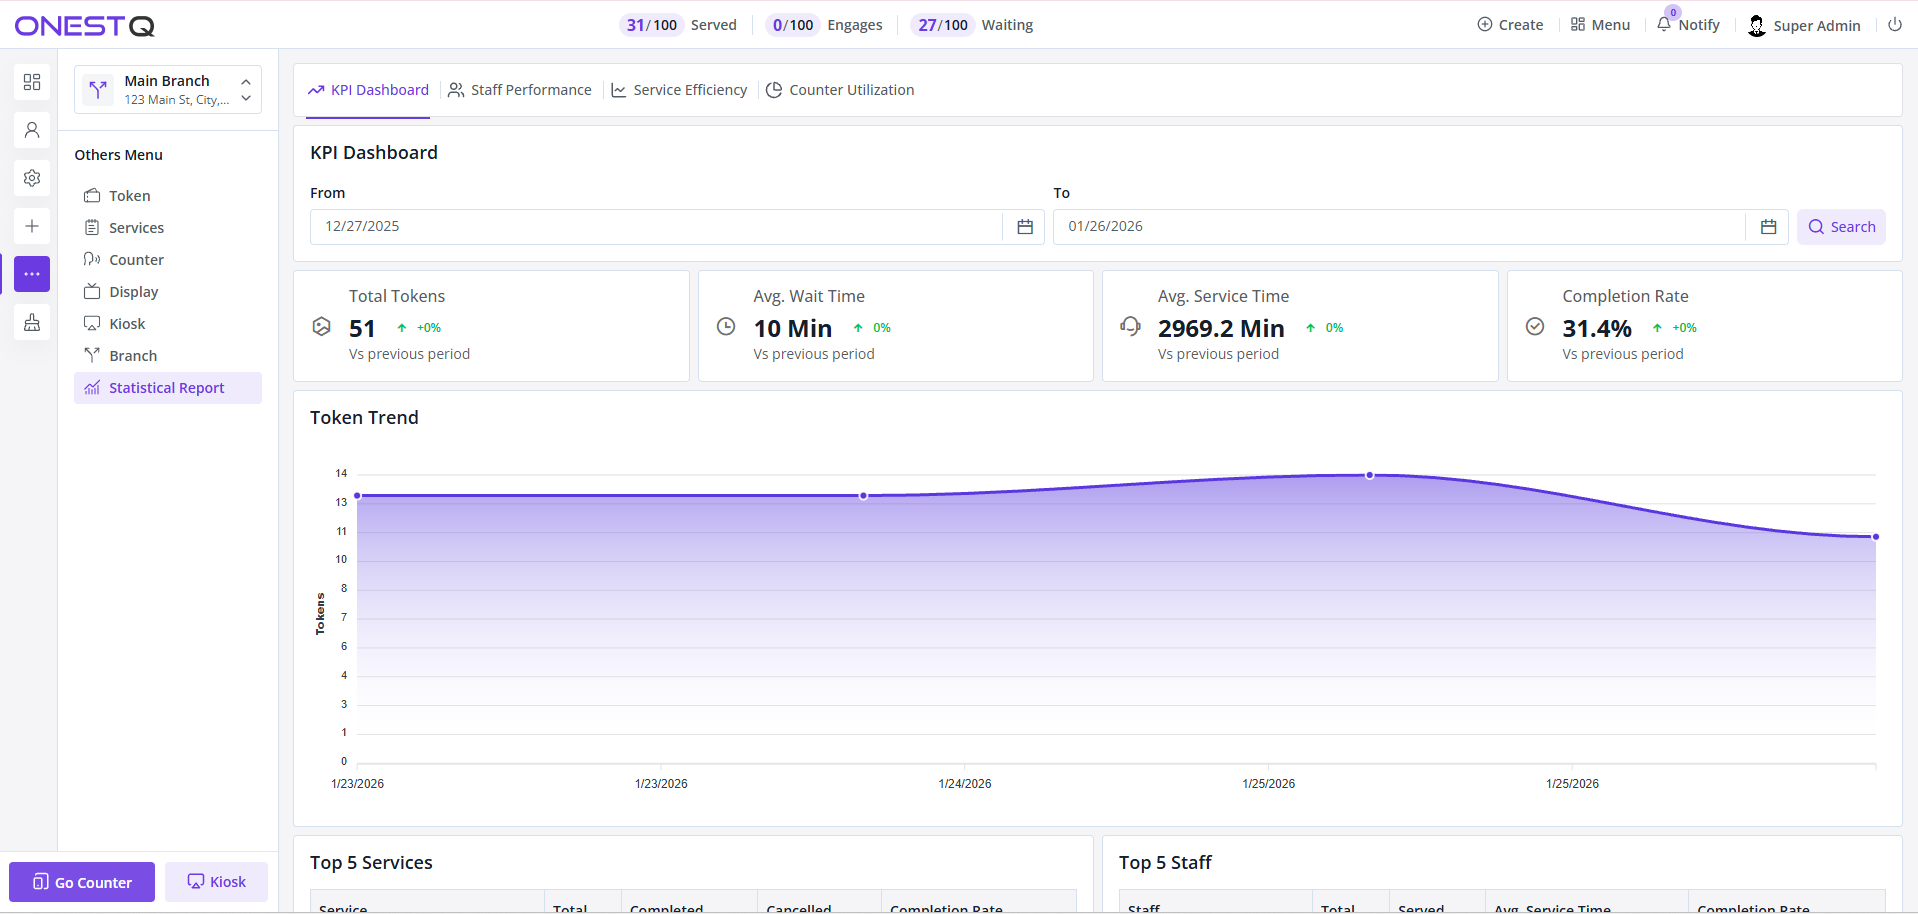
KPI Dashboard showing comprehensive system performance metrics and charts.
Staff Performance Report
Track individual and team performance with detailed staff analytics. This report shows:
- Tokens served per staff member
- Average service time by user
- Staff utilization rates
- Performance comparisons across the team
- Productivity trends over time
Use this report to identify high performers, spot training opportunities, and ensure balanced workload distribution.
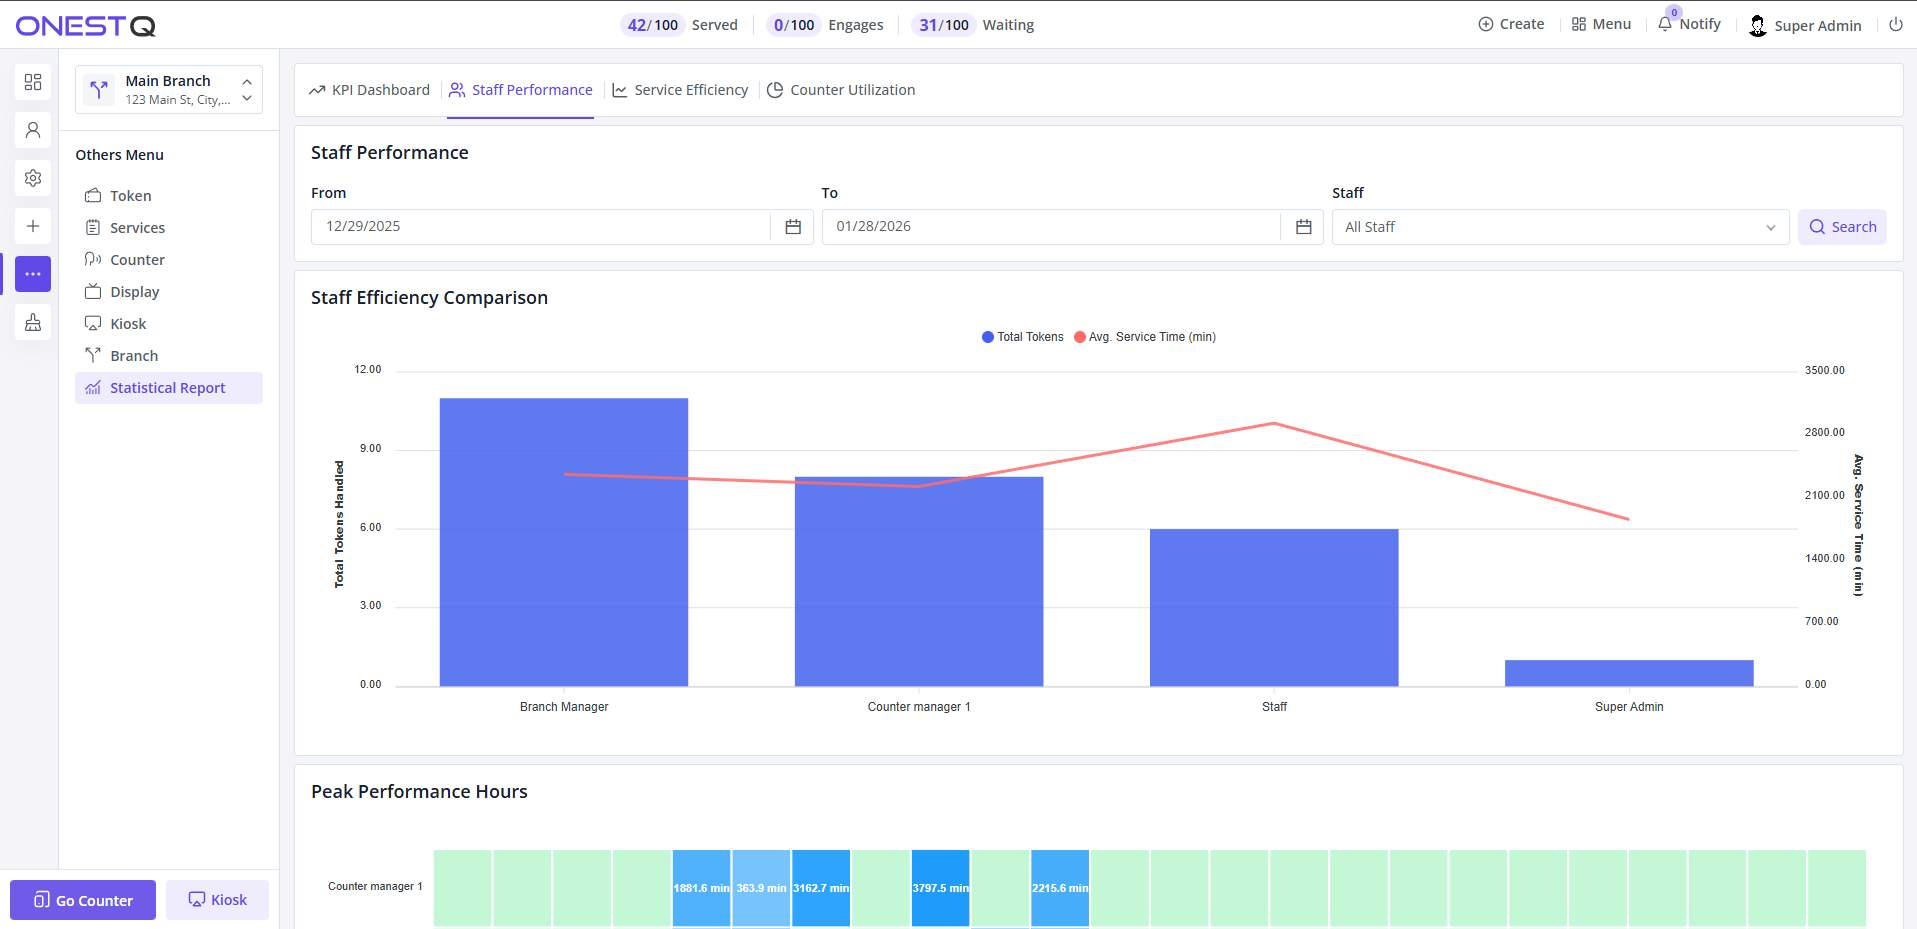
Staff performance report with individual metrics and productivity analysis.
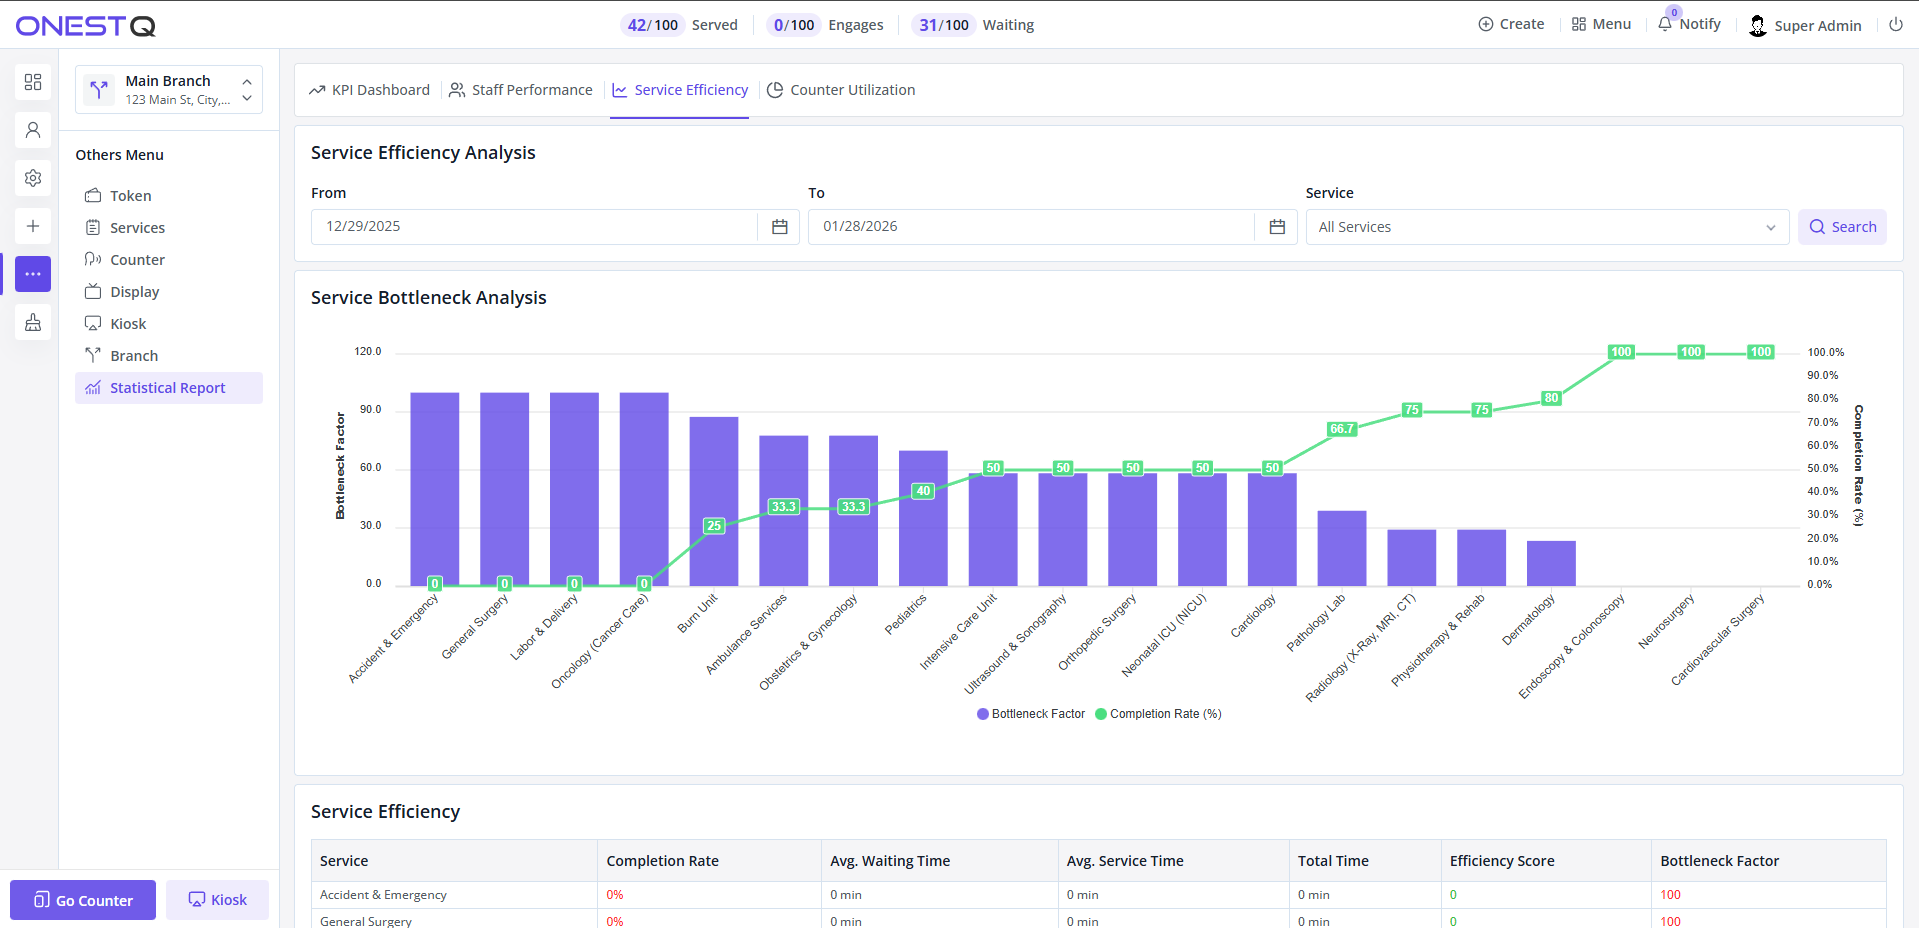
Service efficiency report showing performance by service type.
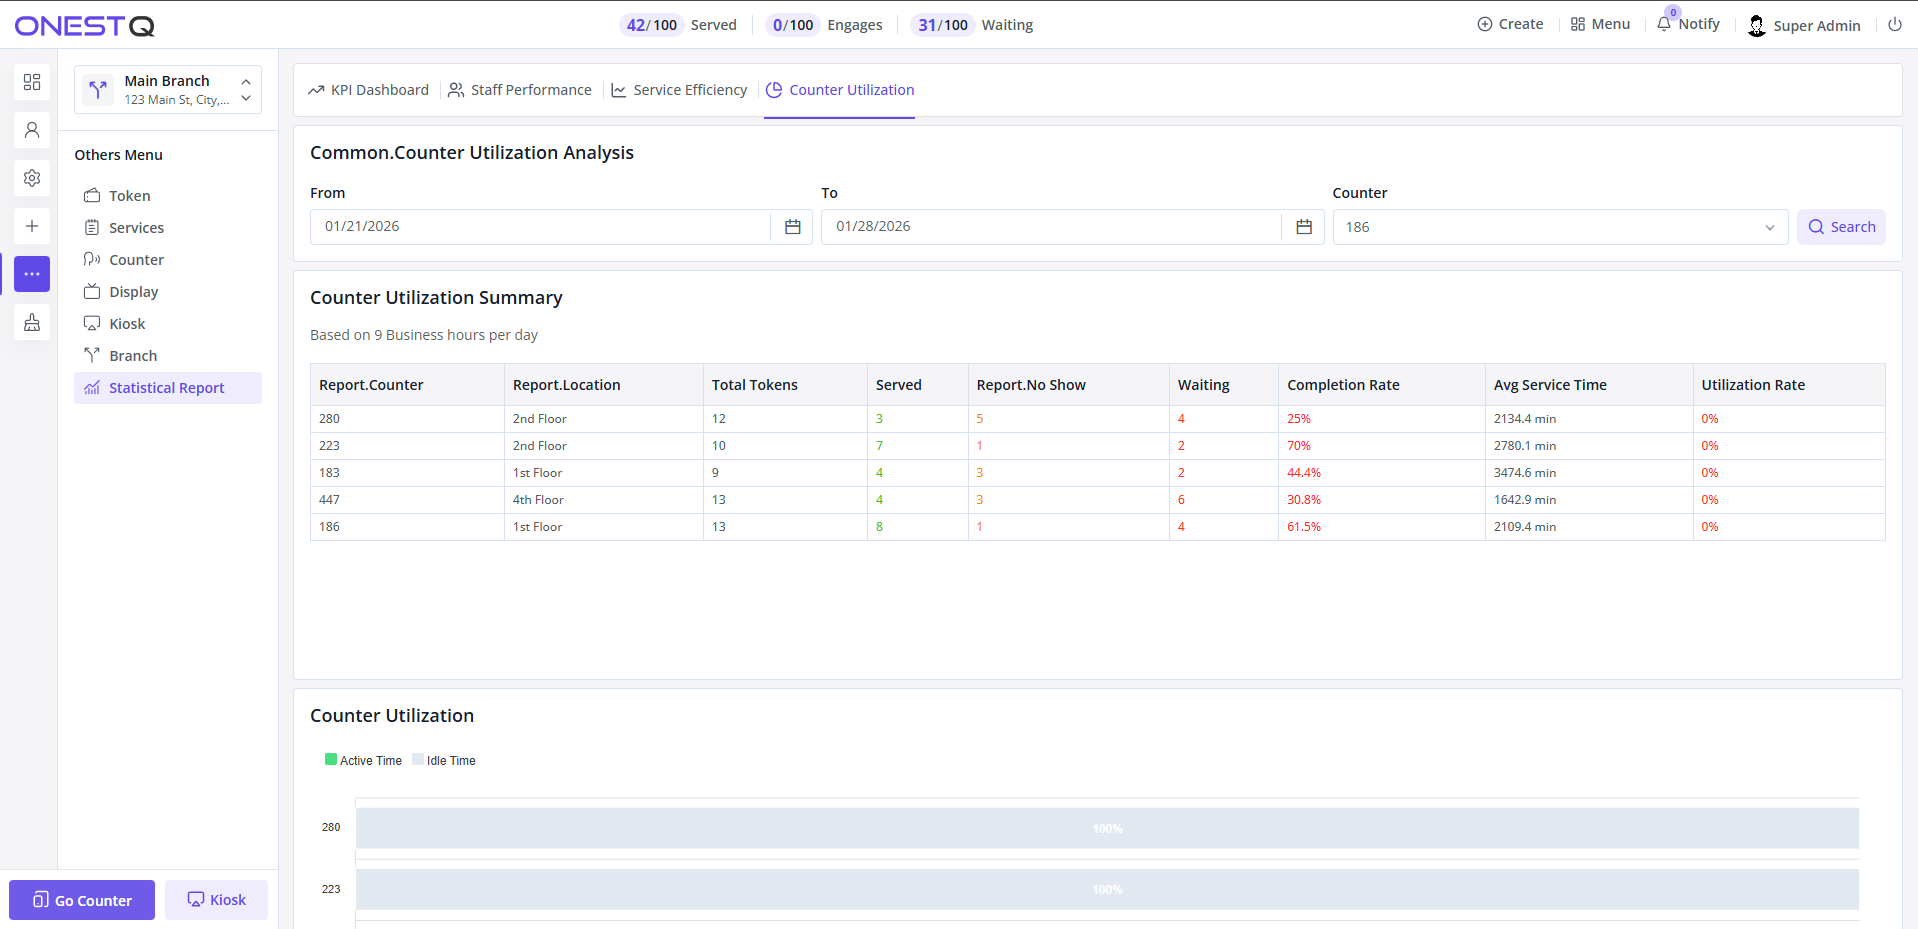
Counter utilization analysis showing workload distribution across service points.
Using Reports Effectively
- Review KPI Dashboard daily to monitor overall system health
- Use staff performance reports weekly for team management
- Analyze service efficiency to optimize service offerings
- Track counter utilization to balance workload and staffing
- Export reports for presentations and deeper analysis
Settings
- General: Site name, address, branding, company footer text, and meta tags.
- Terms/Privacy/Support: Editable content shown on the public pages linked from login screens.
- Devices: Register Kiosk/Display/Printer devices and configure per-device behavior (layout, voice, filters, printer formats).
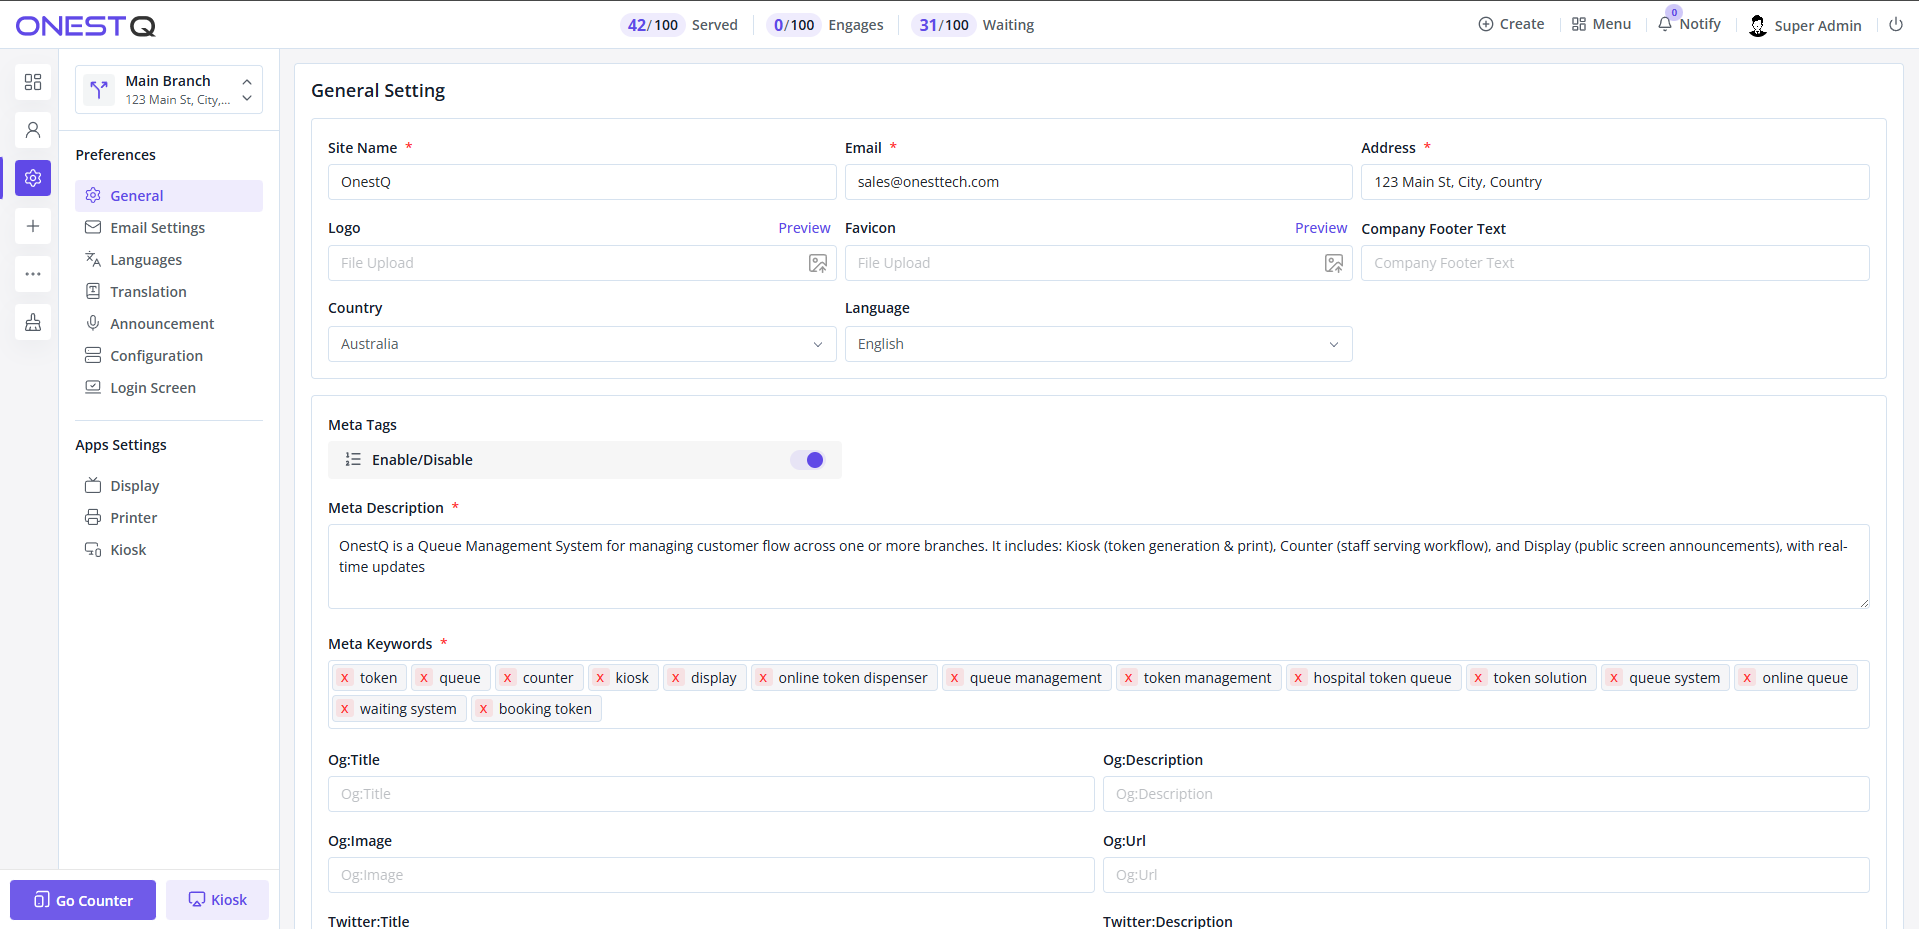
General settings screen
Counter (staff panel)
The Counter app (Counter staff panel) is where Counter Managers (and staff assigned to a counter) run day-to-day serving operations: calling the next token, starting service, completing a visit, handling no-shows, and transferring a token to another service when required.
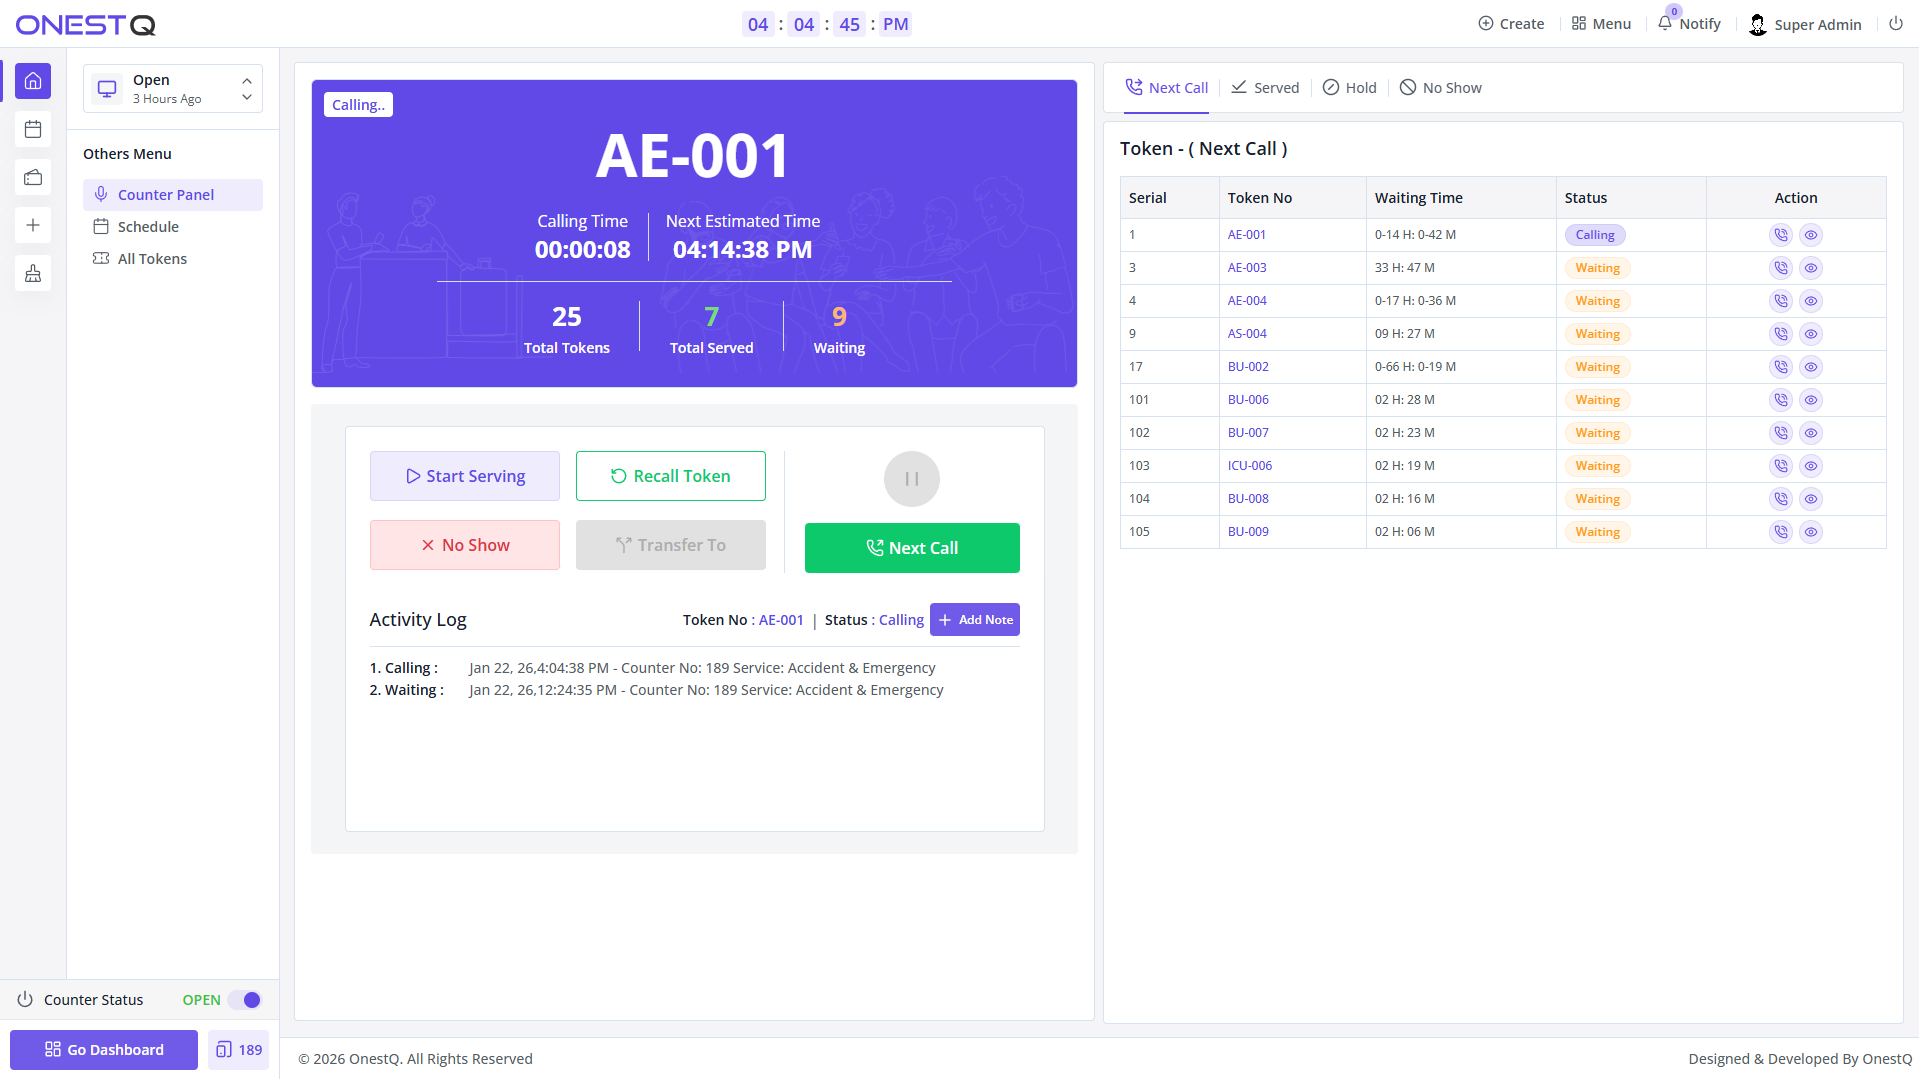
Counter dashboard before calling: actions are disabled until a token is called.
Counter menu (left sidebar)
- Home: the main counter dashboard (Next Call / Serving controls).
- Schedule: view tokens scheduled for this counter (filter by status, service, date, phone).
- All Tokens: list of tokens in the counter context (includes waiting, completed, no-show etc.).
- Create Token: quick token creation from the counter panel (if enabled by permissions).
- Counter Status: set the counter Open/Close (affects whether tokens can be called/served).
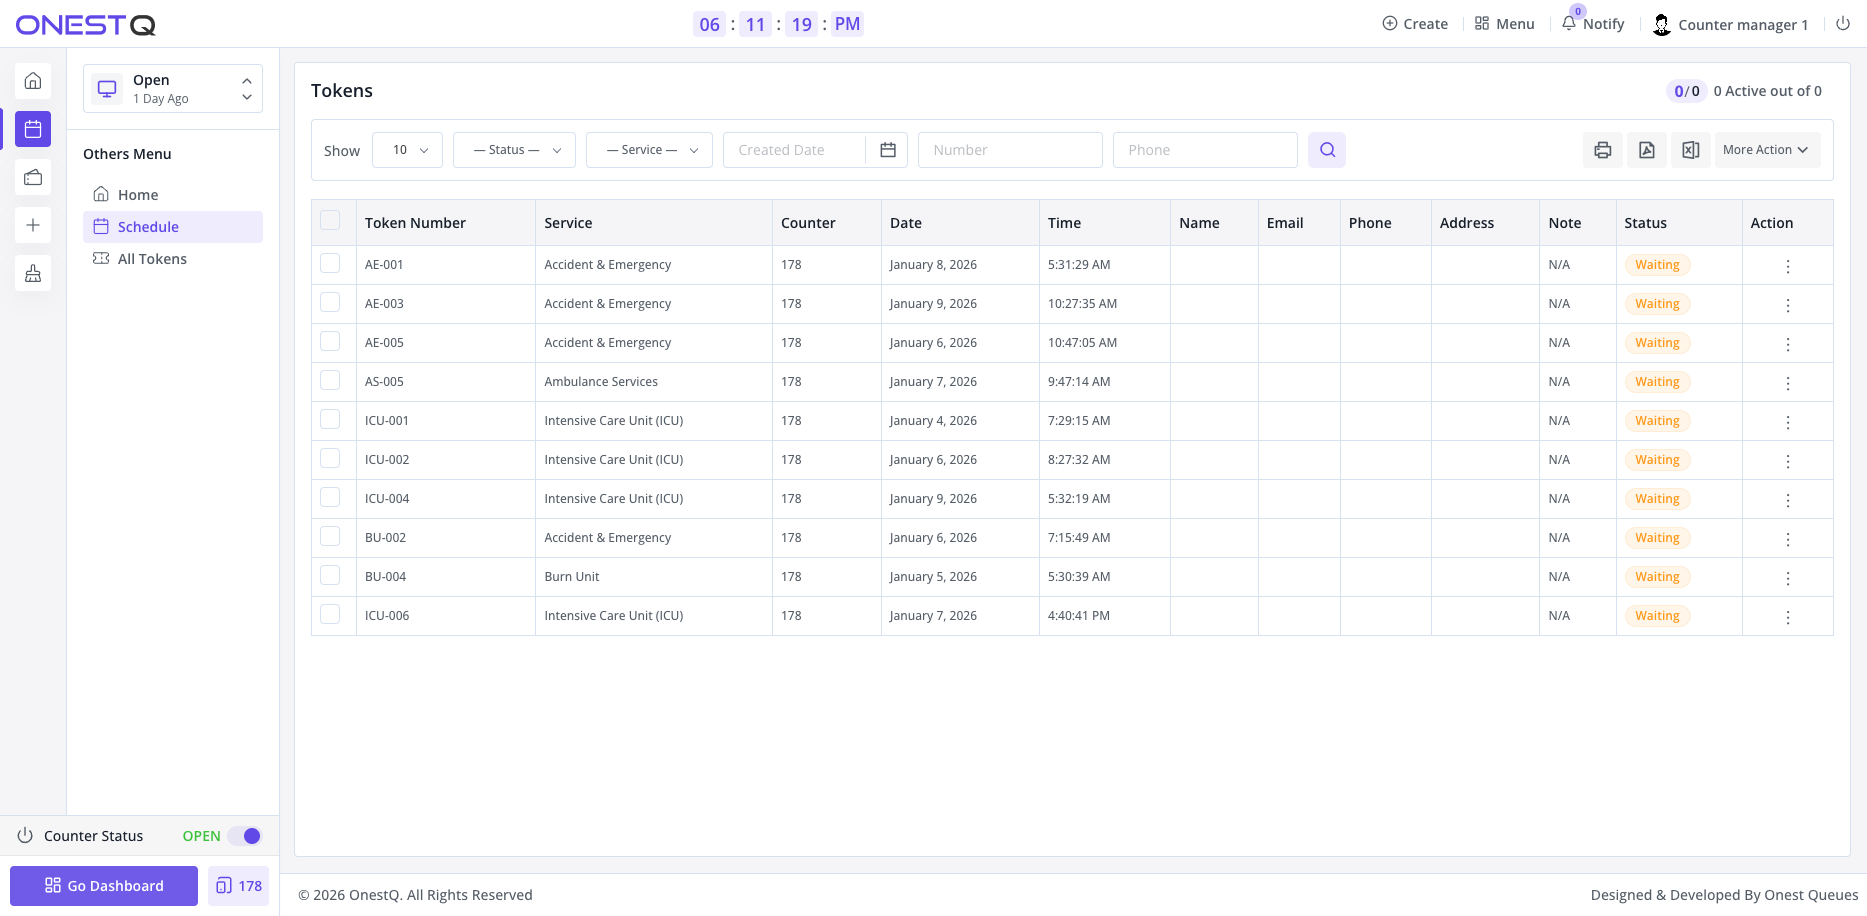
Schedule list inside the Counter panel.
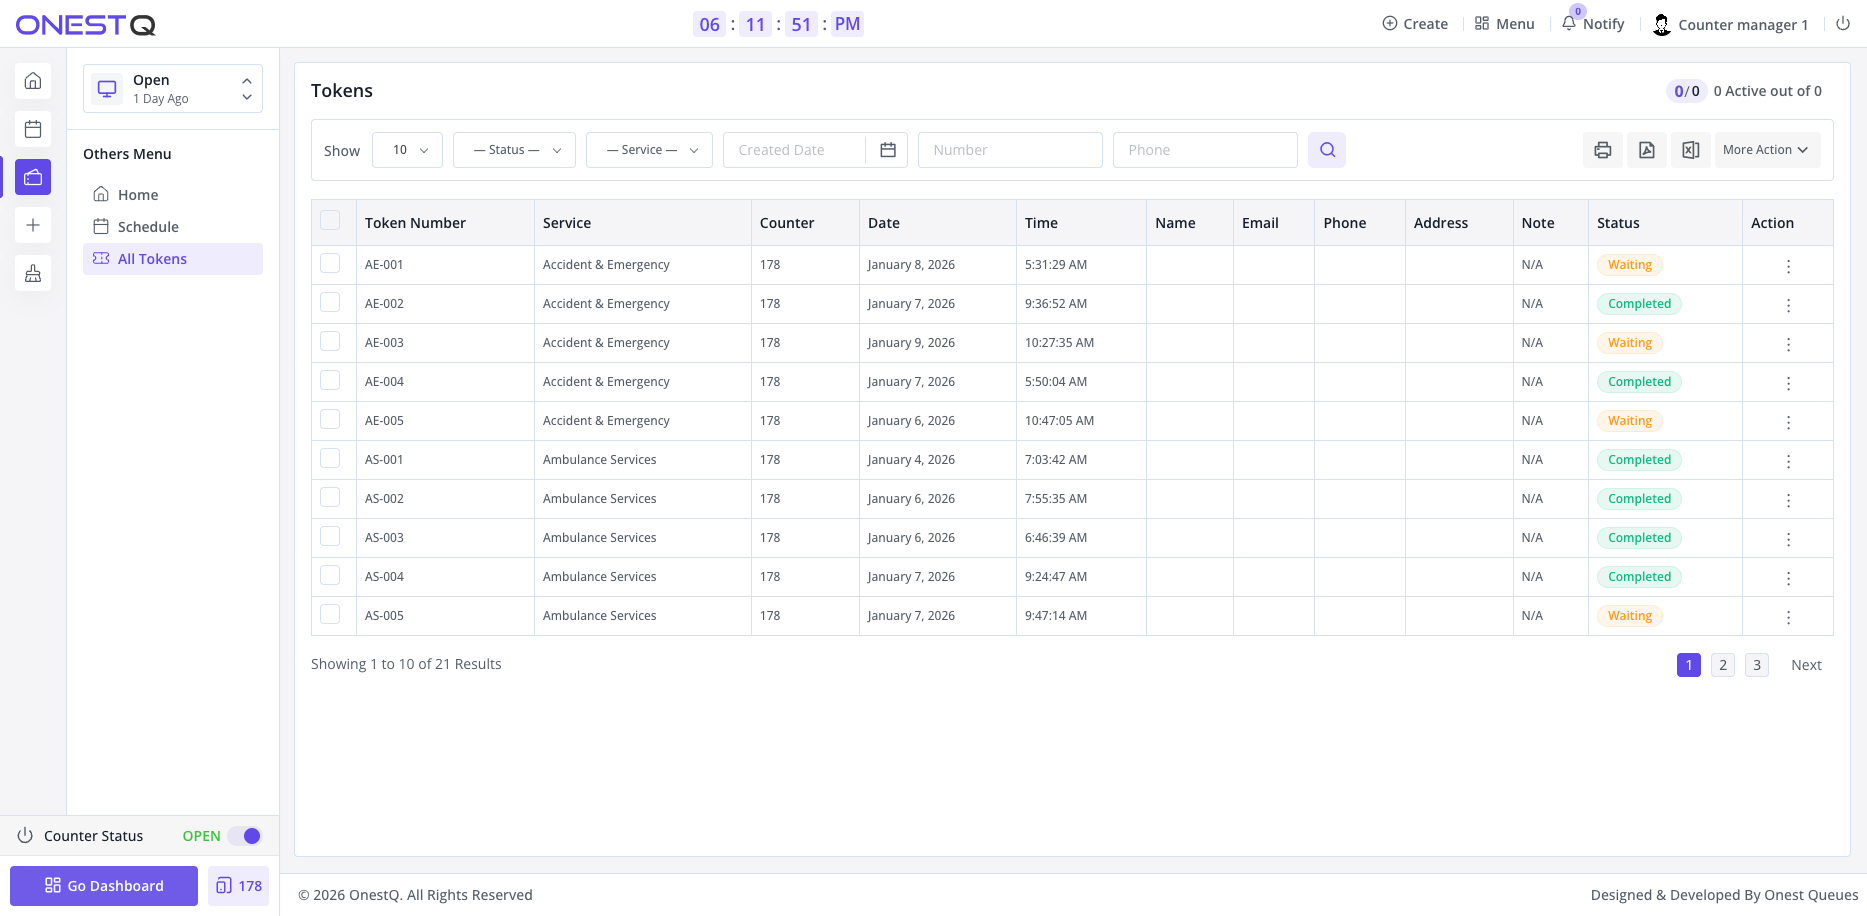
All Tokens inside the Counter panel (filter + Action column).
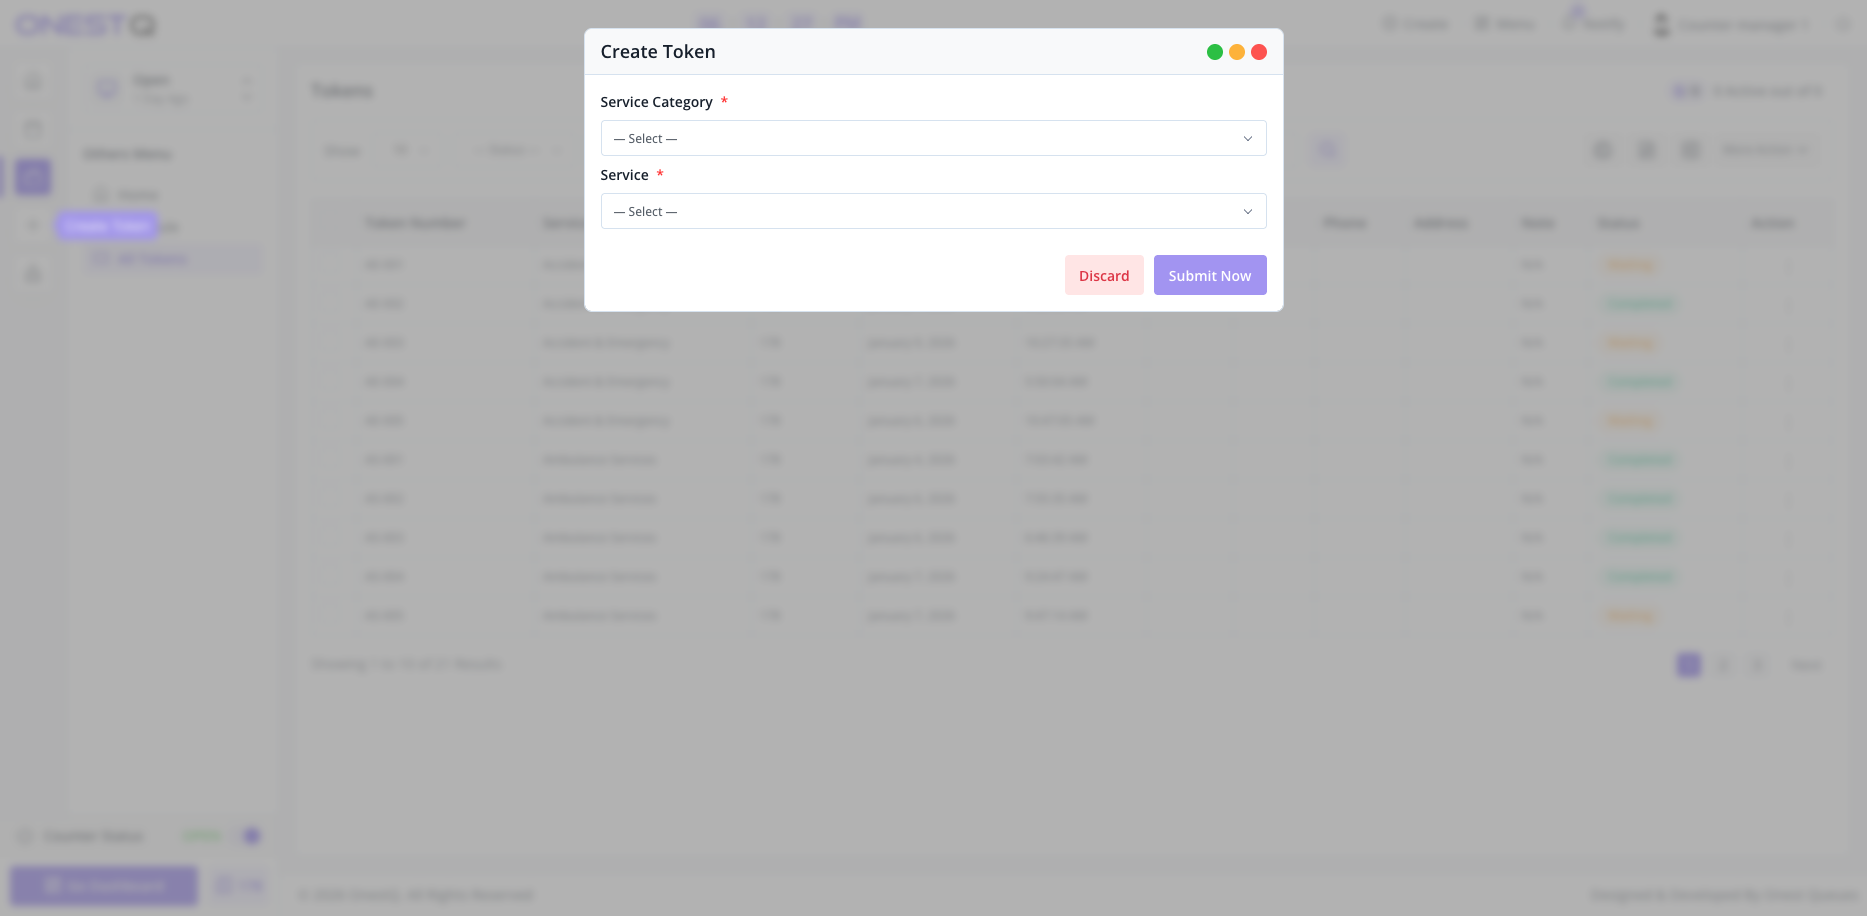
Create Token (choose Service Category → Service → Submit).
Serving workflow (step-by-step)
- Next Call: clicks the next waiting token in queue and moves it to Calling. The token number appears on the left panel and the system can announce it on the Display (depending on settings).
- Start Serving: when the customer reaches the counter, start service. This changes the status to Serving and begins service-time tracking.
- Recall Token: repeats the call/announcement for the current token (useful if the customer didn't hear).
- No Show: marks the token as no-show if the customer does not arrive. (This is important for accurate reporting.)
- Transfer To: moves the current token to another service (for example, when a customer must be routed to a different department). Select a target service and confirm.
- Complete: finishes the visit and marks the token completed/served.
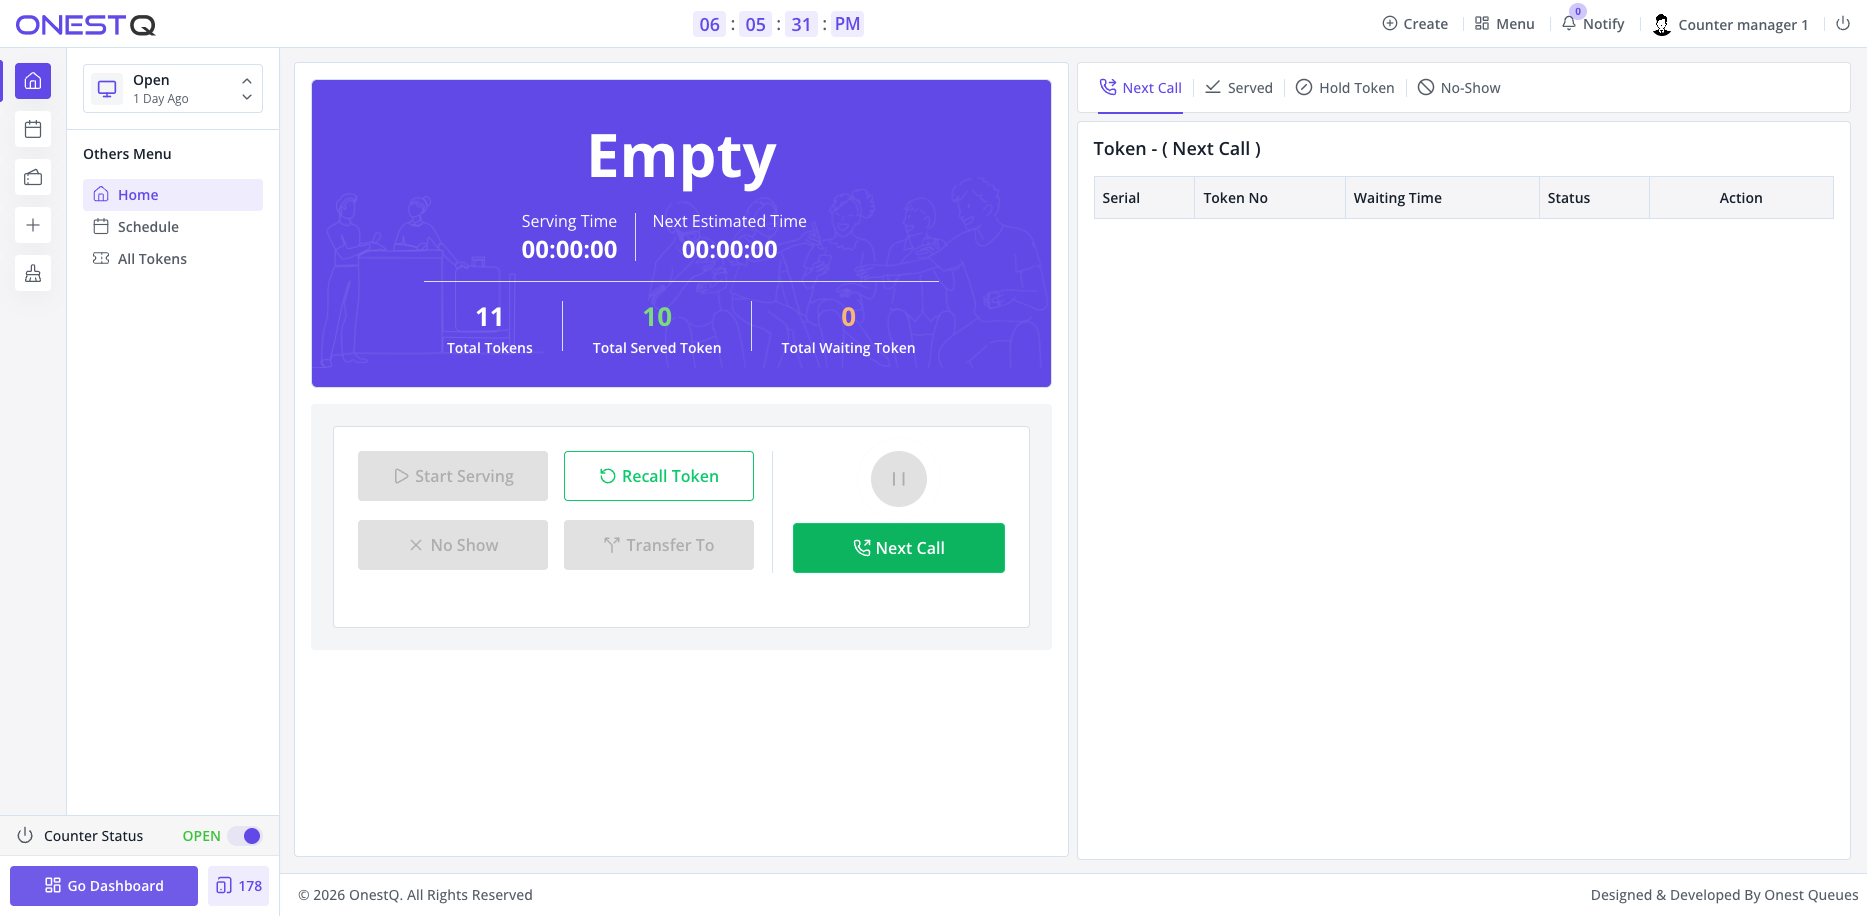
After Next Call: token status becomes Calling and Recall/Start Serving become available.
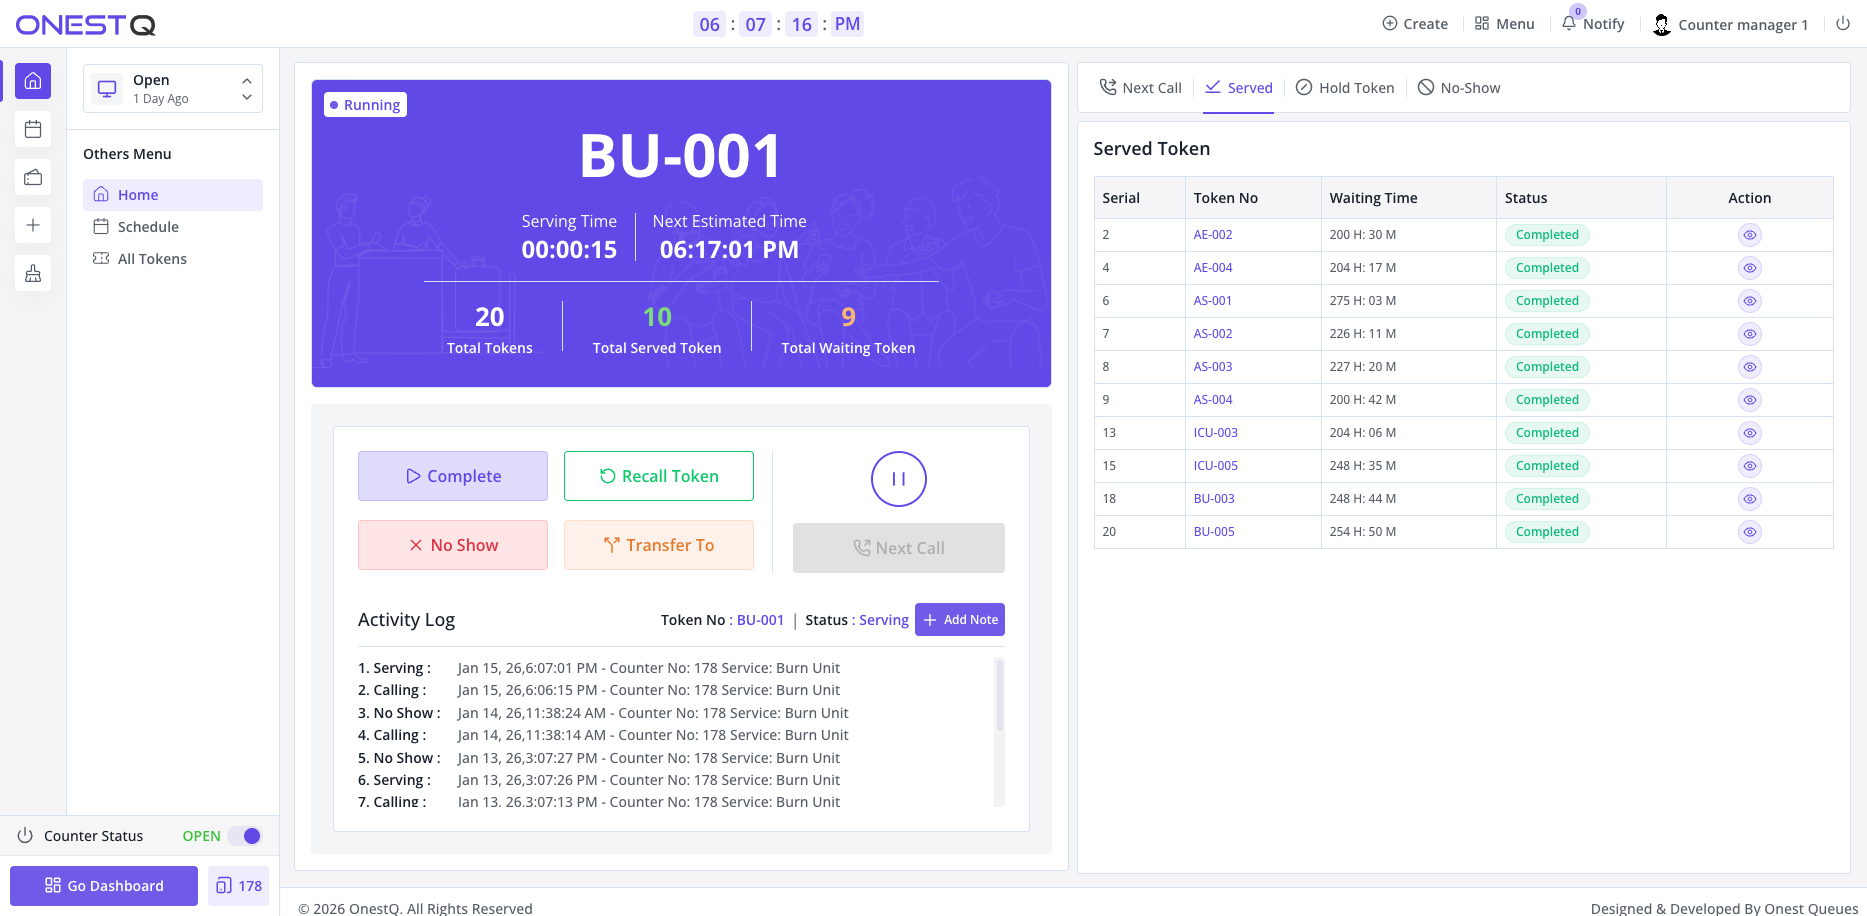
After Start Serving: the panel shows Serving and enables Complete/No Show/Transfer.
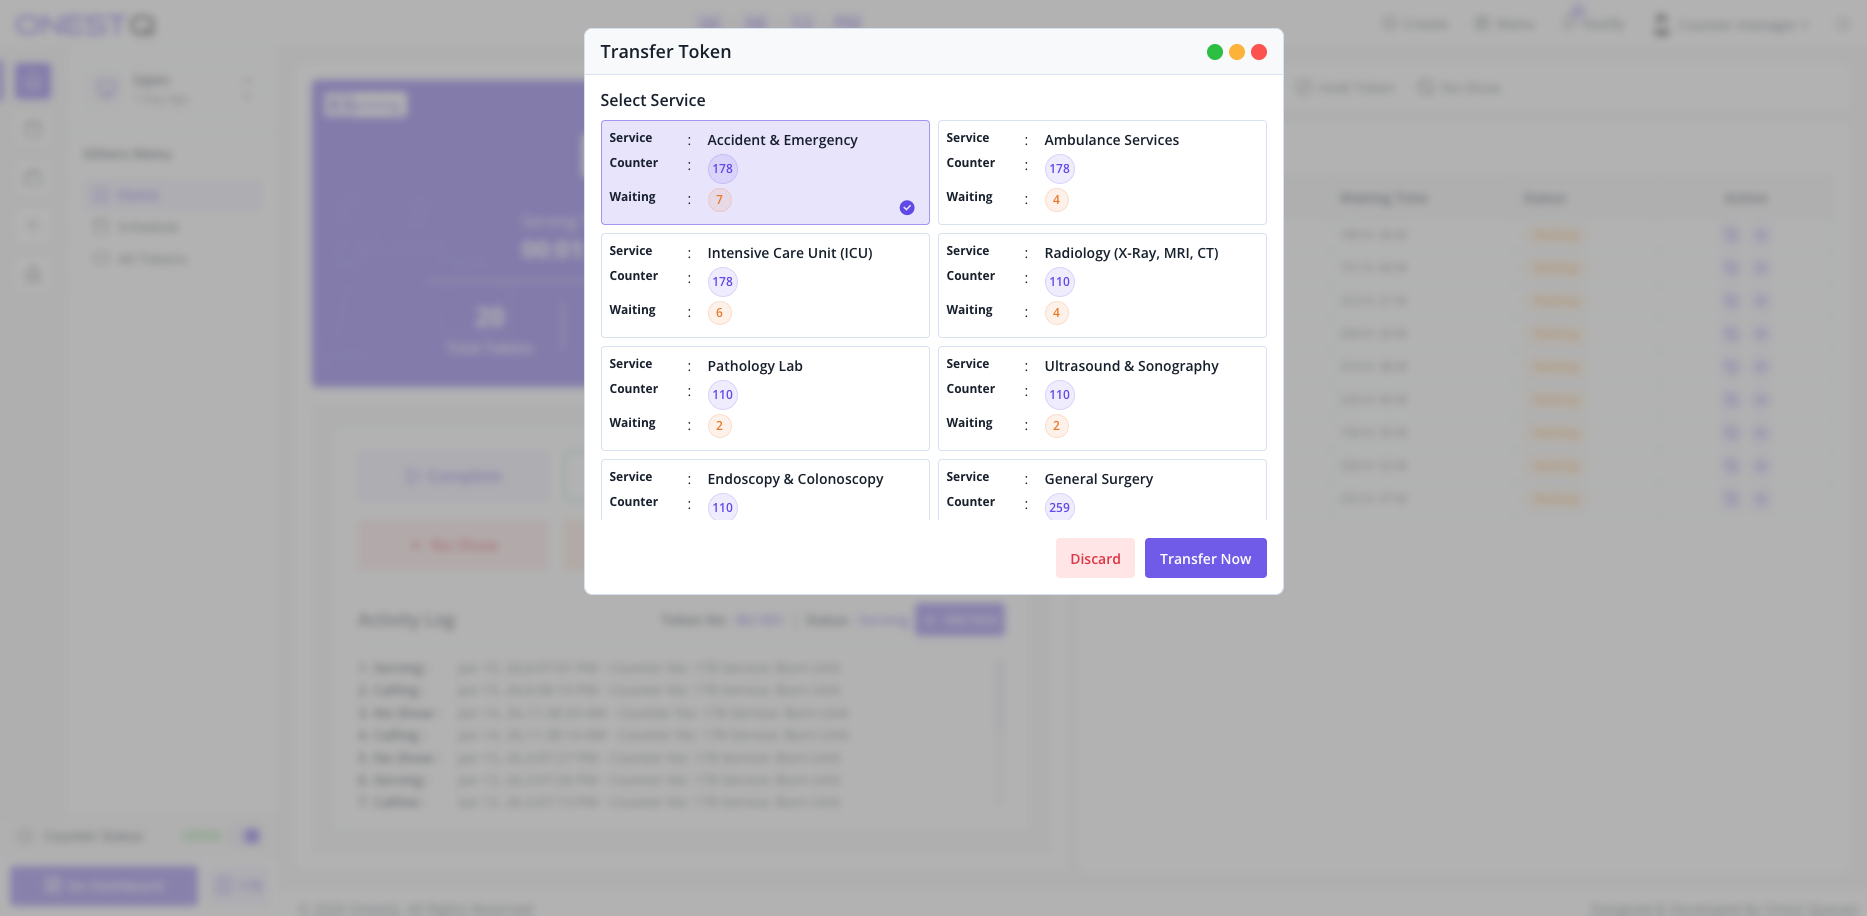
Transfer To: choose the destination service, then confirm Transfer Now.
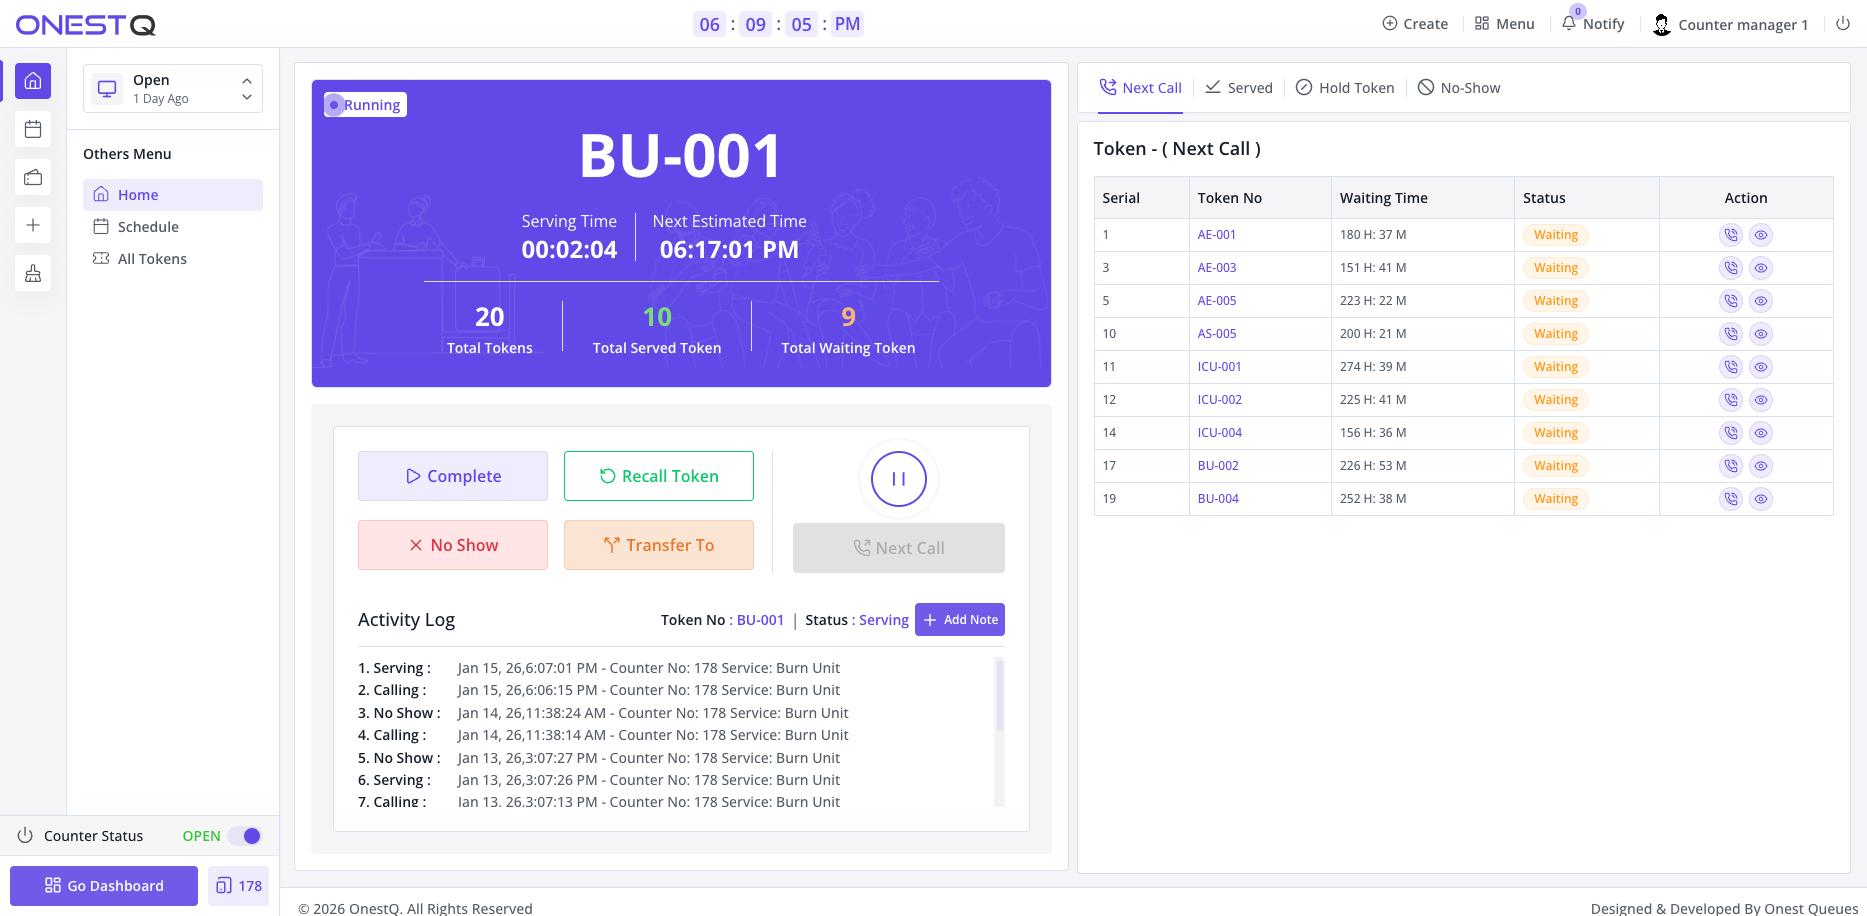
The right table shows waiting tokens and quick actions while you are serving.
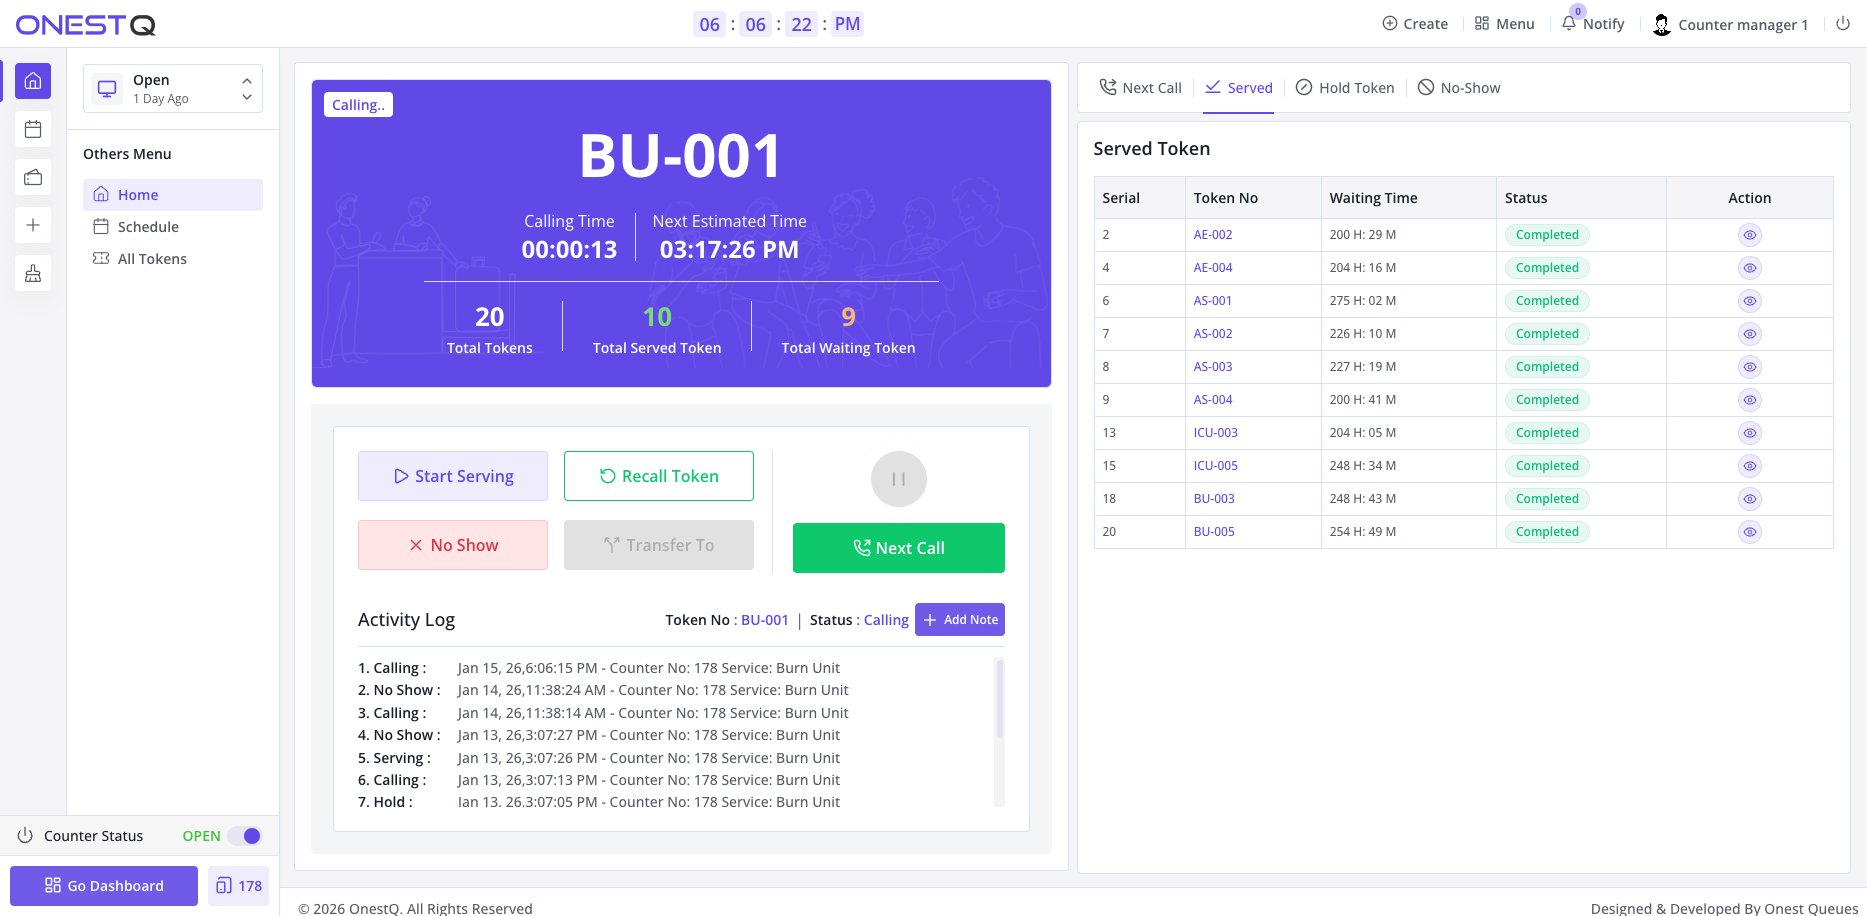
The Counter panel includes tabs for Served / Hold / No-Show to quickly review outcomes.
Kiosk management
Kiosks are customer-facing self-service devices used to create and print tokens. Each kiosk has its own configuration including enabled modules, required customer fields, printing preferences, and session behavior.
Navigate to Kiosk in the Devices Menu to manage kiosk devices, configure settings, and preview the customer interface.
Kiosk List & Configuration
The Kiosk management screen displays all self-service kiosk devices:
- Kiosk Name: Identifier for the kiosk device
- Branch: Location where the kiosk is installed
- Services: Which services are available on this kiosk
- Status: Active, Inactive, or Online (currently connected)
- Device ID & PIN: Authentication credentials
- Printer: Connected thermal/laser printer configuration
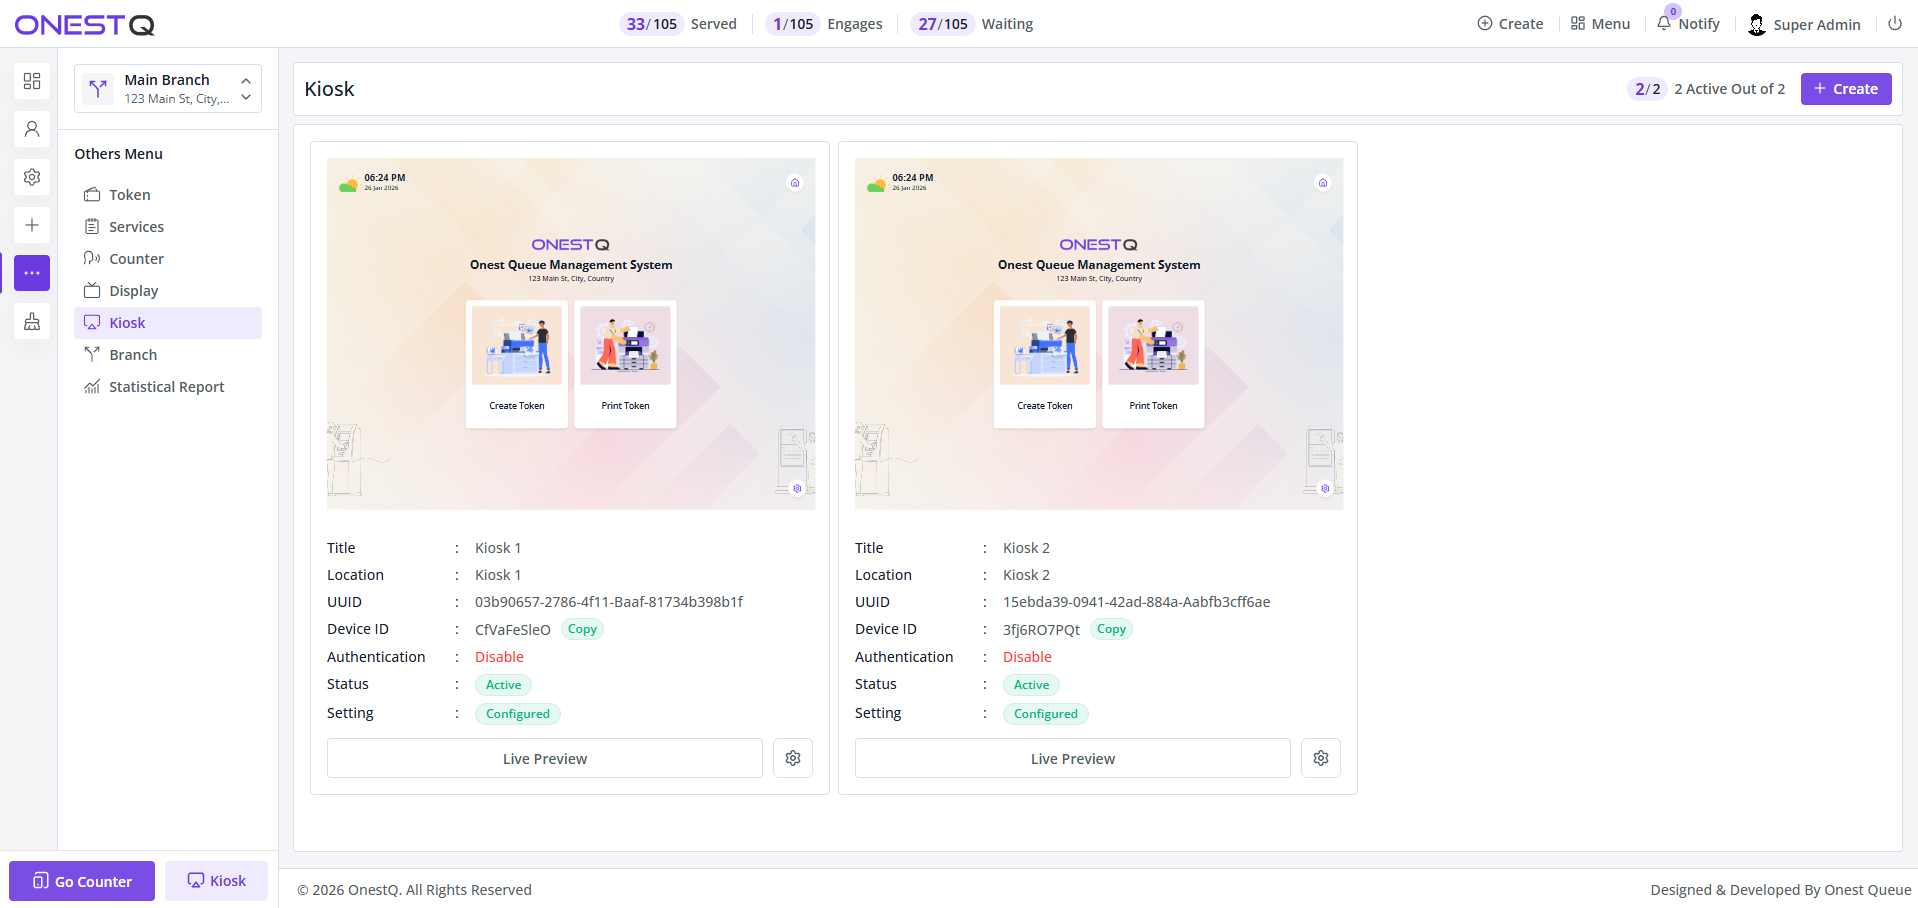
Kiosk list showing all configured kiosks with preview and settings options.
Creating a New Kiosk
When creating a new kiosk device, configure:
- Basic Info: Kiosk name, branch, location description
- Device Authentication: Set unique device ID and PIN
- Service Selection: Choose which services customers can access
- Customer Fields: Configure what information to collect (name, phone, email)
- Printer Settings: Connect thermal or laser printer, set ticket format
- UI Preferences: Language, theme, button size, timeout settings
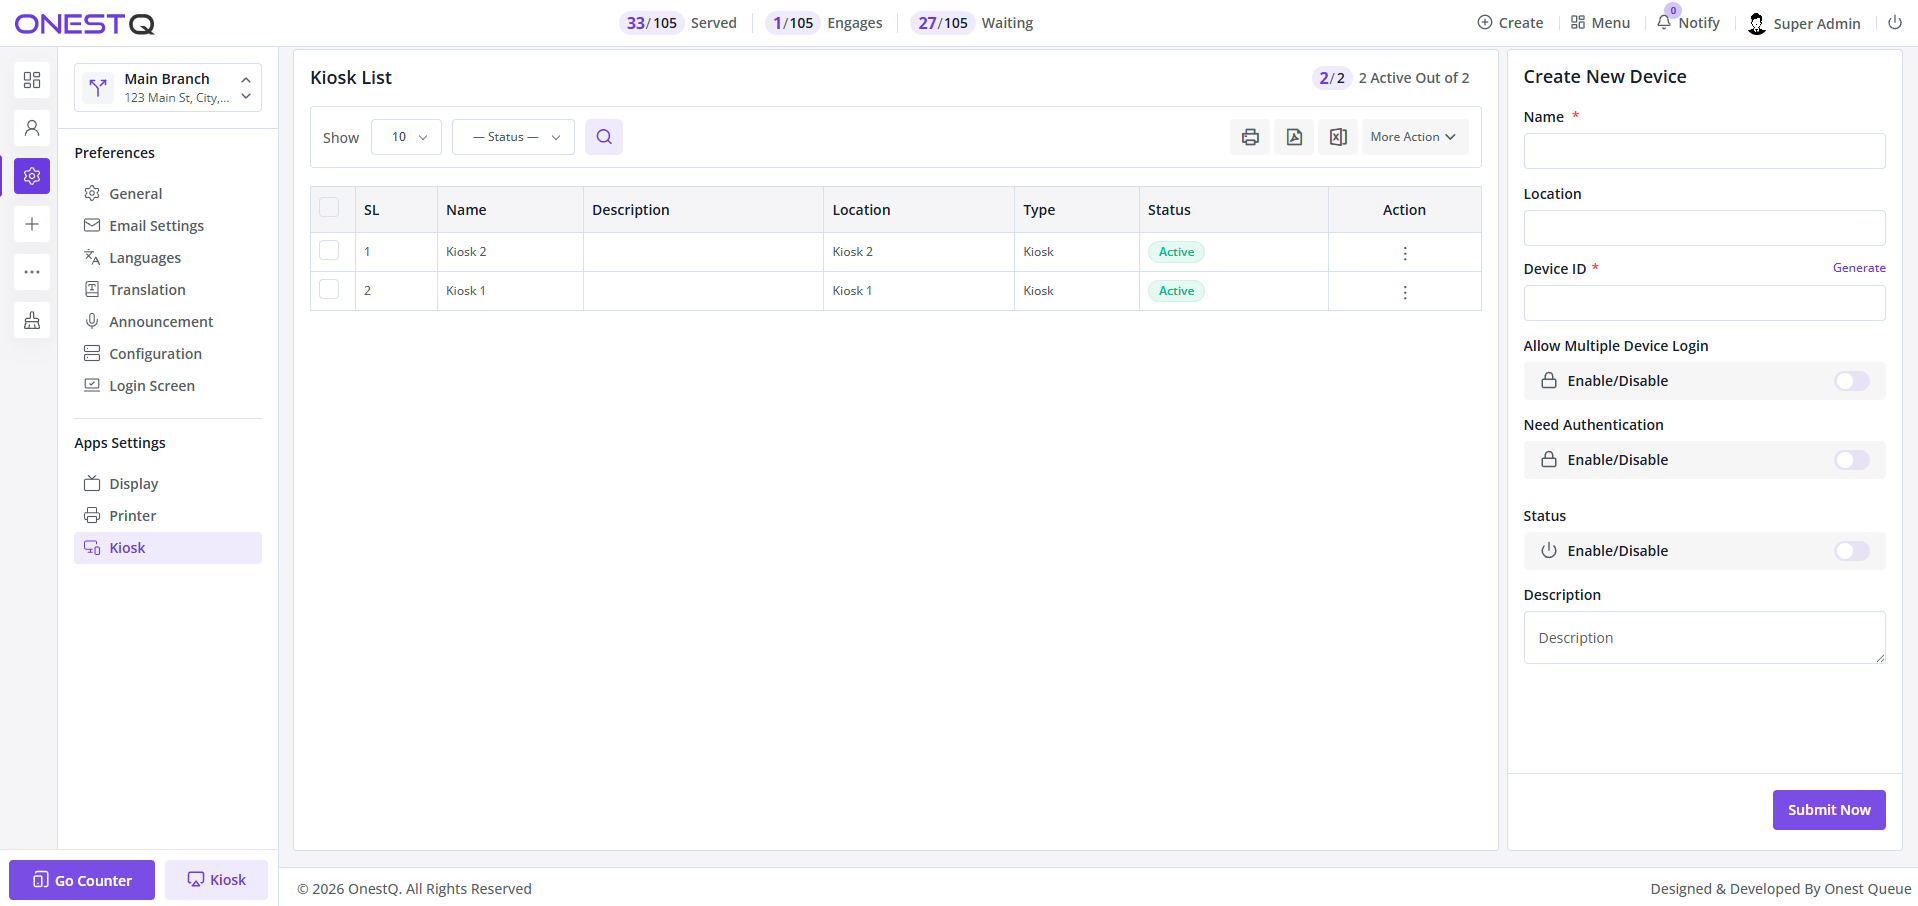
Create new kiosk form with device and service configuration options.
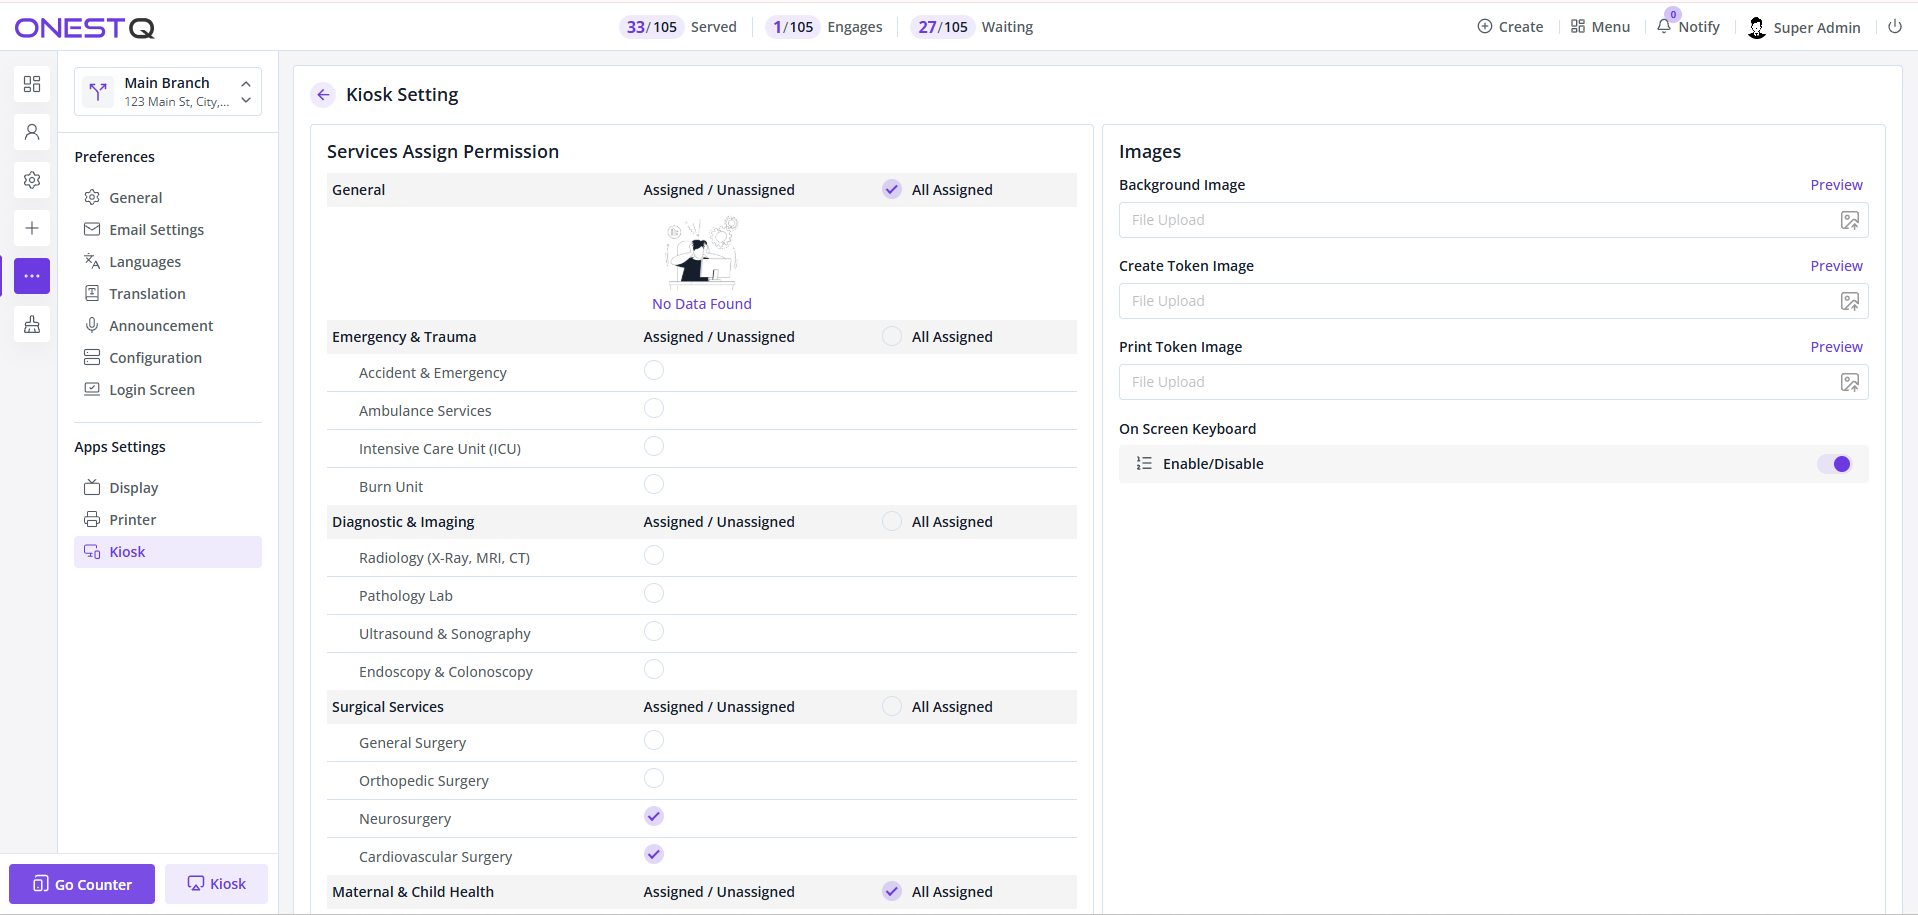
Kiosk settings for configuring customer fields, printer, and UI preferences.
Kiosk Deployment Tips
- Place kiosks in easily accessible locations near facility entrances
- Ensure printers are regularly stocked with paper and tested
- Set appropriate session timeouts to prevent one customer from blocking the kiosk
- Use simple, clear language and large buttons for ease of use
- Test the complete flow (service selection → token generation → printing) regularly
Kiosk workflow (device → token generation)
- Device Authentication: If the kiosk is configured as a device, access it using the device ID/PIN or use the demo device buttons (e.g., "Kiosk 1/2") for testing.
- Home Screen: After authentication, the kiosk displays two main options: Create Token (generate a new queue token) and Print Token (reprint an existing token).
-
Navigation Buttons: The kiosk interface
includes:
- Home: Returns to the home screen (Create Token / Print Token selection).
- Back: Goes back to the previous step in the workflow.
- Settings: From this menu you can logout from the kiosk using Device ID & PIN (PIN is configurable in the kiosk settings). When you logout, the kiosk will return to the home screen.
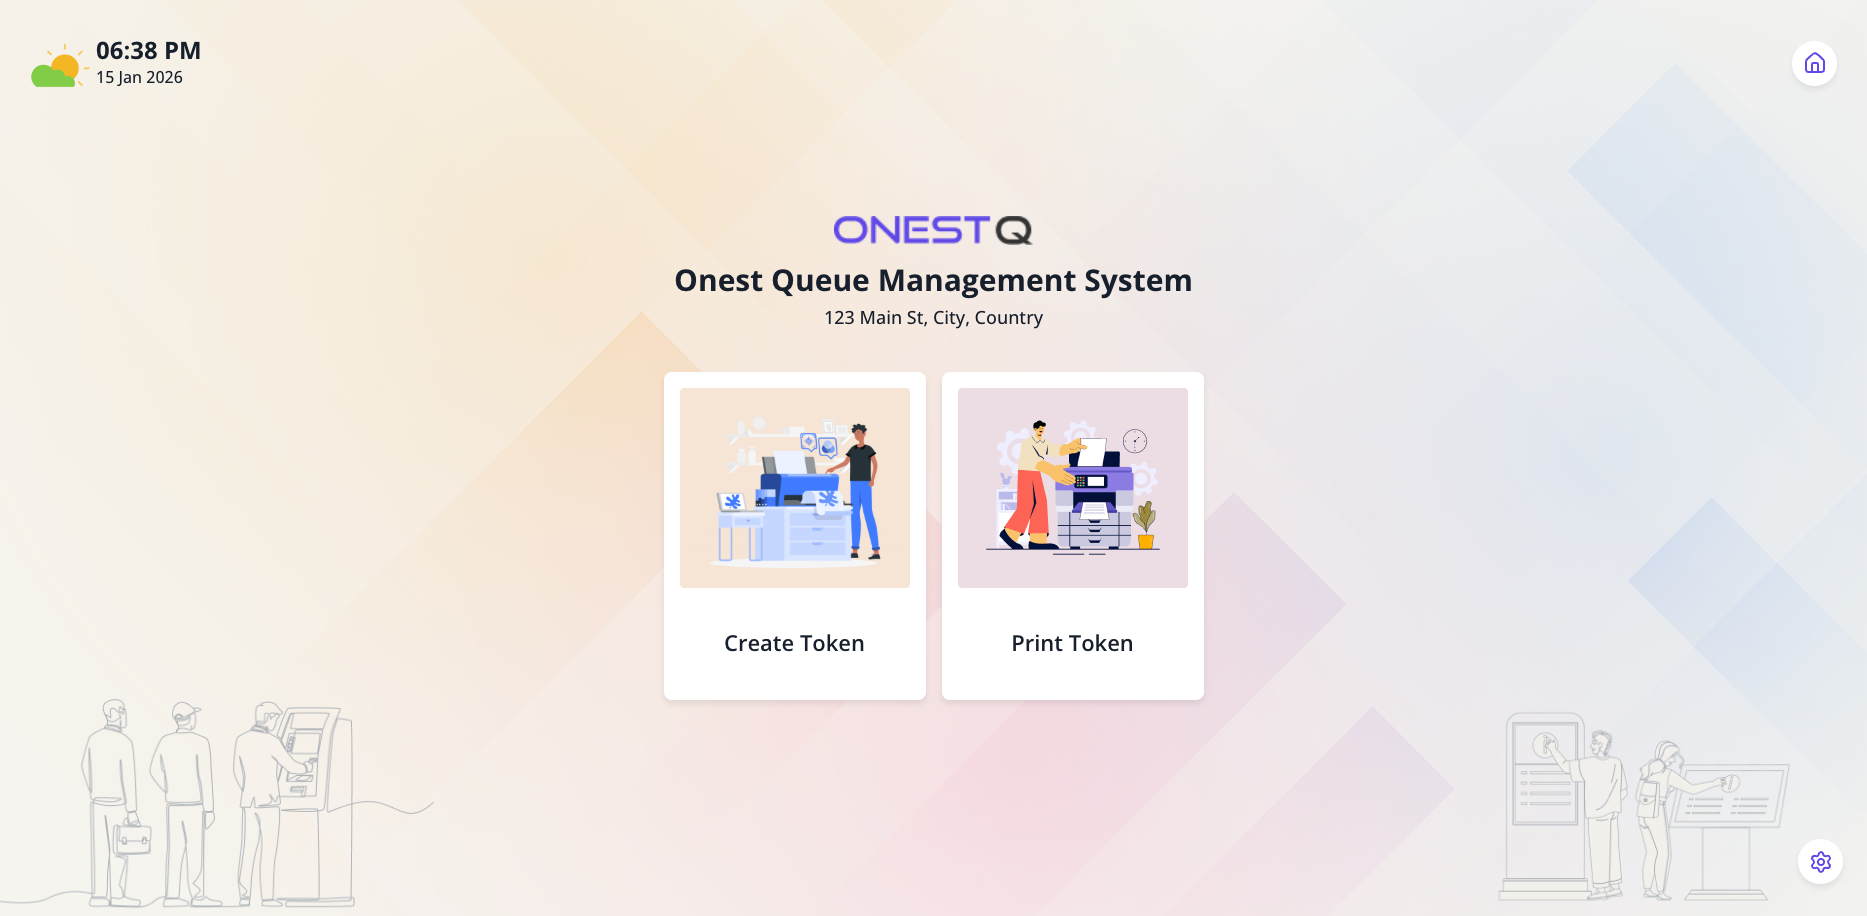
Kiosk home screen: Choose between Create Token or Print Token. Navigation buttons (Home, Back, Settings) are available at the top/bottom.
Creating a new token
- Select "Create Token" from the home screen.
- Choose Service Category: Browse available service categories (e.g., Emergency & Trauma, Diagnostic & Imaging, Surgical Services). Categories are displayed as tabs or large buttons for easy touch interaction.
- Select Service: After selecting a category, choose the specific service you need (e.g., Accident & Emergency, Ambulance Services, ICU, Burn Unit). The service list shows available services for the selected category.
-
Submit & Generate Token: Confirm your
selection. The kiosk generates a unique token number (e.g.,
AE-009) with a barcode. The token details include:
- Token number (format: ServiceCode-Number)
- Barcode (for scanning at counters)
- Service name
- Estimated wait time (if configured)
- Print Token: If the kiosk has a printer configured, click "Print Token" to print a physical copy. The print dialog appears, and you can use the browser's print controls or the kiosk's thermal printer (if connected).
- Back to Home: After generating or printing, use "Back to home" to return to the main menu.
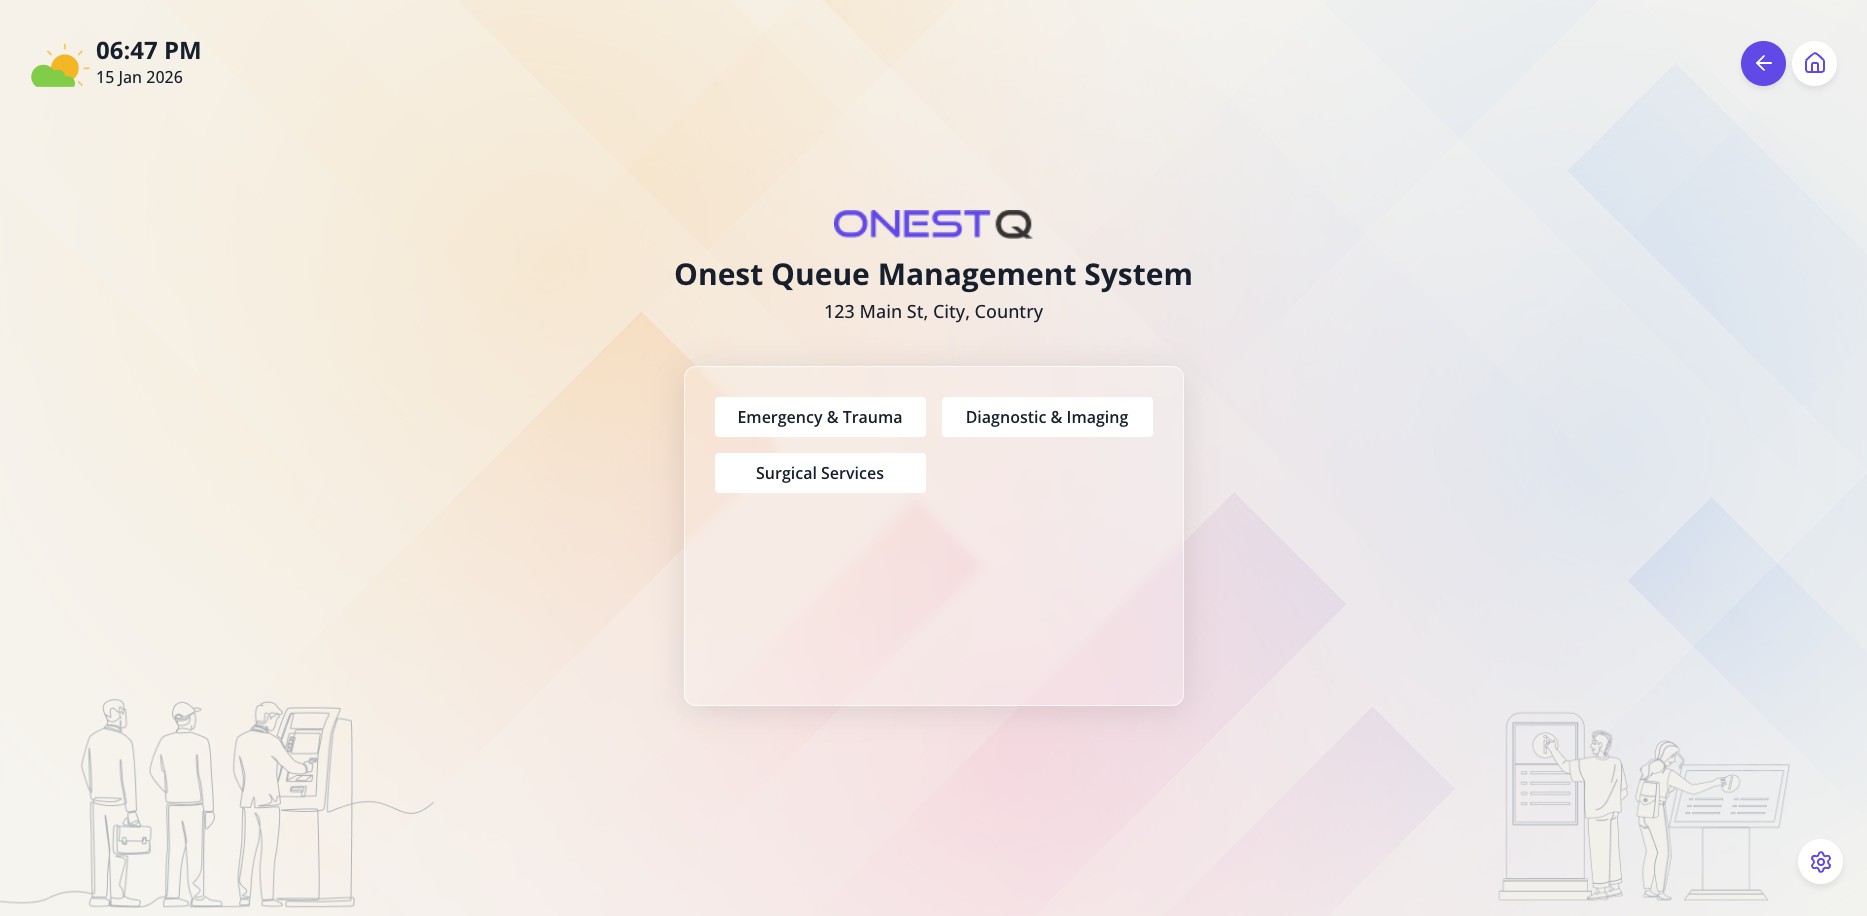
Service category selection: Touch-friendly category tabs (Emergency & Trauma, Diagnostic & Imaging, Surgical Services).
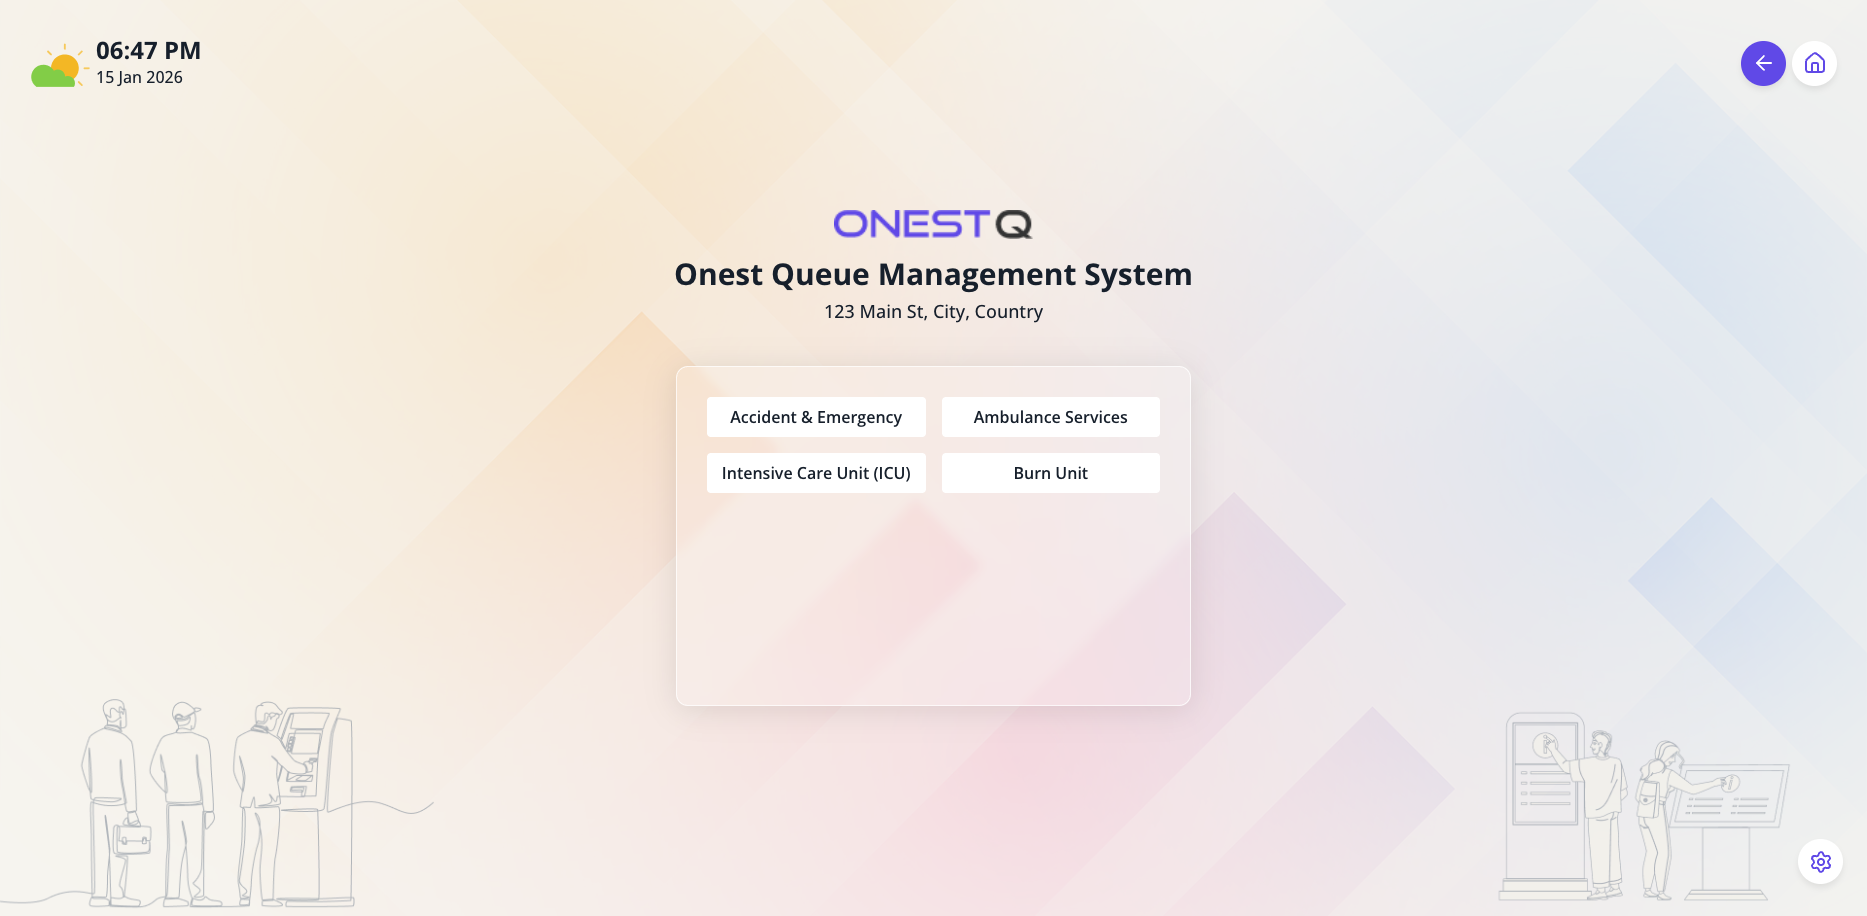
Service selection: After choosing a category, select the specific service (e.g., Accident & Emergency, Ambulance Services, ICU).
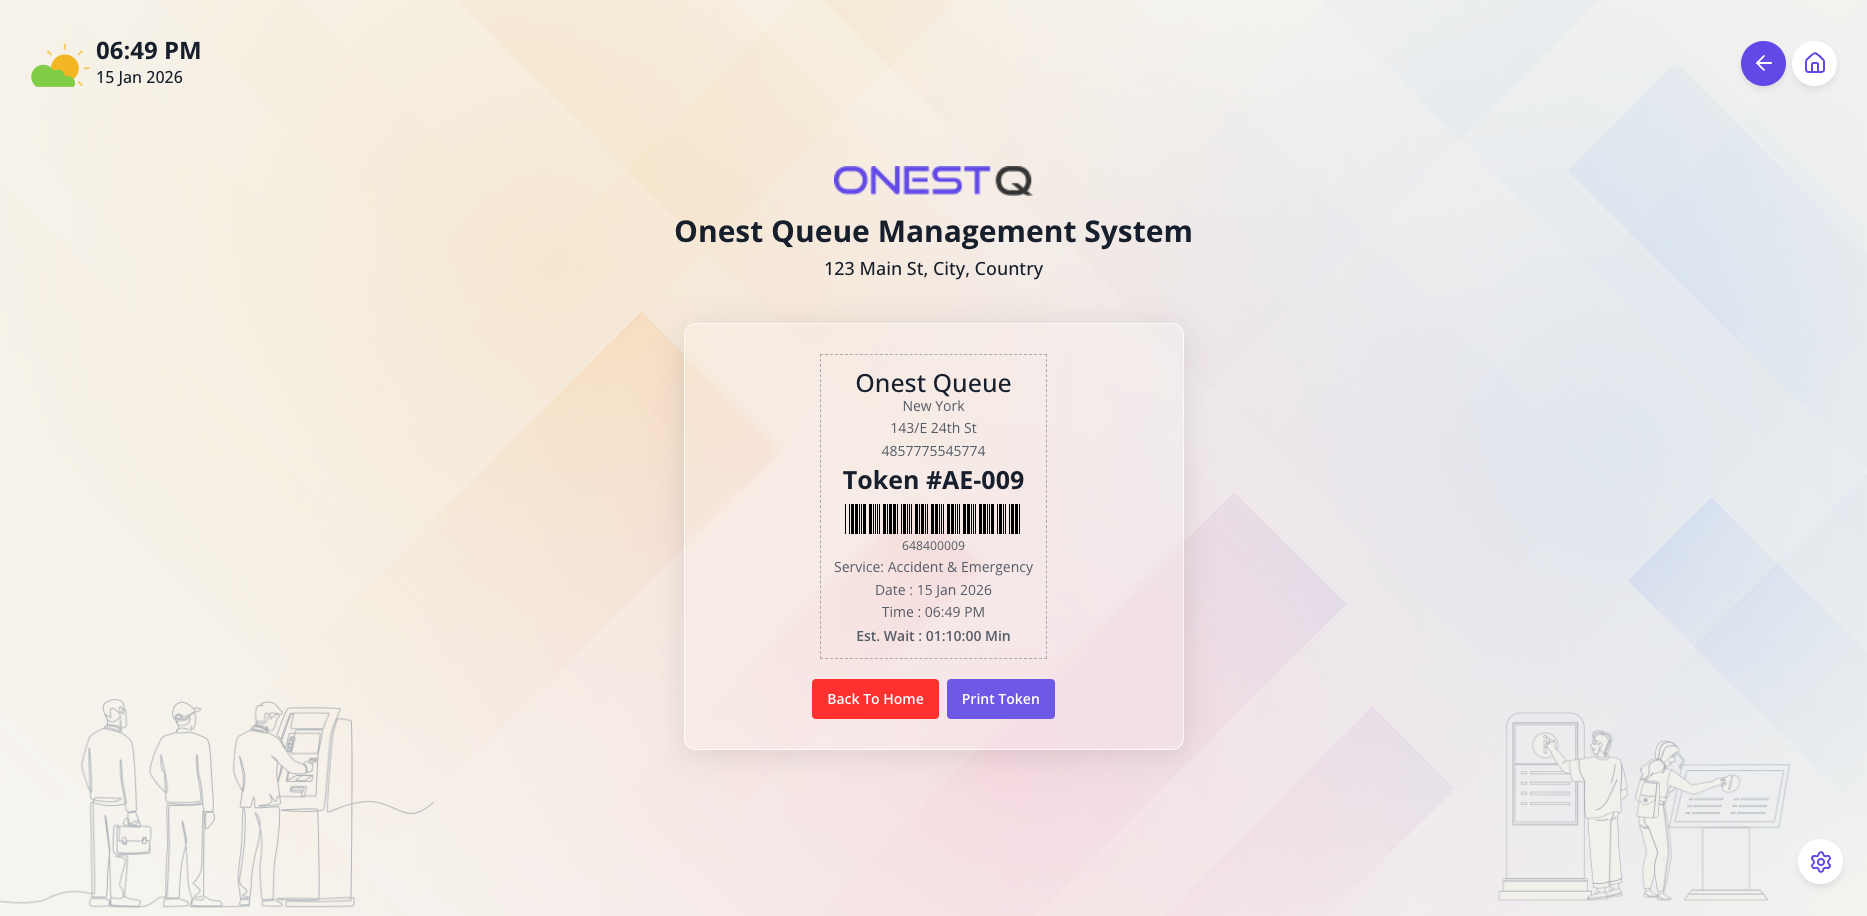
Token generated: The kiosk displays the token number (AE-009), barcode, service name, and options to Print Token or go Back to home.
Reprinting an existing token
- Select "Print Token" from the home screen.
- Enter Token Number: Input the token number you want to reprint (e.g., AE-009). The input field accepts the token format displayed during generation.
-
View Token: Click "View Token" to retrieve
and display the token details. If the token exists, the kiosk
shows:
- Token number and barcode
- Original service
- Token status (waiting, called, serving, served, no-show)
- Date and time information
- Print Token: Click "Print Token" to generate a new printout of the existing token. This is useful when a customer loses their original token slip.
Note: The reprint form is accessed from the home screen's "Print Token" option. Enter the token number in the input field (e.g., AE-009) and click "View Token" to retrieve the token details, then use "Print Token" to generate a new printout.
Display management
Displays are public-facing screens that show real-time queue information to customers. Each display can be configured to show tokens by counter or by service, and includes device authentication, layout customization, voice announcements, and ticker notifications.
Navigate to Display in the Devices Menu to manage display devices, configure settings, and preview live output.
Display List & Configuration
The Display management screen shows all configured display devices:
- Display Name: Identifier for the display device
- Branch: Location assignment
- Type: Counter-based or Service-based display
- Status: Active, Inactive, or Online (currently connected)
- Device ID: Unique authentication identifier
- PIN: Security PIN for device access
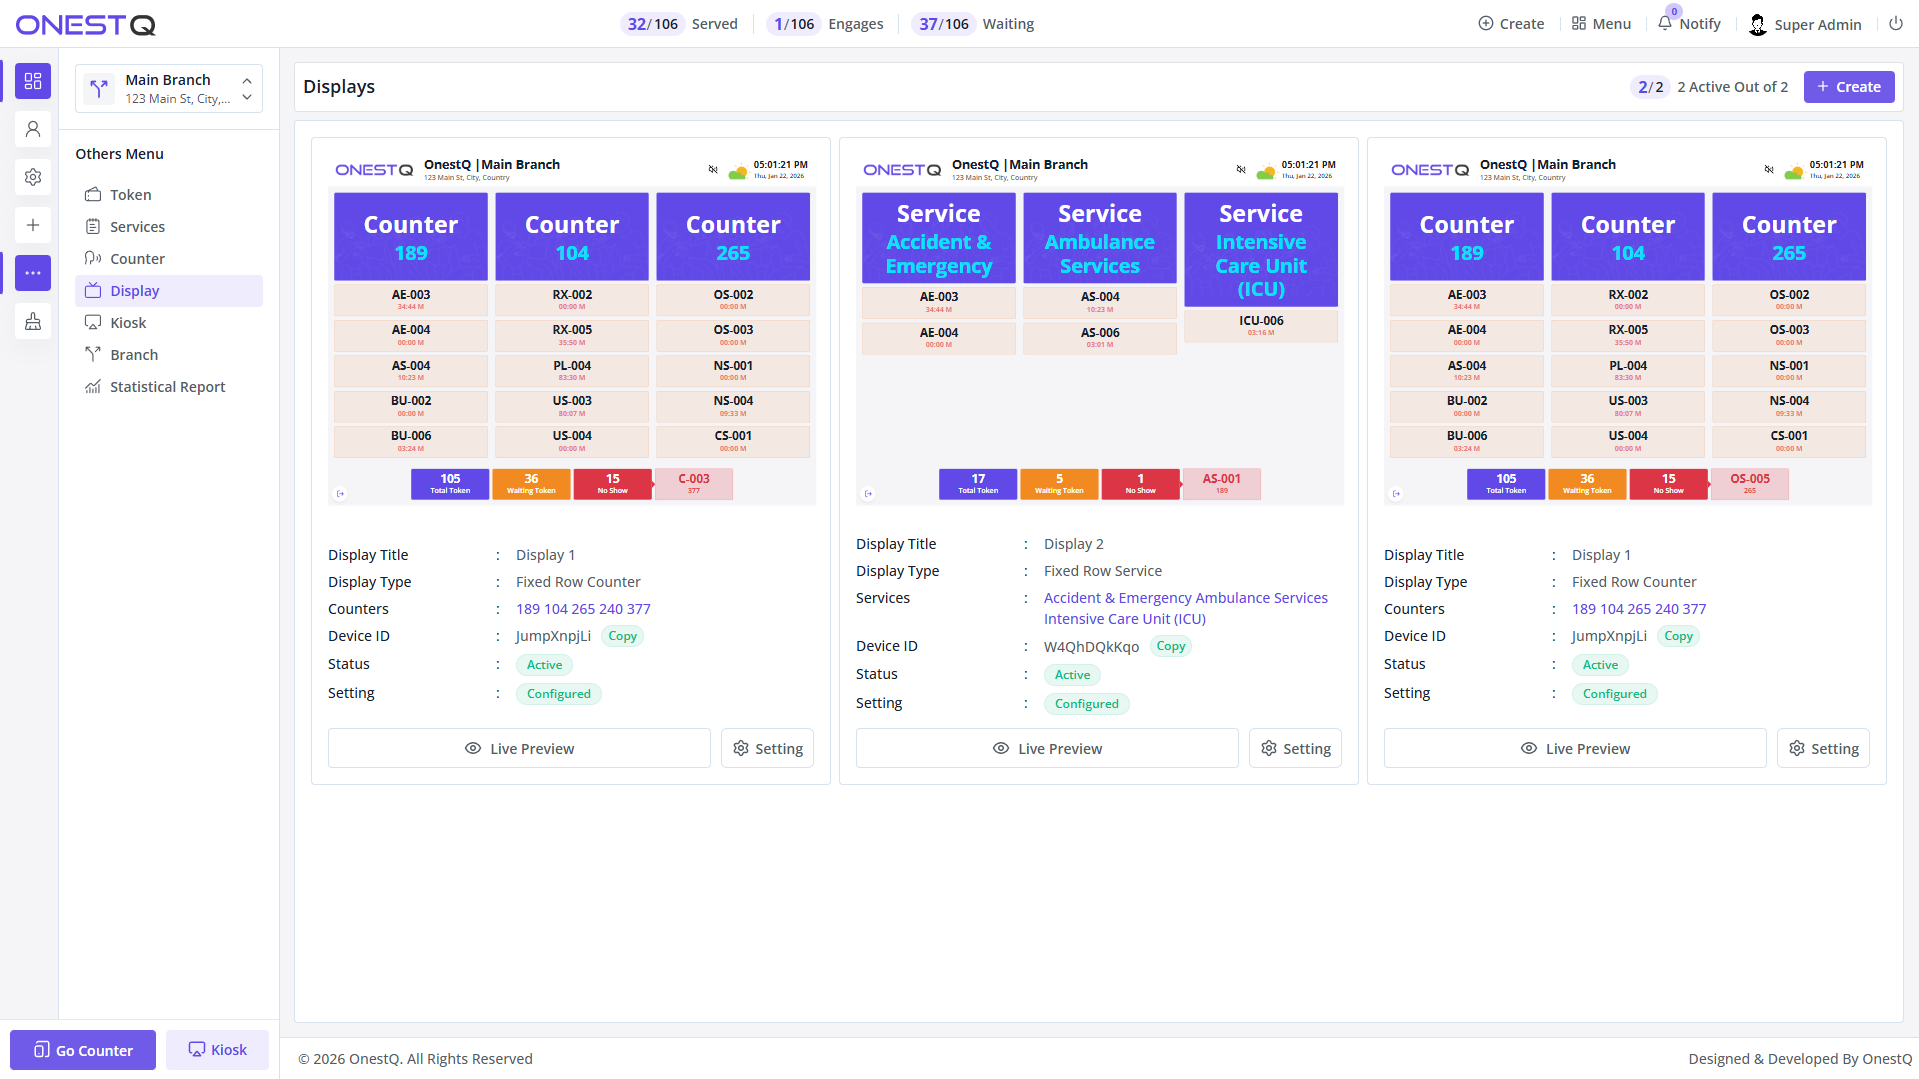
Display list showing all configured displays with preview and settings options.
Creating a New Display
When creating a new display device, configure:
- Basic Info: Display name, branch assignment
- Display Type: Choose counter-based or service-based layout
- Device Authentication: Set device ID and PIN for secure access
- Visual Settings: Layout theme, colors, font sizes
- Audio Settings: Voice announcements, sound effects
- Filtering: Which counters/services to show on this display
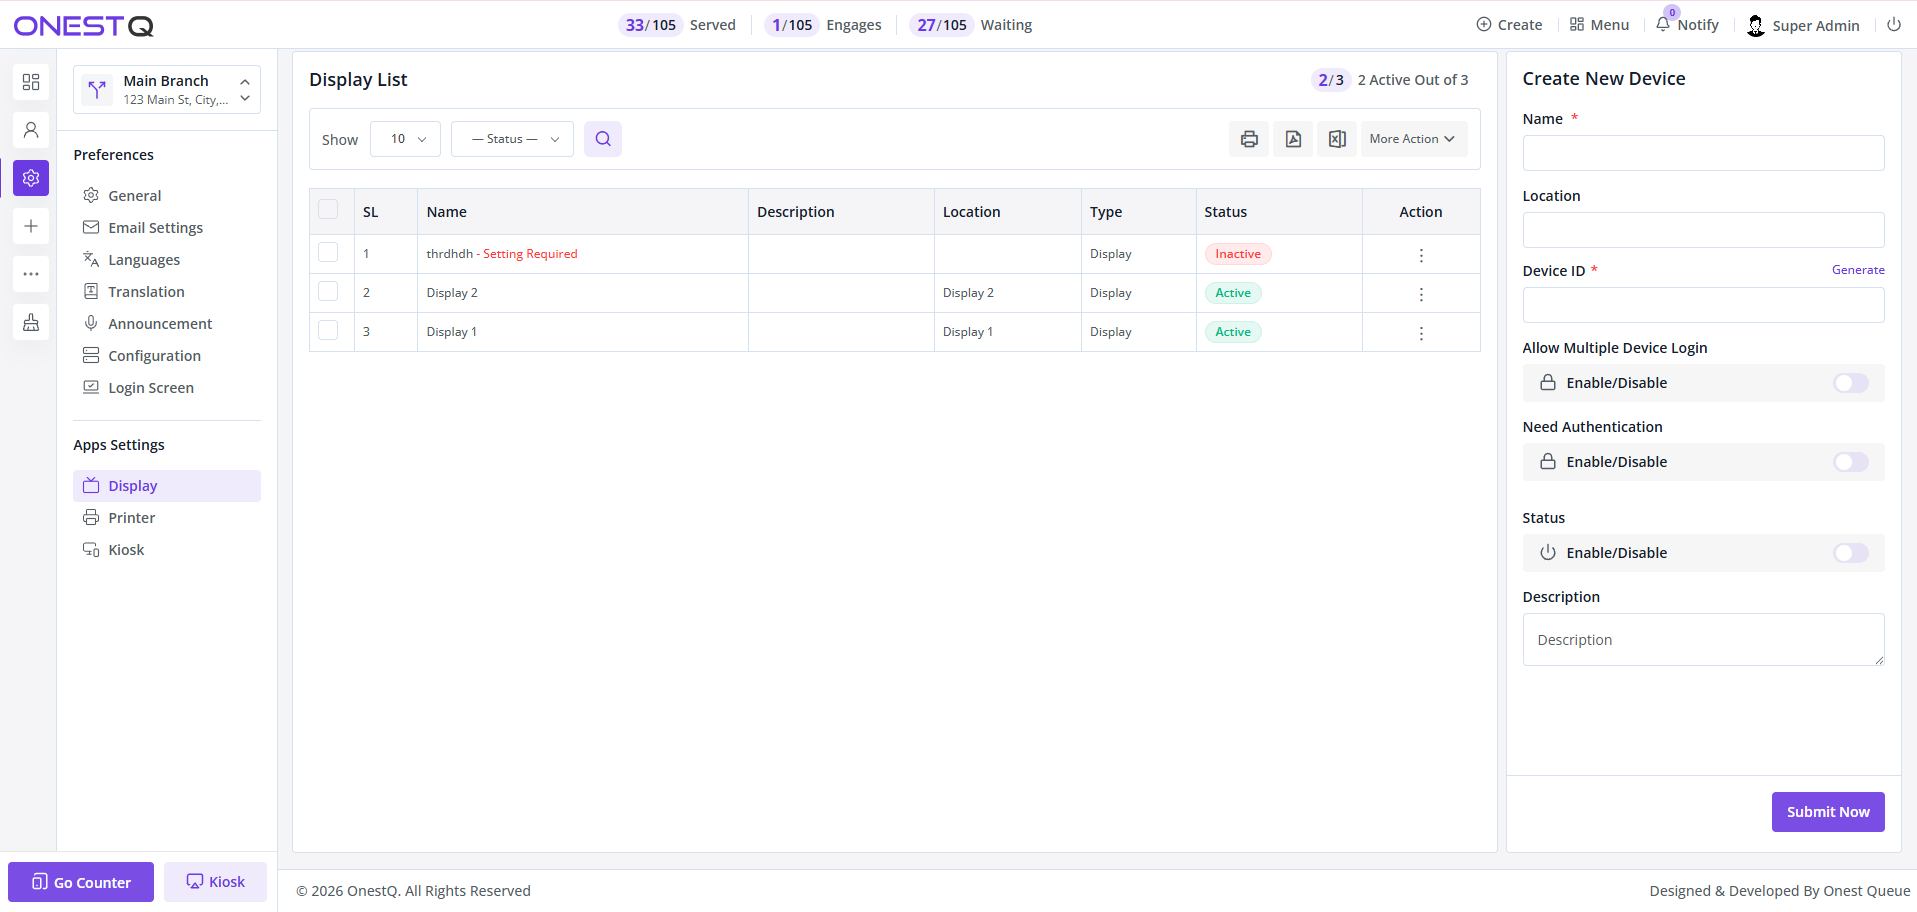
Create new display form with all configuration options.
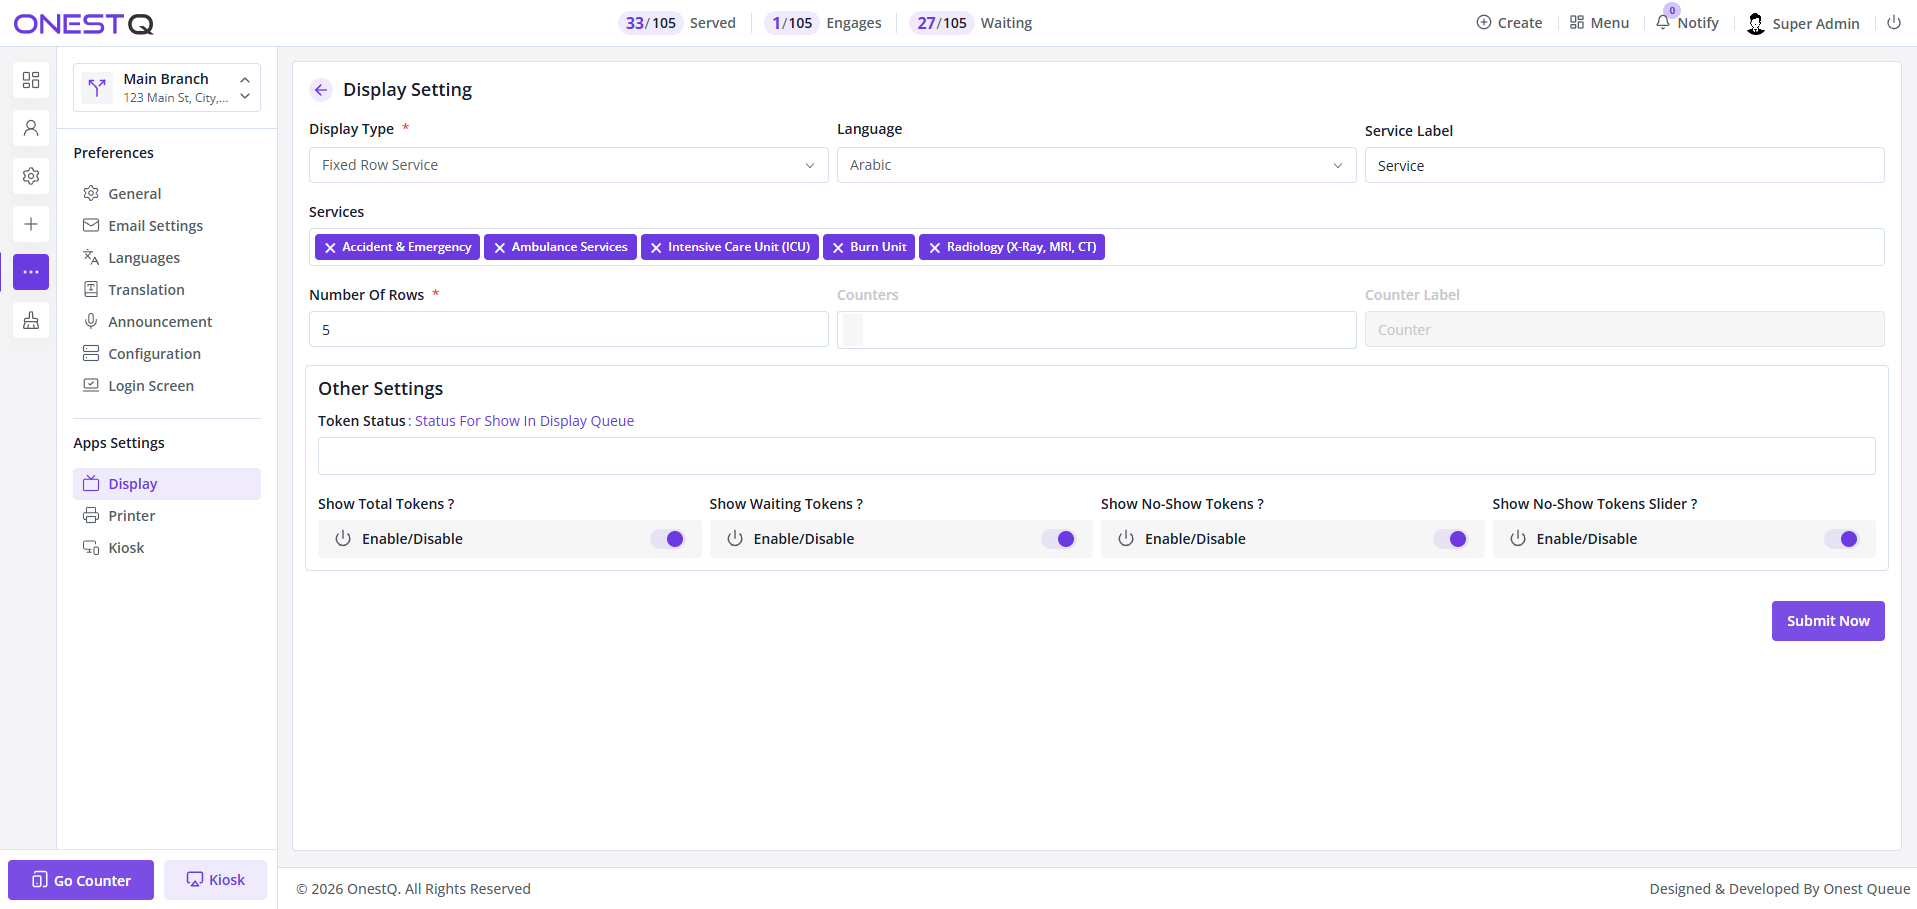
Display settings for configuring layout, voice, filters, and behavior.
Display Best Practices
- Position displays where customers can easily see them while waiting
- Use large fonts and high-contrast colors for readability
- Enable voice announcements for accessibility
- Test display layouts before deploying to production areas
- Use counter-based displays for focused service points, service-based for general waiting areas
Display workflow (device → live screen)
- Open Display from the app switcher (home page). If the Display is configured as a device, you'll see the device login screen.
- Authenticate using a device ID (or the demo buttons like "Display 1/2").
- Go live: the display shows the current calling token and the waiting list, updating in real-time.
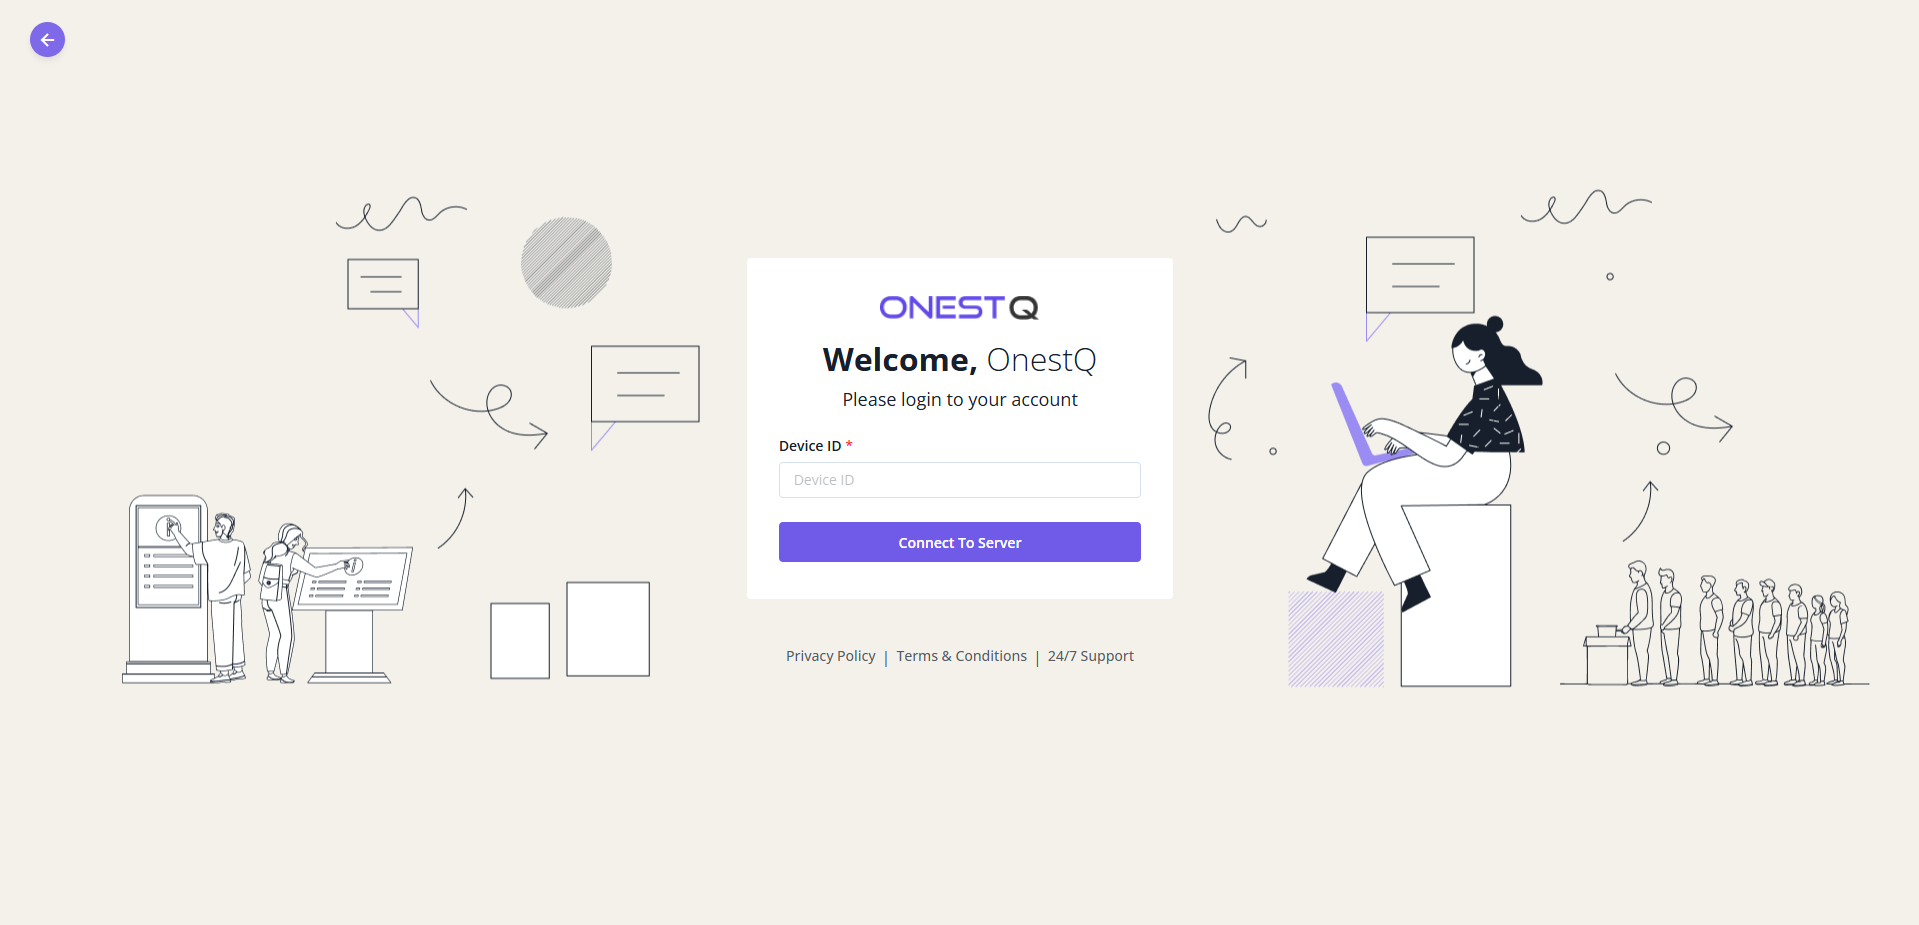
Display device login (use device ID or a demo device button).
What customers see on Display
- Calling token: the bottom/right highlight area shows the currently called token number and its counter/service context (example shown as BU-001 / 178).
- Waiting lists: depending on configuration, the display can show waiting tokens grouped by Counter or by Service.
- Summary totals: total tokens, waiting tokens, and no-show count help staff and customers understand queue load.
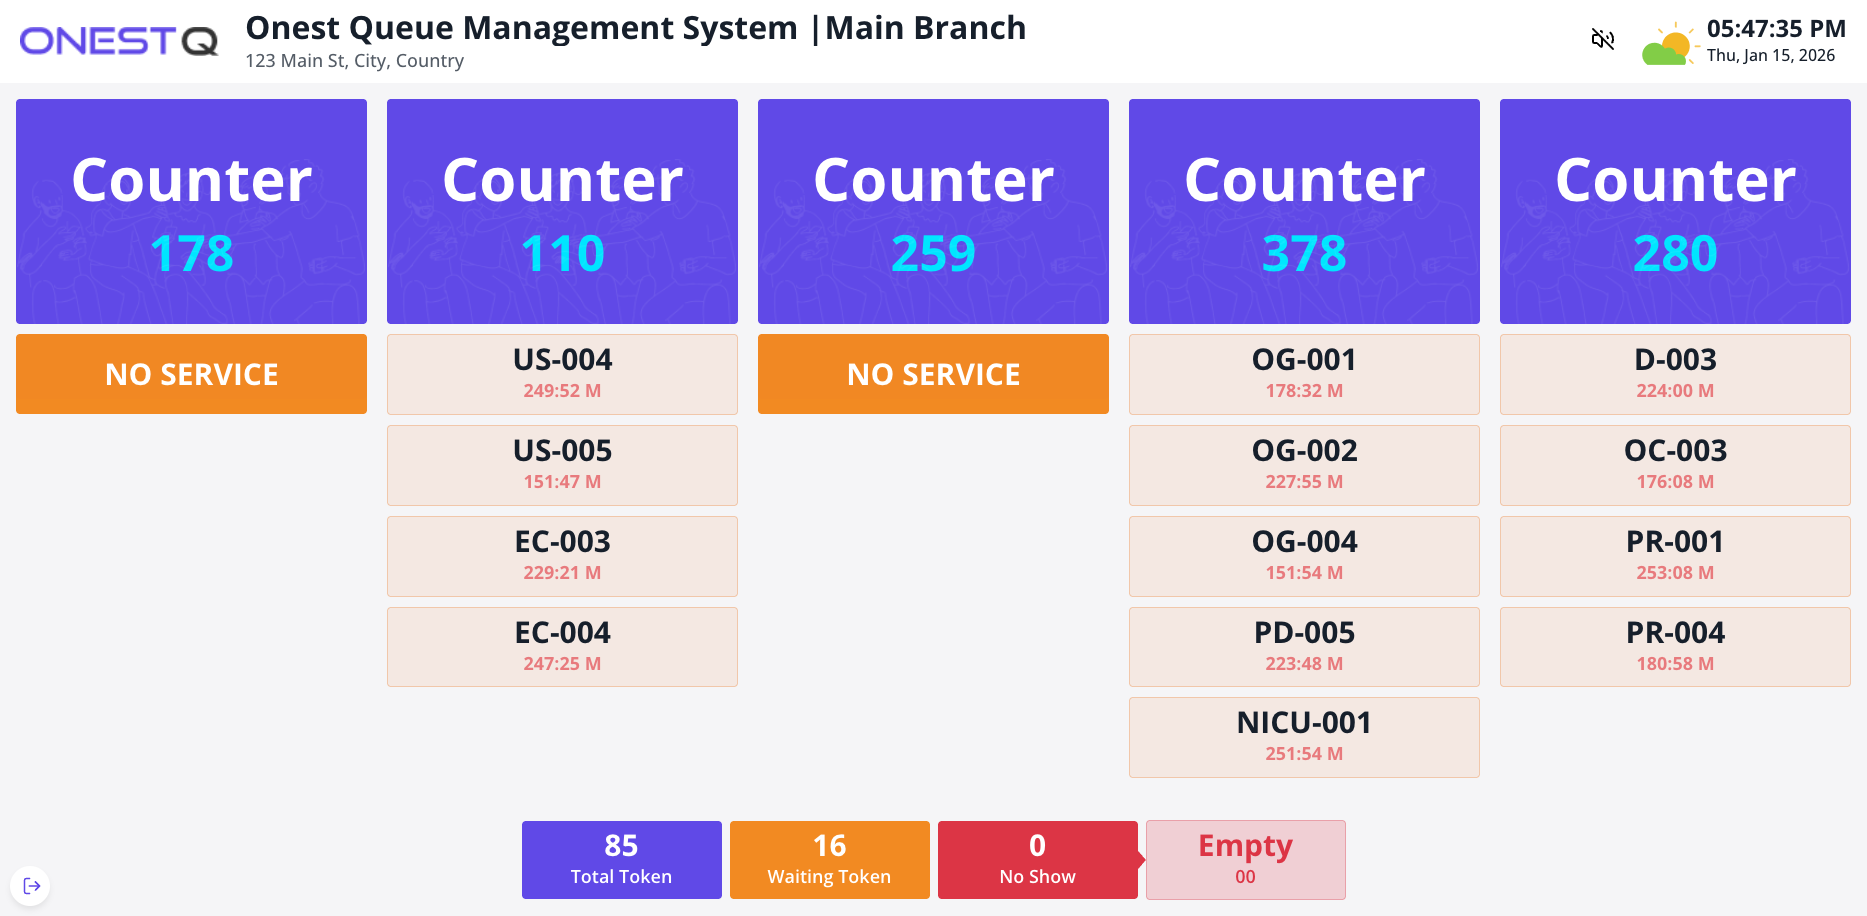
Example Display view grouped by Counter.
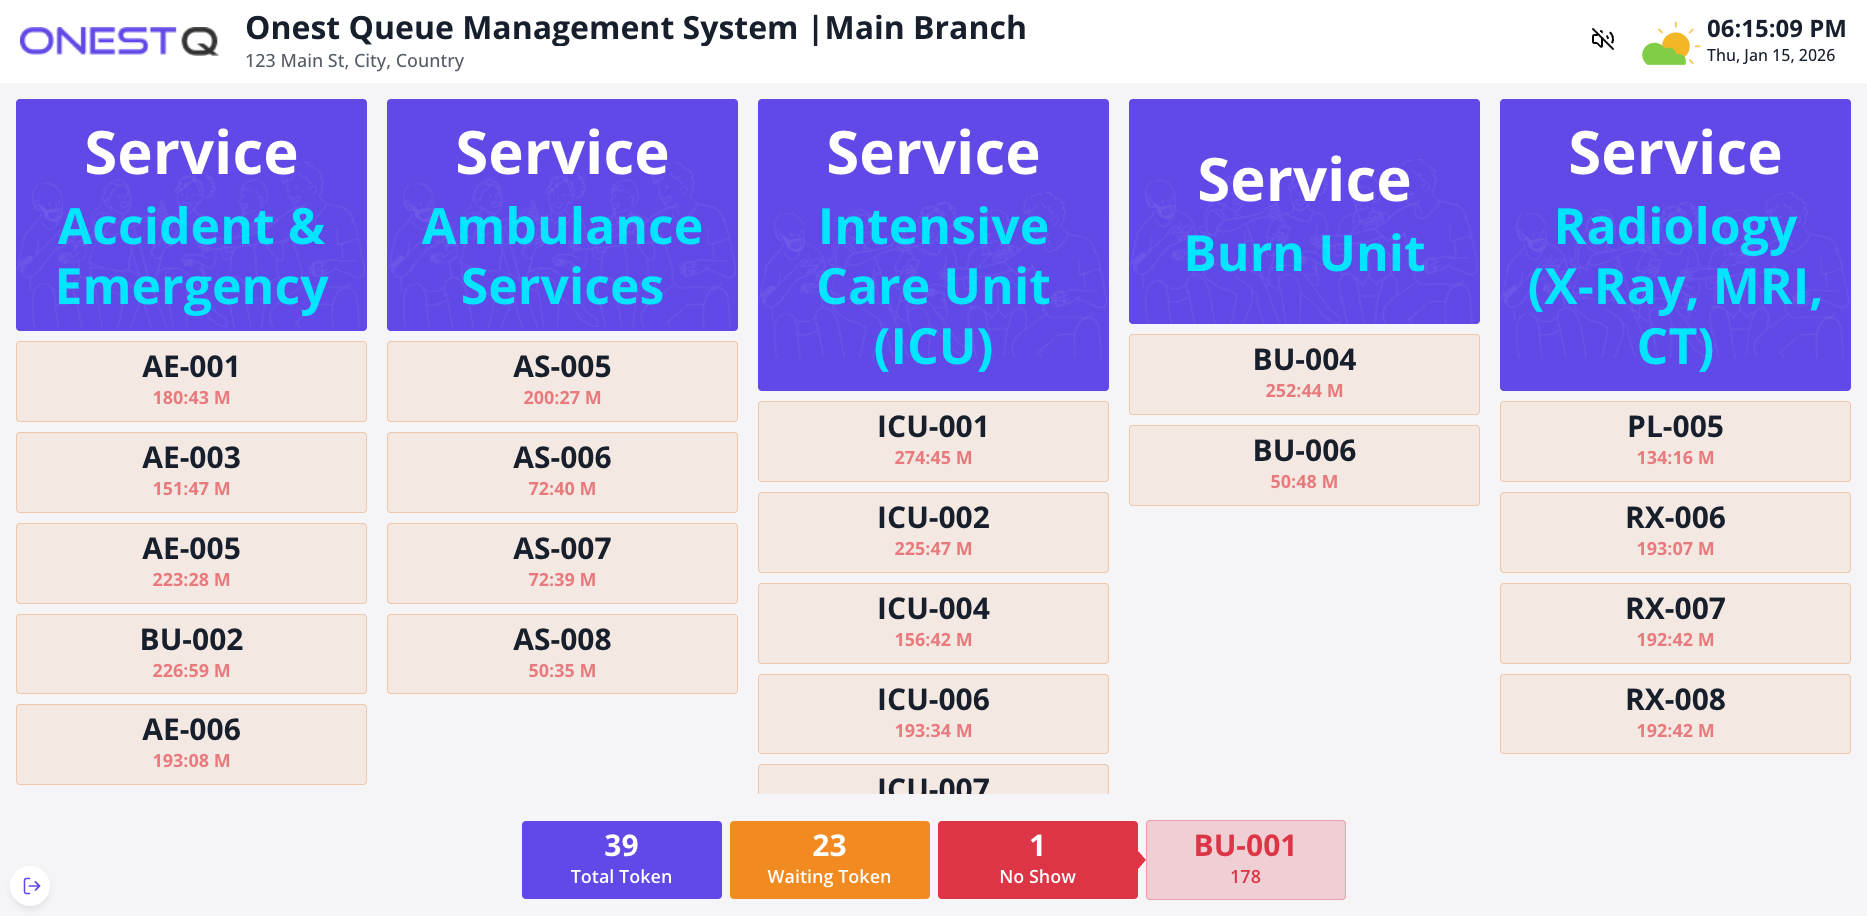
Example Display view grouped by Service (waiting list visible per service).
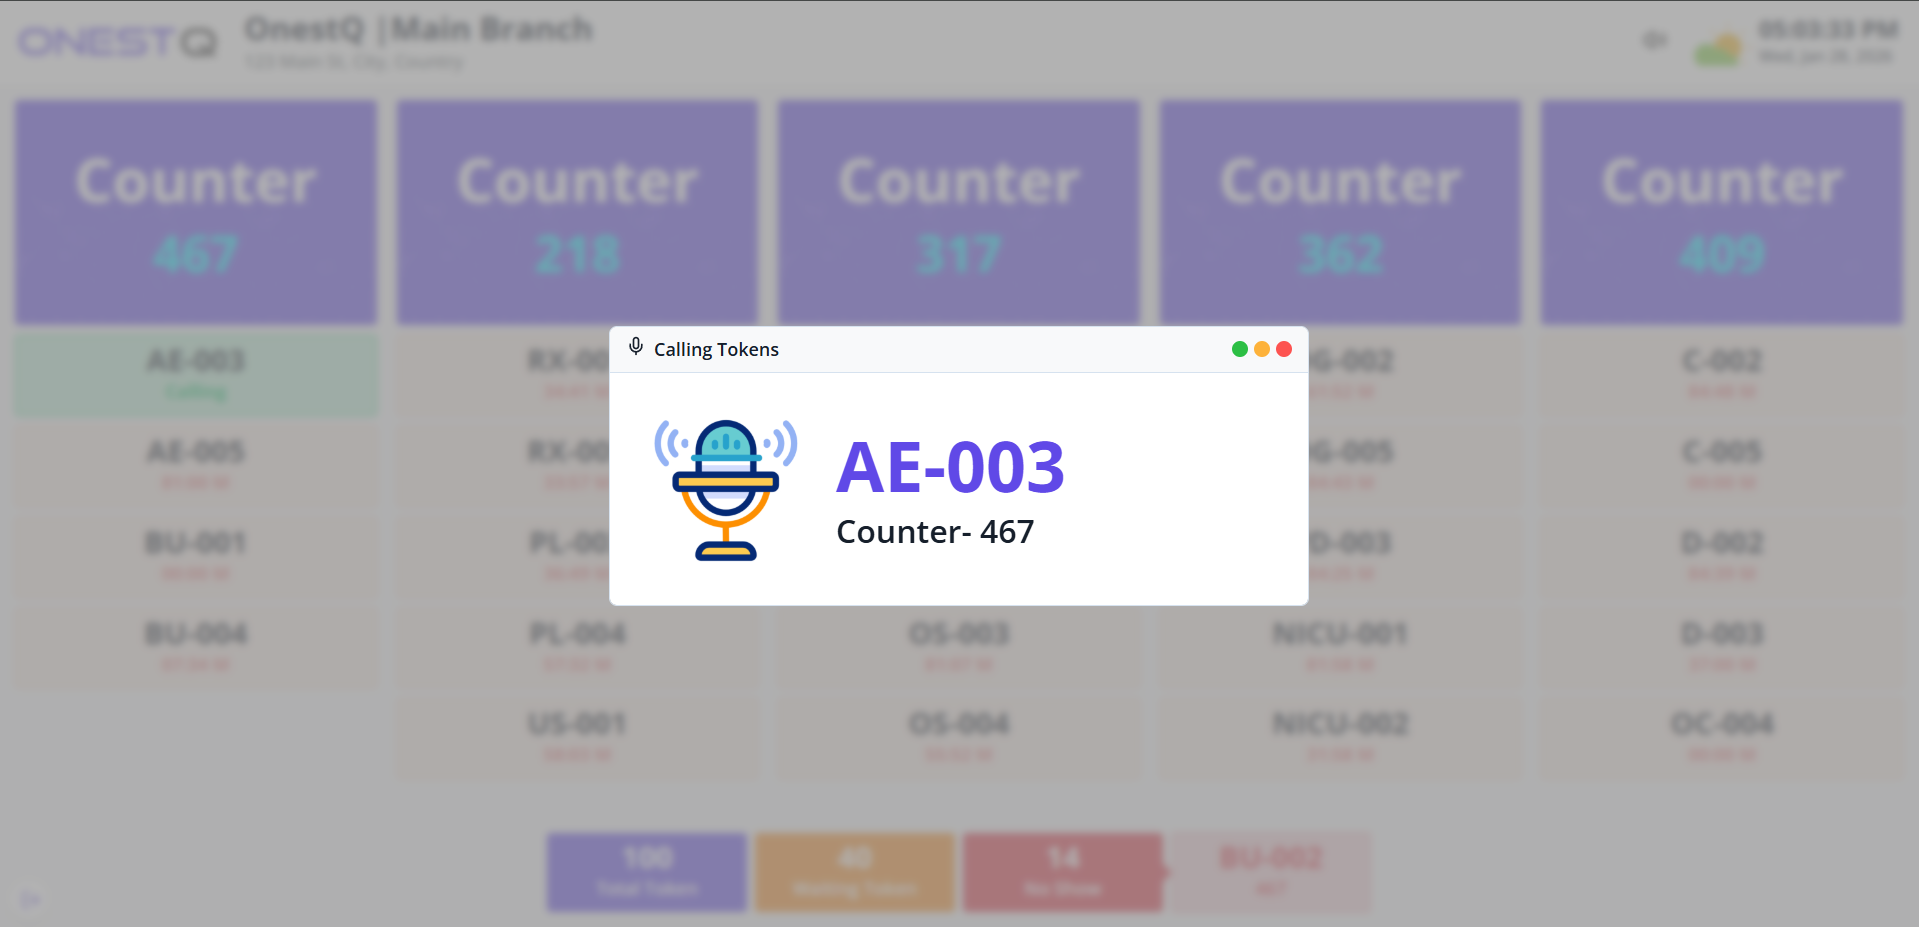
When a token is called, the display shows a full-screen overlay with the token number, counter name.
Blade Structure
Overview of the HTML markup structure used in the OnestQ application. Uses Laravel Blade templates with Bootstrap 5 for a responsive layout.
The OnestQ application uses Laravel Blade templates. Key paths and components:
- Layouts:
resources/views/layouts/— head, meta, footer_script, keyboard - Backend layout:
resources/views/backend/company/layouts/— sidebar, header, footer_script - Auth views:
resources/views/auth/— login-display, login-kiosk, login-counter - Form components:
resources/views/components/form/— file_upload, input, select-component, date-picker, editor, checkbox, radio, status - Table components:
resources/views/components/table/— table-container, action-dropdown, bulk-actions, pagination - Backend pages:
resources/views/backend/company/— dashboard, branch, queue (services, counters, tokens, device), user_management, settings, trash - Error pages:
resources/views/errors/— 403, 404, 405, 429, 500 - Modules:
Modules/Counter/,Modules/Kiosk/,Modules/Display/— Blade views for each module
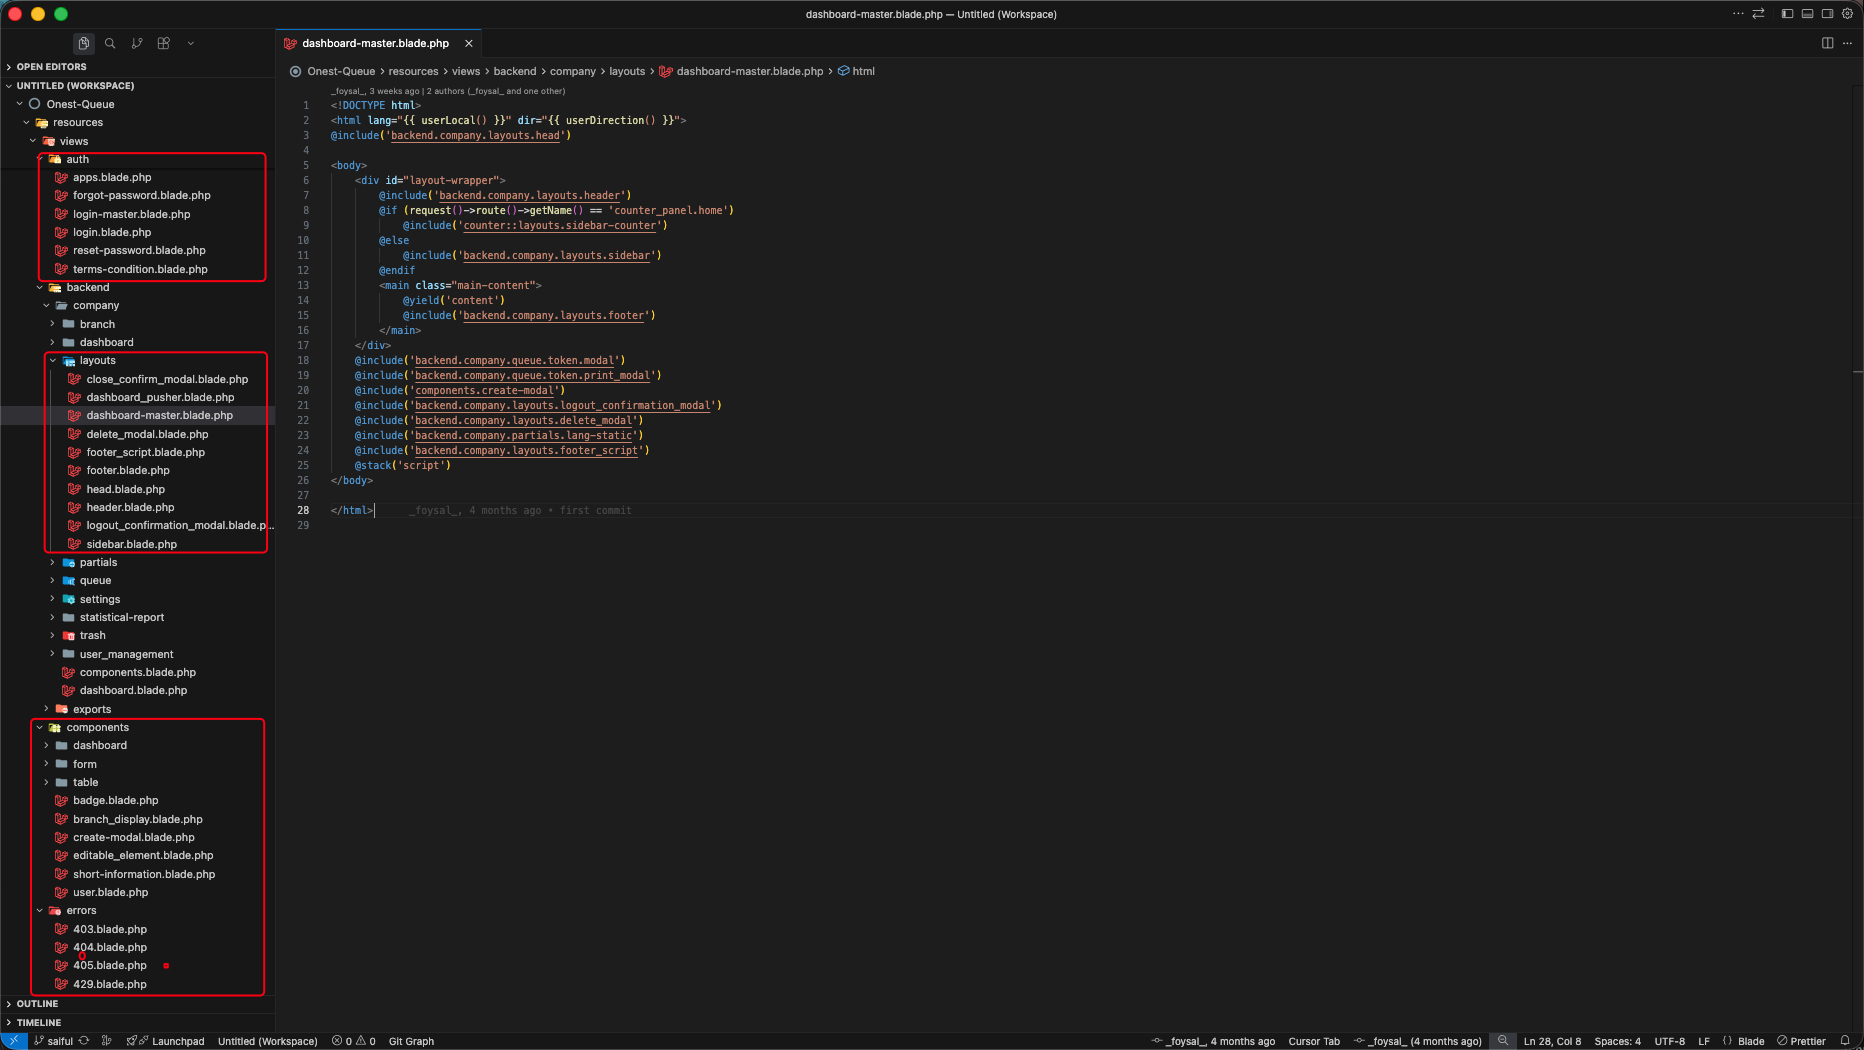
Admin dashboard showing the main layout structure: sidebar, header, and content area.
CSS Structure
Overview of the CSS organization, theming, and styling approach used in the OnestQ application.
The OnestQ application uses SCSS compiled to CSS. Key paths and structure:
- Entry point:
public/assets/backend/scss/main-style.scss— main SCSS import - Global:
scss/global/— _global.scss, _animation.scss, _button.scss, _rtl.scss, _select2.scss, _bootstrap-tooltip-custom.scss - Layout:
scss/layout/— _header.scss, _sidebar.scss, _footer.scss - Components:
scss/components/— _form.scss, _table.scss, _token.scss, _custom-modal.scss, _breadcrumb.scss - Pages:
scss/pages/— _counter.scss, _display.scss, _kiosk.scss, _login.scss, _error.scss - Sections:
scss/sections/— _dashboard.scss, _profile.scss, _dashboard-card.scss - Output:
public/assets/backend/css/— compiled CSS files - Framework: Bootstrap 5 for layout, grid, and base components
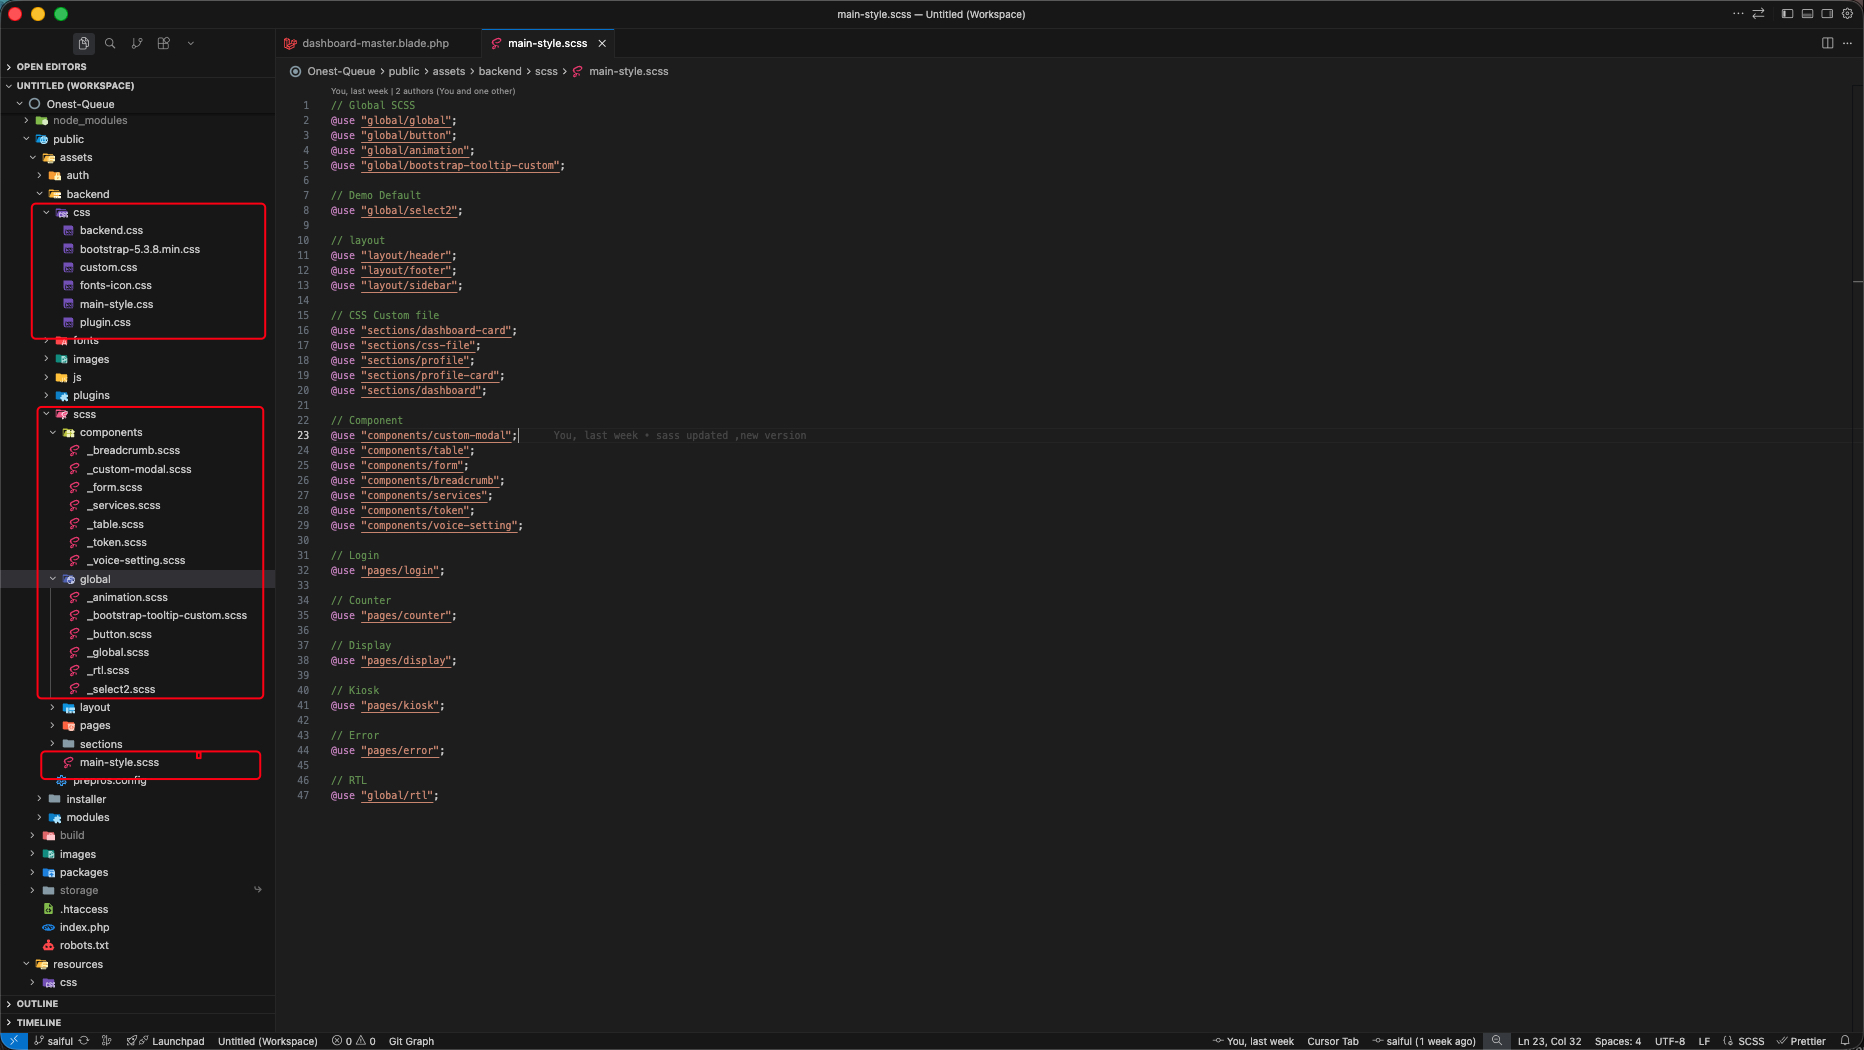
Counter panel illustrating the CSS structure: buttons, cards, and styled components.
JS Structure
Overview of the JavaScript structure, modules, and scripts used in the OnestQ application.
The OnestQ application uses jQuery, Bootstrap JS, and custom scripts. Key paths and structure:
- Core:
public/assets/backend/js/— jquery-4.0.0.min.js, bootstrap-5.3.8.min.js, main-core.js, main-ui.js, main-forms.js - Custom scripts: custom-core.js, custom-modals.js, custom-tokens.js, custom-devices.js, custom-settings.js, bulk-action.js, dashboard.js, queue-dashboard.js
- Plugins:
plugins/— plugin.js, lucide-icon.js, LoadingOverlay.js, nprogress, quill.min.js, pusher.min.js, file-preview file_preview_handler.js - Chart:
plugins/chart/— apexcharts.js, chart-custom.js - Modules:
assets/modules/— counter/counter.js, display/display.js, kiosk/kiosk.js, deviceauth/auth-script.js - Build: Vite (Laravel vite.config.js) for resources/js/app.js and resources/css/app.css
- Real-time: Pusher for live token and queue updates
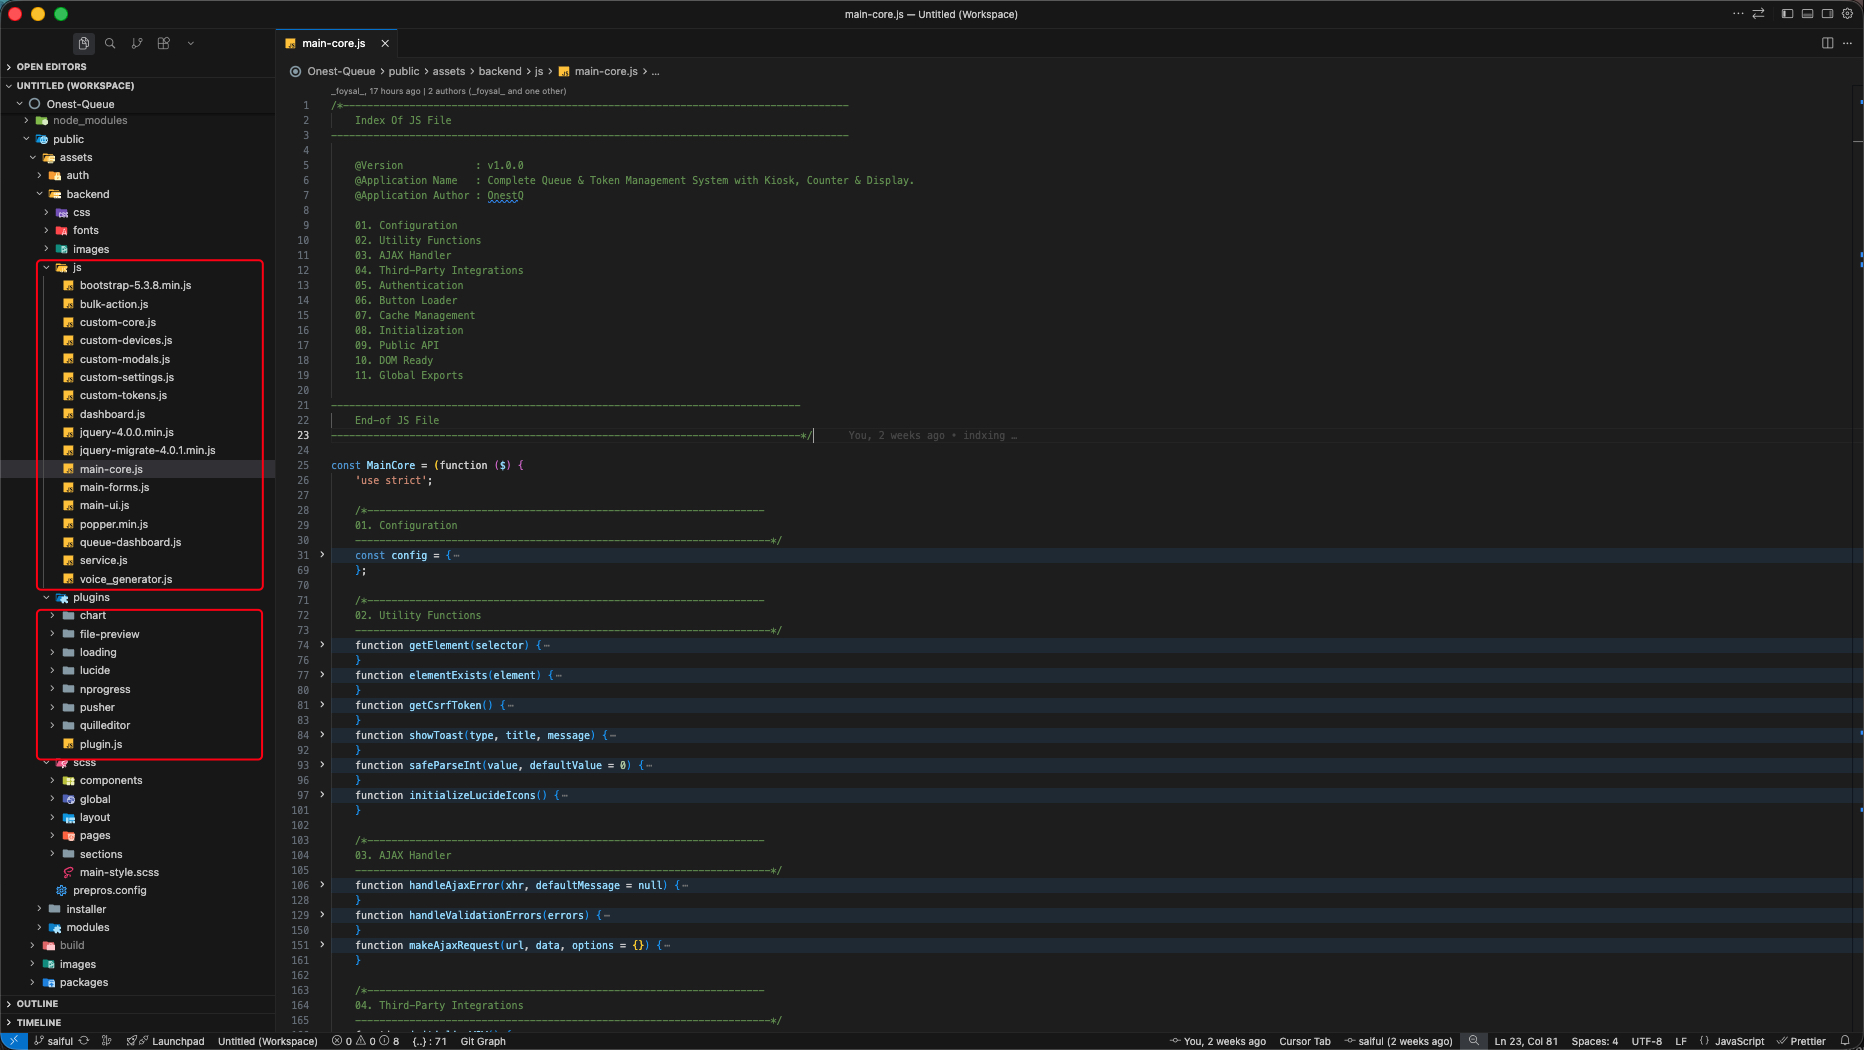
Quick Create modal with charts, filters, and real-time updates powered by the JS structure.
PHP Structure
Overview of the PHP backend structure, controllers, models, and routing used in the OnestQ application.
The OnestQ application backend is built with Laravel. Key paths and structure:
- Controllers:
app/Http/Controllers/— backend/ (BranchController, DashboardController, queue_management/TokenController, ServiceController, CounterController, DeviceController), Auth/, UserController - Models:
app/Models/— Token, Service, ServiceCategory, Counter, Branch, User, Role, Device, Printer, KioskSetting, DisplaySetting - Repositories:
app/Repositories/— Data access layer for tokens, services, branches, etc. - Routes:
routes/web.php,routes/api.php— admin prefix (admin/branches, admin/queue/*, admin/user/*), device auth (login-kiosk, login-display, login-counter) - Middleware:
app/Http/Middleware/— auth, permissionCheck, device auth - Services:
app/Services/— TokenService, ReportService, CommonExportService - Config:
config/— app, database, queue, broadcasting, reverb - Modules:
Modules/Counter/,Modules/Kiosk/,Modules/Display/,Modules/DeviceAuth/— module-specific controllers and views
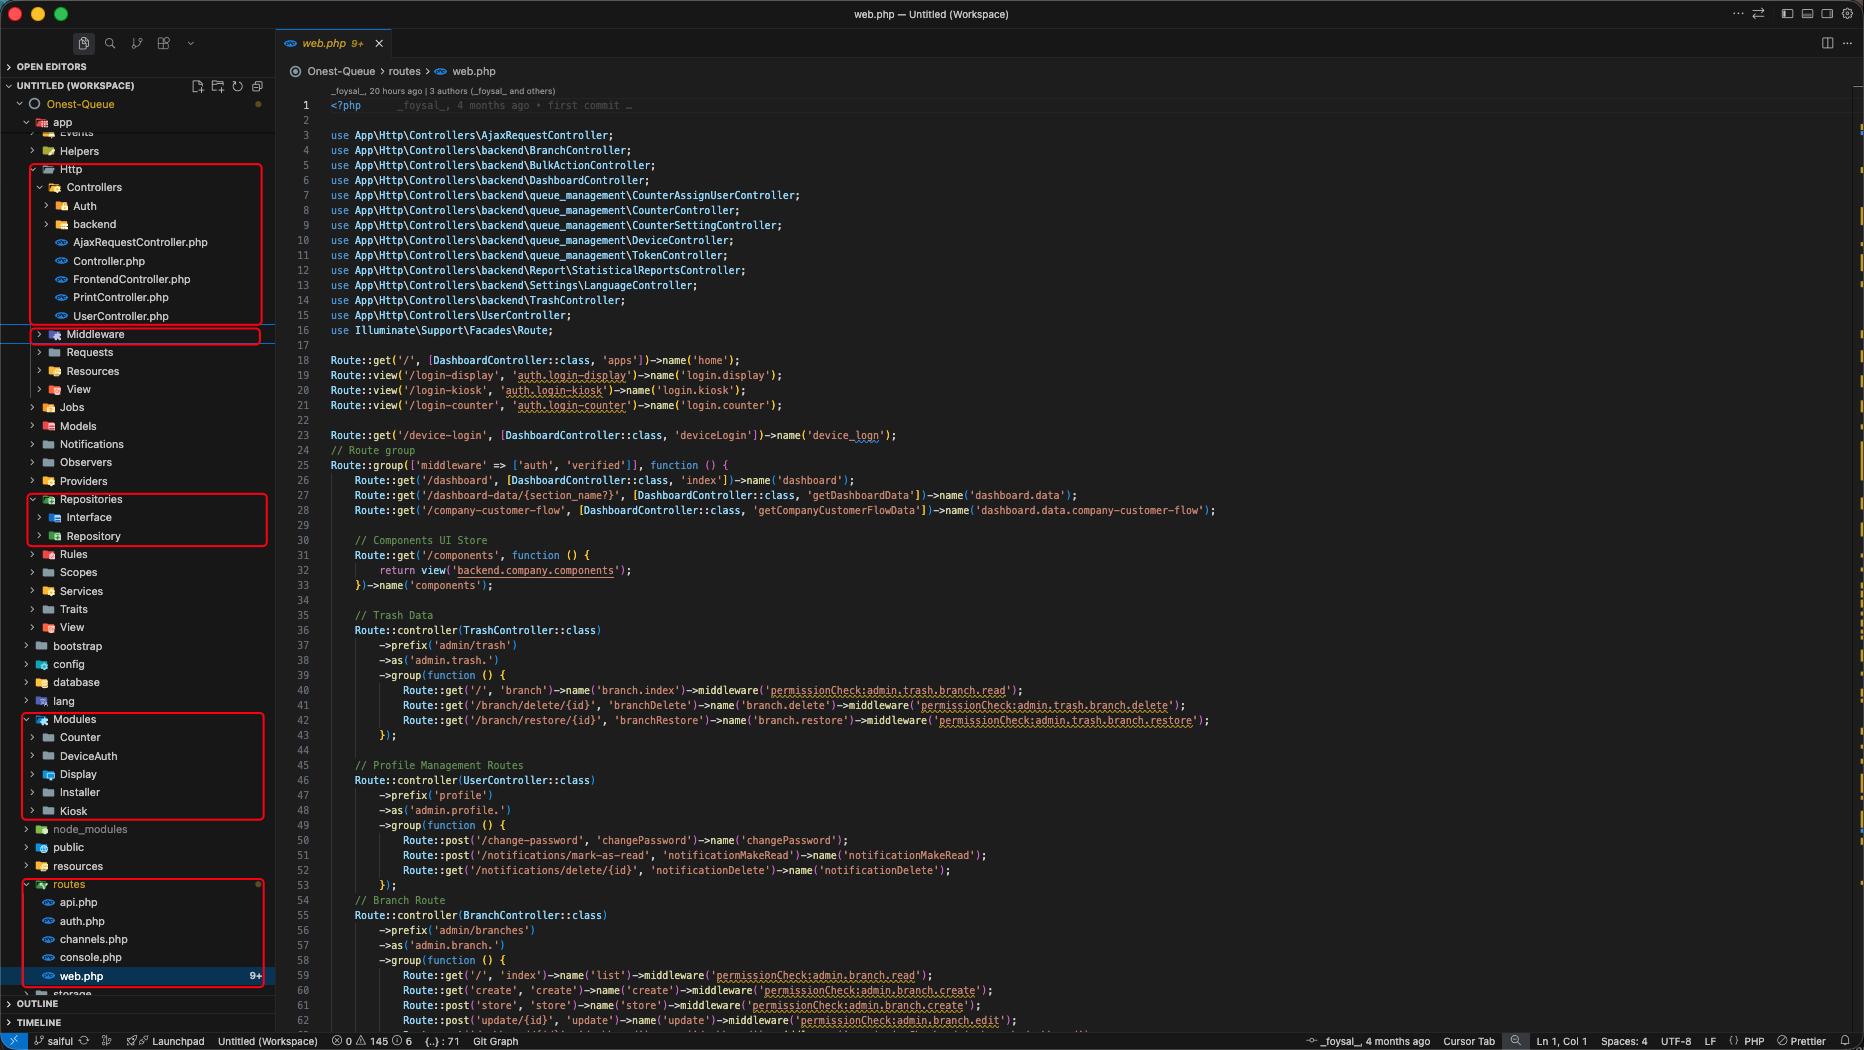
Admin dashboard rendered by Laravel controllers and Blade templates.
Database Structure
Overview of the database schema, tables, and relationships used in the OnestQ application.
The OnestQ application uses a relational database (MySQL/MariaDB/SQLite). Migrations are in database/migrations/. Key tables:
- Core: companies, branches, services, service_categories, counters, tokens
- Users: users, roles, departments, designations, counter_users
- Devices: devices, display_settings, display_setting_counters, display_setting_services, kiosk_settings, printer_settings
- Queue operations: tokens (reference_number, status, service_id, counter_id), token_logs, counter_logs, counter_feedback
- Service config: service_schedule_setups, service_time_slots
- Settings: general_settings, company_settings, branch_settings, counter_settings
- Other:file_managers, activity_log, notifications, sms_templates, device_login_logs
Plugins
Third-party libraries and plugins used in the OnestQ application. Click any name to open the official documentation or live demo.
NProgress
Slim progress bar for Ajax. Used in main-core.js for page navigation. Styles from plugins/nprogress/nprogres.css.
ApexCharts
Charting for dashboard and reports. Loaded from plugins/chart/apexcharts.js. Custom config in chart-custom.js.
Wow
Reveal animations on scroll. Initialized in main-core.js via initializeWOW().
Select2
Enhanced select dropdowns. Used via class="select2" in printer settings, voice select, user language.
SweetAlert
Modal dialogs for alerts and confirmations. Bundled in plugins/plugin.js. Used in custom-core.js (toasts) and bulk-action.js (confirmations).
Loading Overlay
jQuery loading overlays. Loaded from plugins/loading/LoadingOverlay.js.
Pusher
Real-time WebSockets for live token/queue updates. Client: plugins/pusher/pusher.min.js. Server: pusher/pusher-php-server in composer.
Quill Editor
Rich text editor. Loaded from plugins/quilleditor/quill.min.js and quill.snow.css. Used in form/editor.blade.php.
Laravel Toaster Magic
Toaster notifications for Laravel applications. Used in custom-core.js.
Custom File Upload
Custom file upload component at resources/views/components/form/file_upload.blade.php with file_preview_handler.js for image preview, modal preview, and validation.
Fonts
Typography used in the OnestQ application. Click any font to open Google Fonts or the official source.
Icons
Icon libraries used in the OnestQ application. Click any name to open the icon library or documentation.
Images
Image assets and media sources used in the OnestQ application.
Key image paths in the project:
- Backend assets:
public/assets/backend/images/— favicon, no-data placeholder, UI images - Auth:
public/assets/auth/— login backgrounds - Modules:
assets/modules/— kiosk (kiosk-bg.png), display (calling-icon.gif), counter images - User uploads: Stored via FileManager; paths from
storageAssetPath()
No Results Found
We couldn't find any documentation matching your search.